SHARE THIS
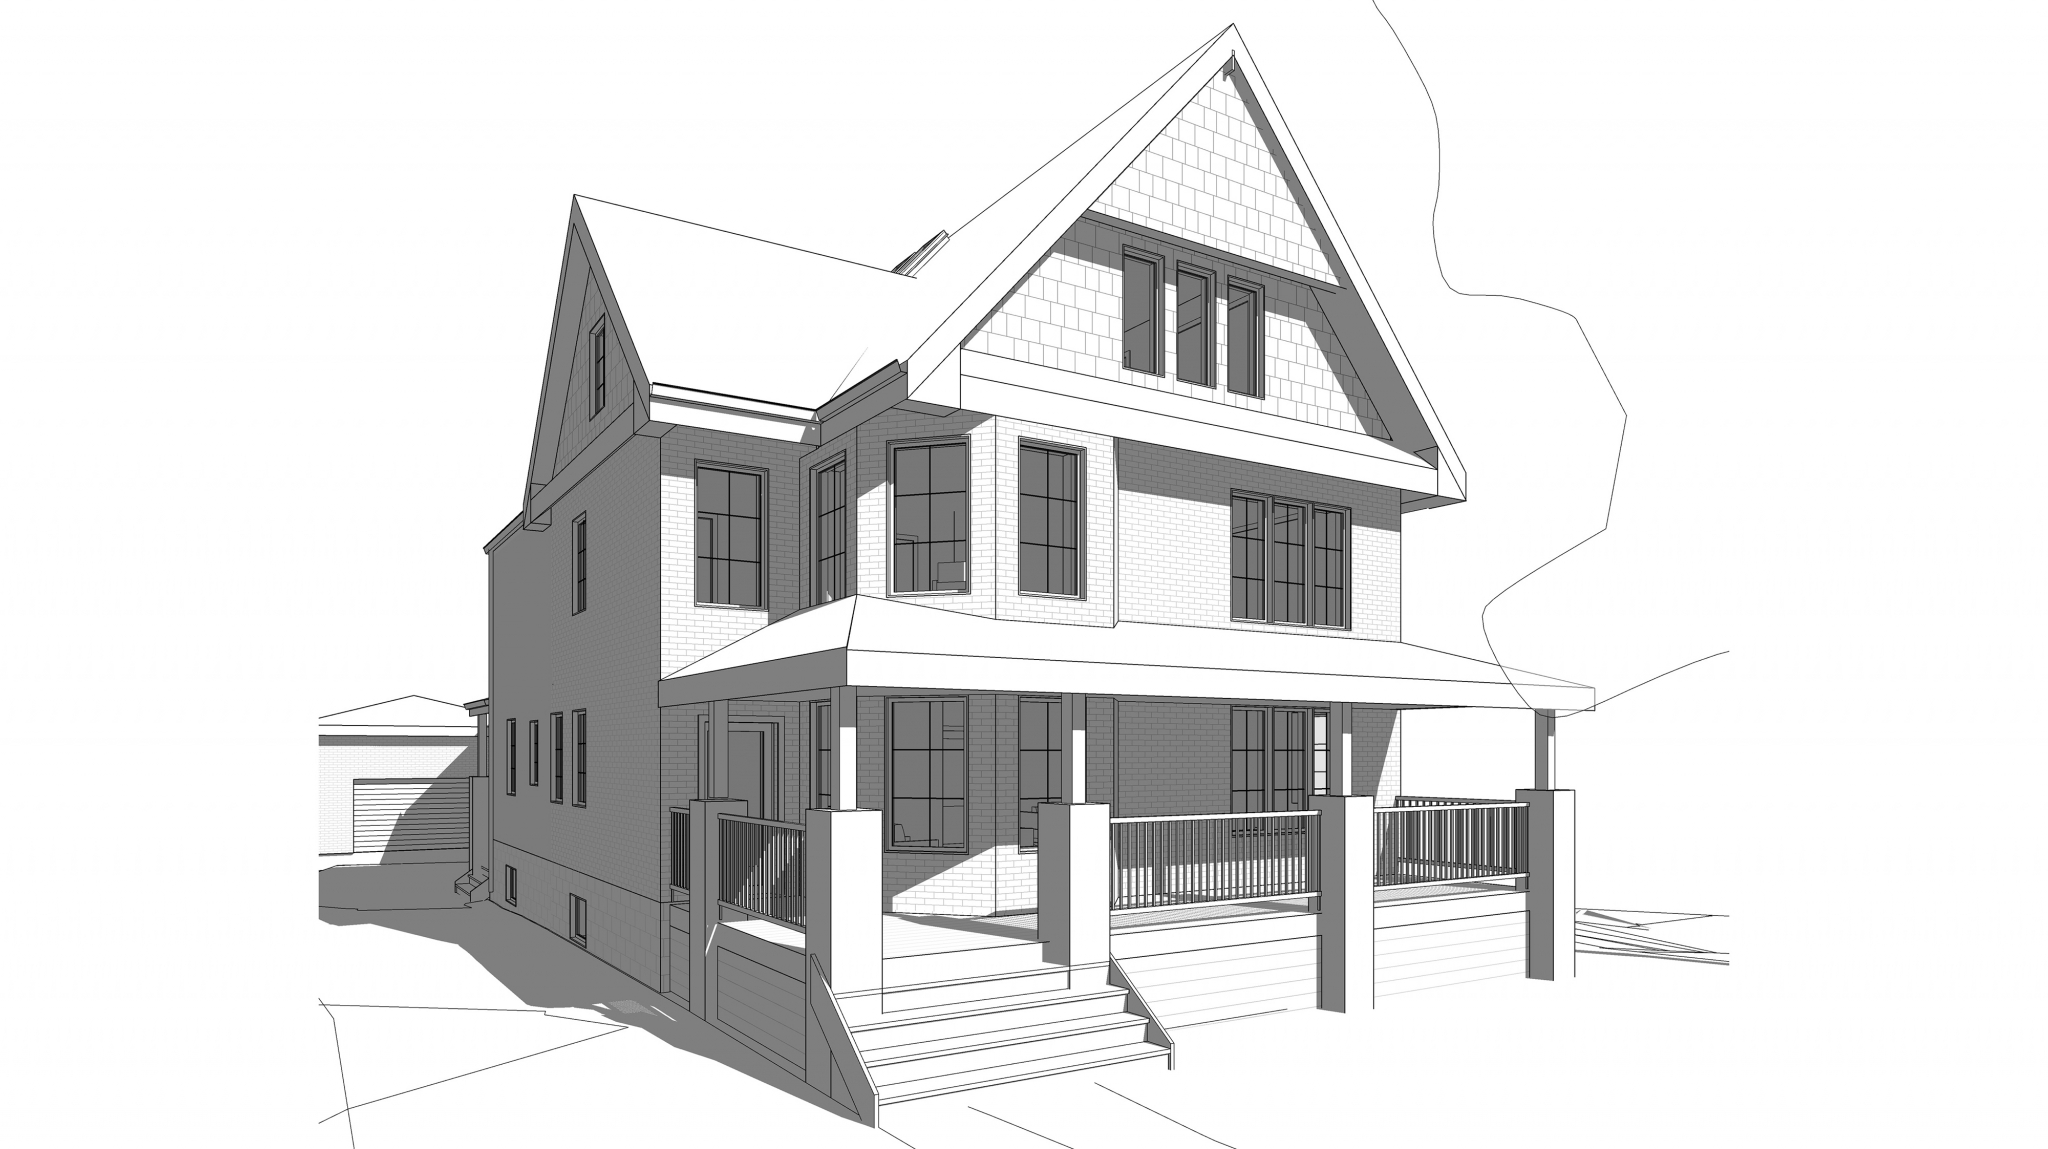
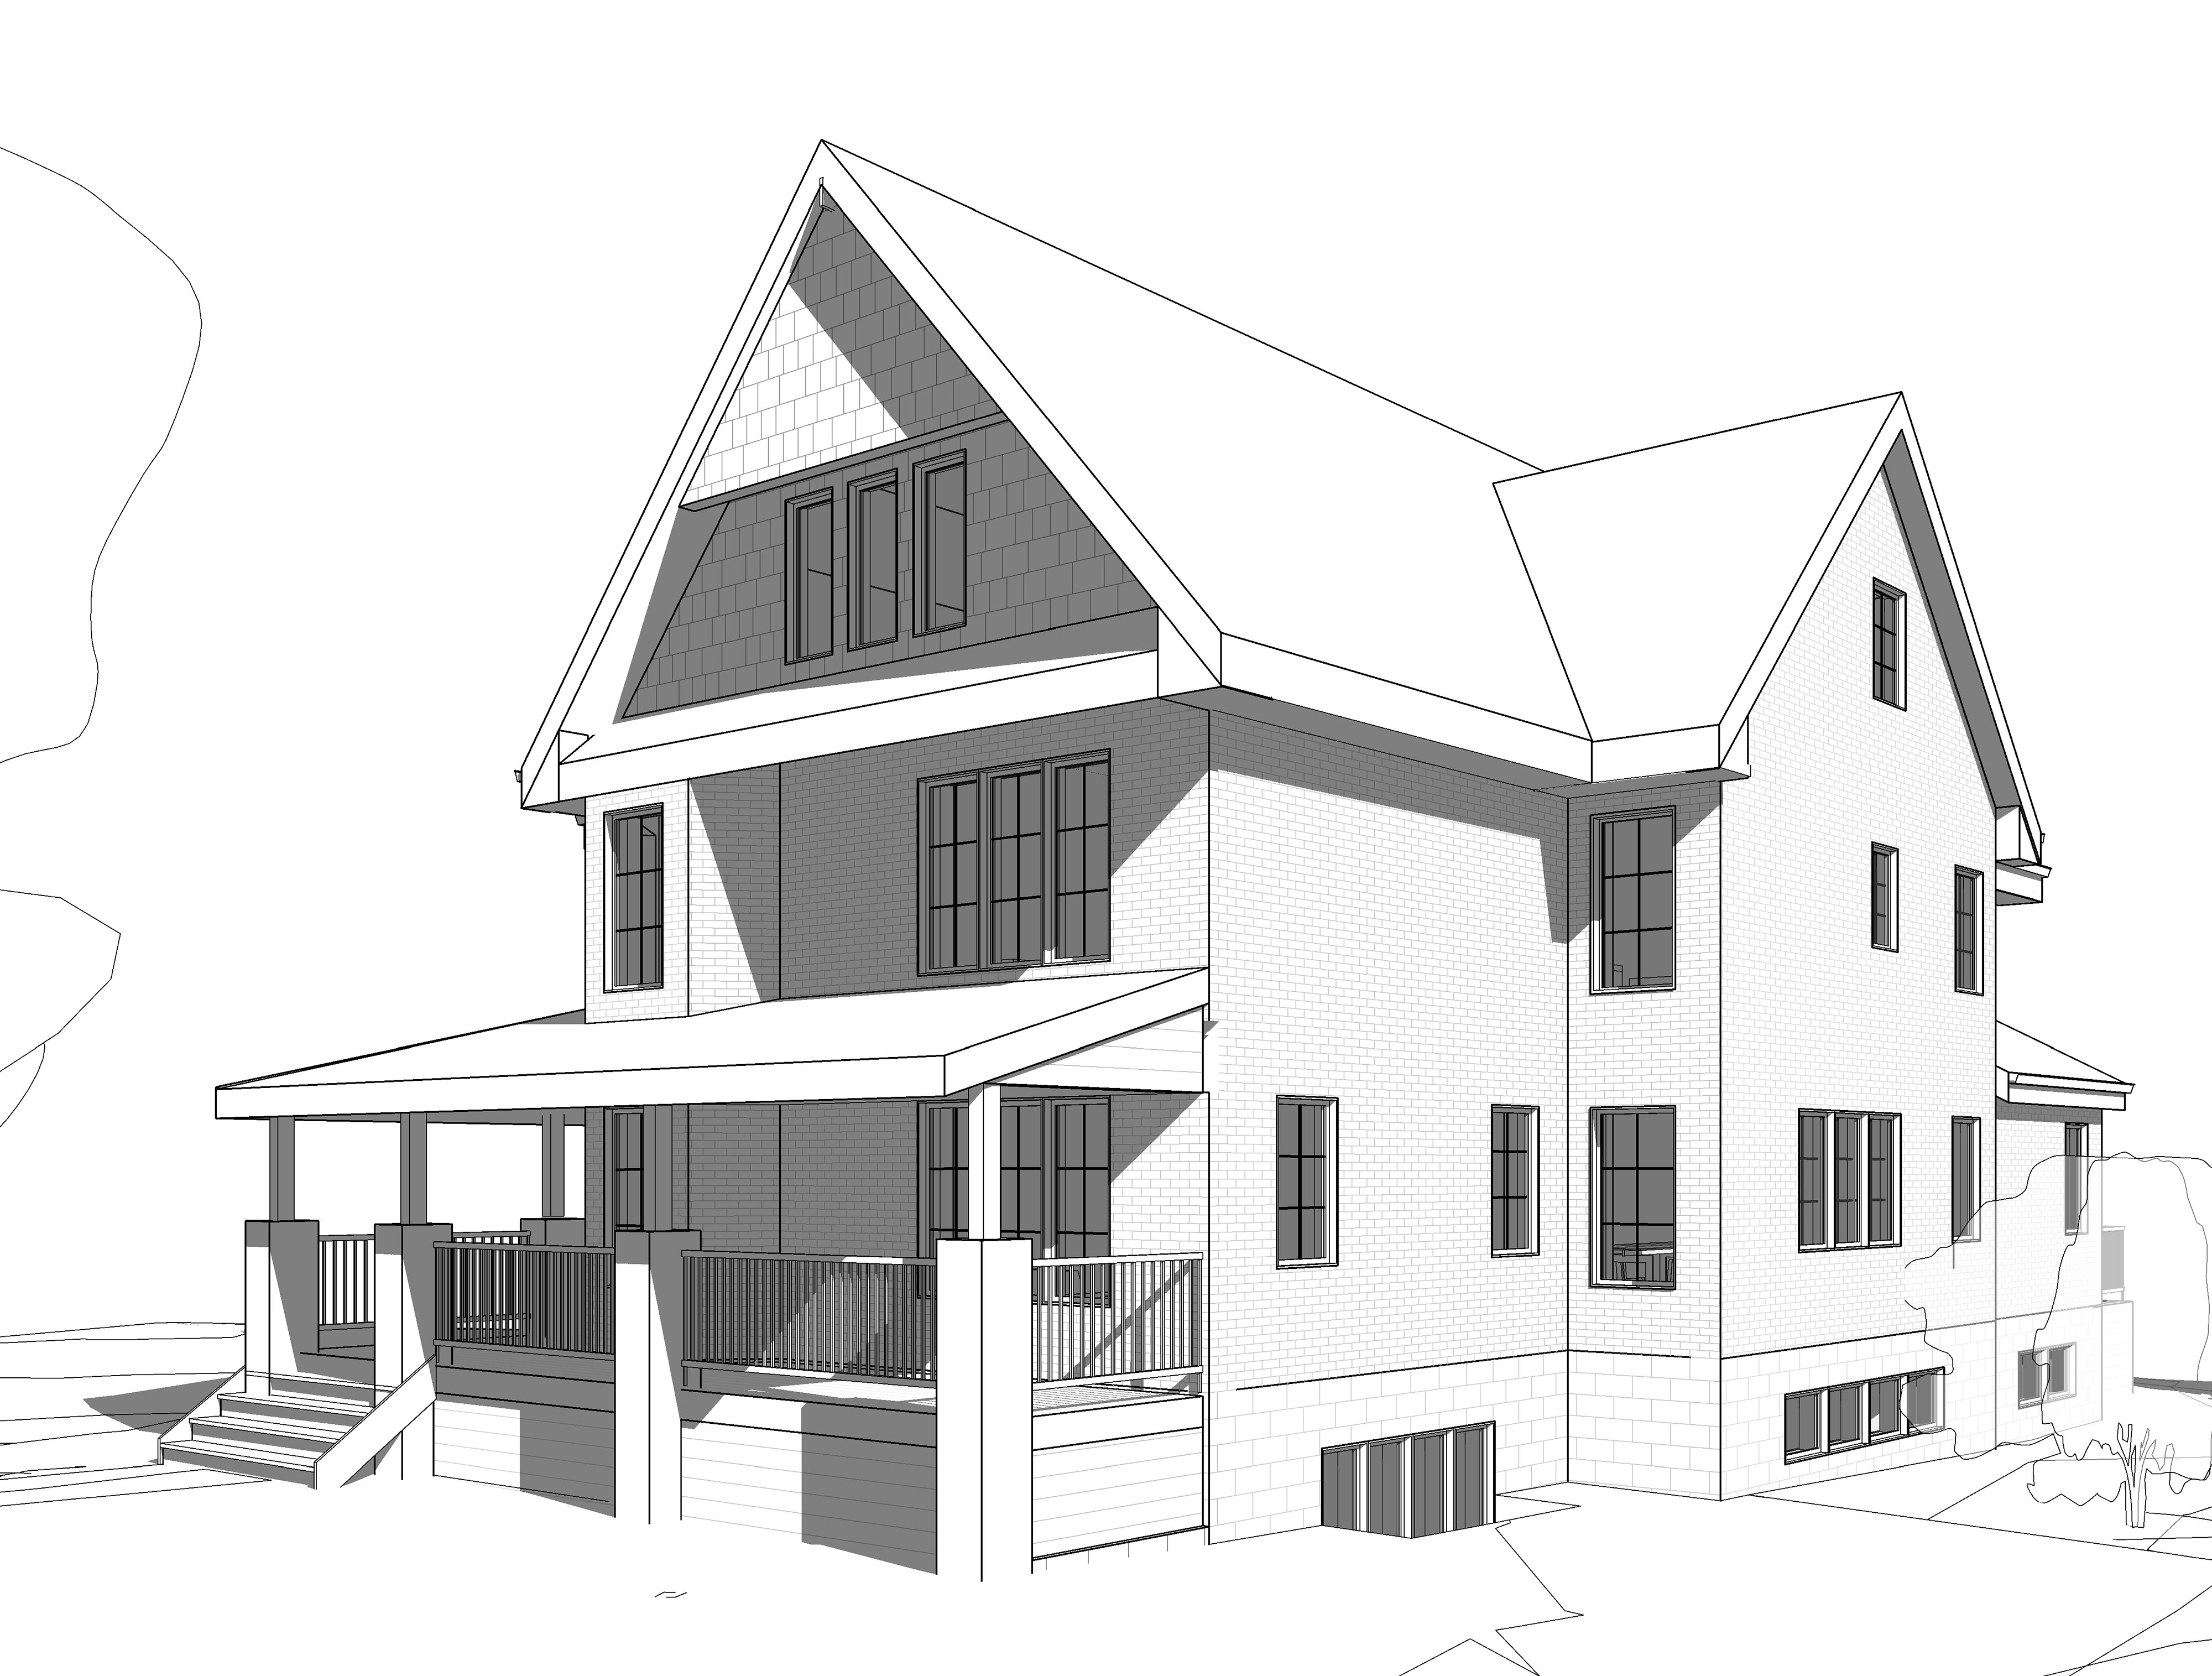
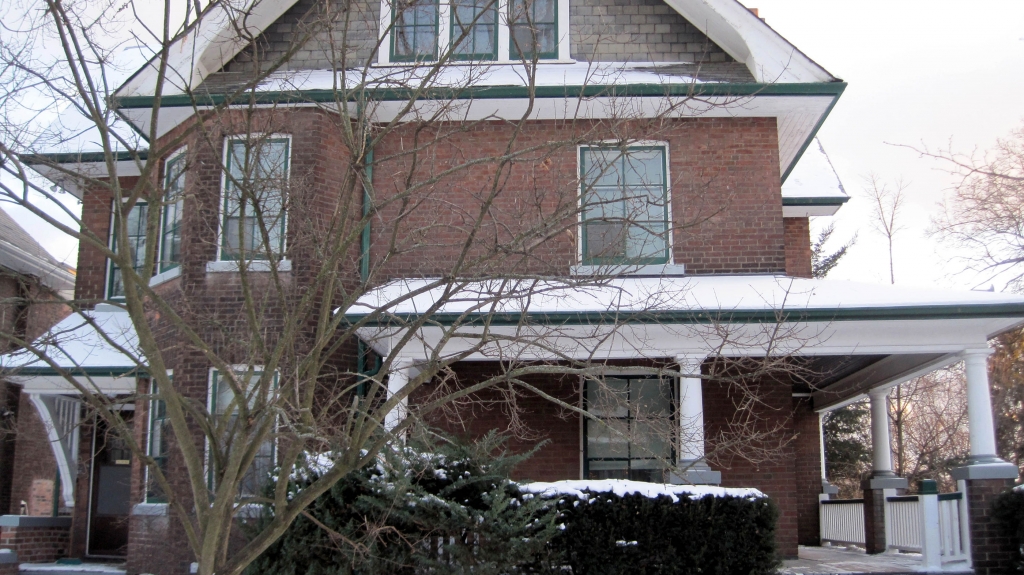
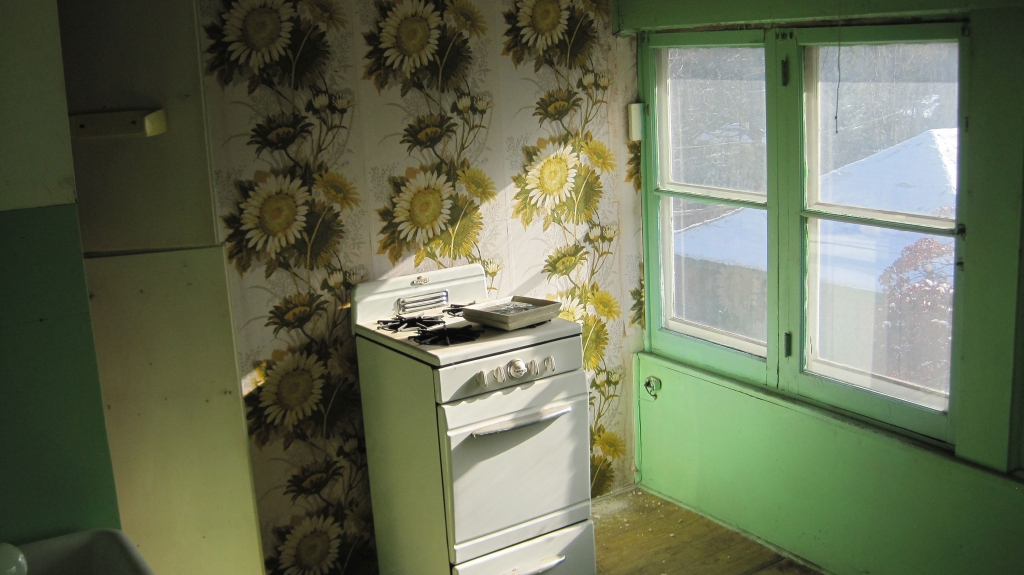
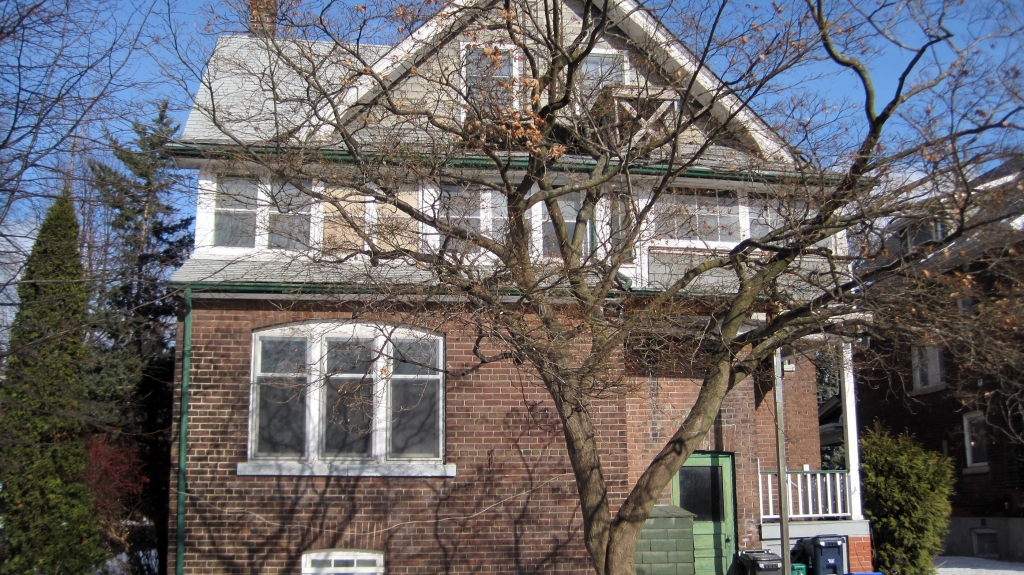
With construction underway, I’m excited to introduce to you our Edwardian Renovation Project! This project is interesting and unique in many ways, and we’re looking forward to upgrading this 1800s Toronto house into a sustainable, energy-efficient home. Our clients, a family of four, were drawn to the house’s exterior appeal, yet the interiors lacked the open-concept aesthetic and functionality they wanted in their forever home. The exterior of the house, though old, had wonderful and unique elements characteristic of its age, like the double brick, load-bearing walls, which we wanted to keep intact as much as possible. The house sits on a corner lot, and the back faces south, boasting a beautiful view of downtown Toronto. Before we began demolition, the interior was broken up into many different rooms and units, with multiple stairways crisscrossing the various zones of the house. Some areas of the house were only accessible in roundabout ways, which gave the house a multi-unit feel, even though it had not been used as one for years. The oppressive dark rooms, awkward stairways and an excess of doors sound ideal for a game of Hide-and-Seek, but might become frustrating and exhausting for long-term, day-to-day living. The house was really starting to show its age – a lack of upkeep, updating or any renovations over many years had caused the original condition to wear down drastically. With our clients’ vision and collaboration, we started the project of turning this house into a bright and open single-family home, while maintaining its historical character and as much of the original detailing as possible. I’ll be keeping you posted as renovations continue on this Edwardian home. When I return to this project in a few weeks’ time, I’ll fill you in on our ideas and design constraints (teaser: no use of spray-foam insulation!). Our plans for this big, beautiful building are ambitious, but what’s a worthwhile renovation without some juicy challenges?Introducing the Edwardian RenovationGo To Project Page
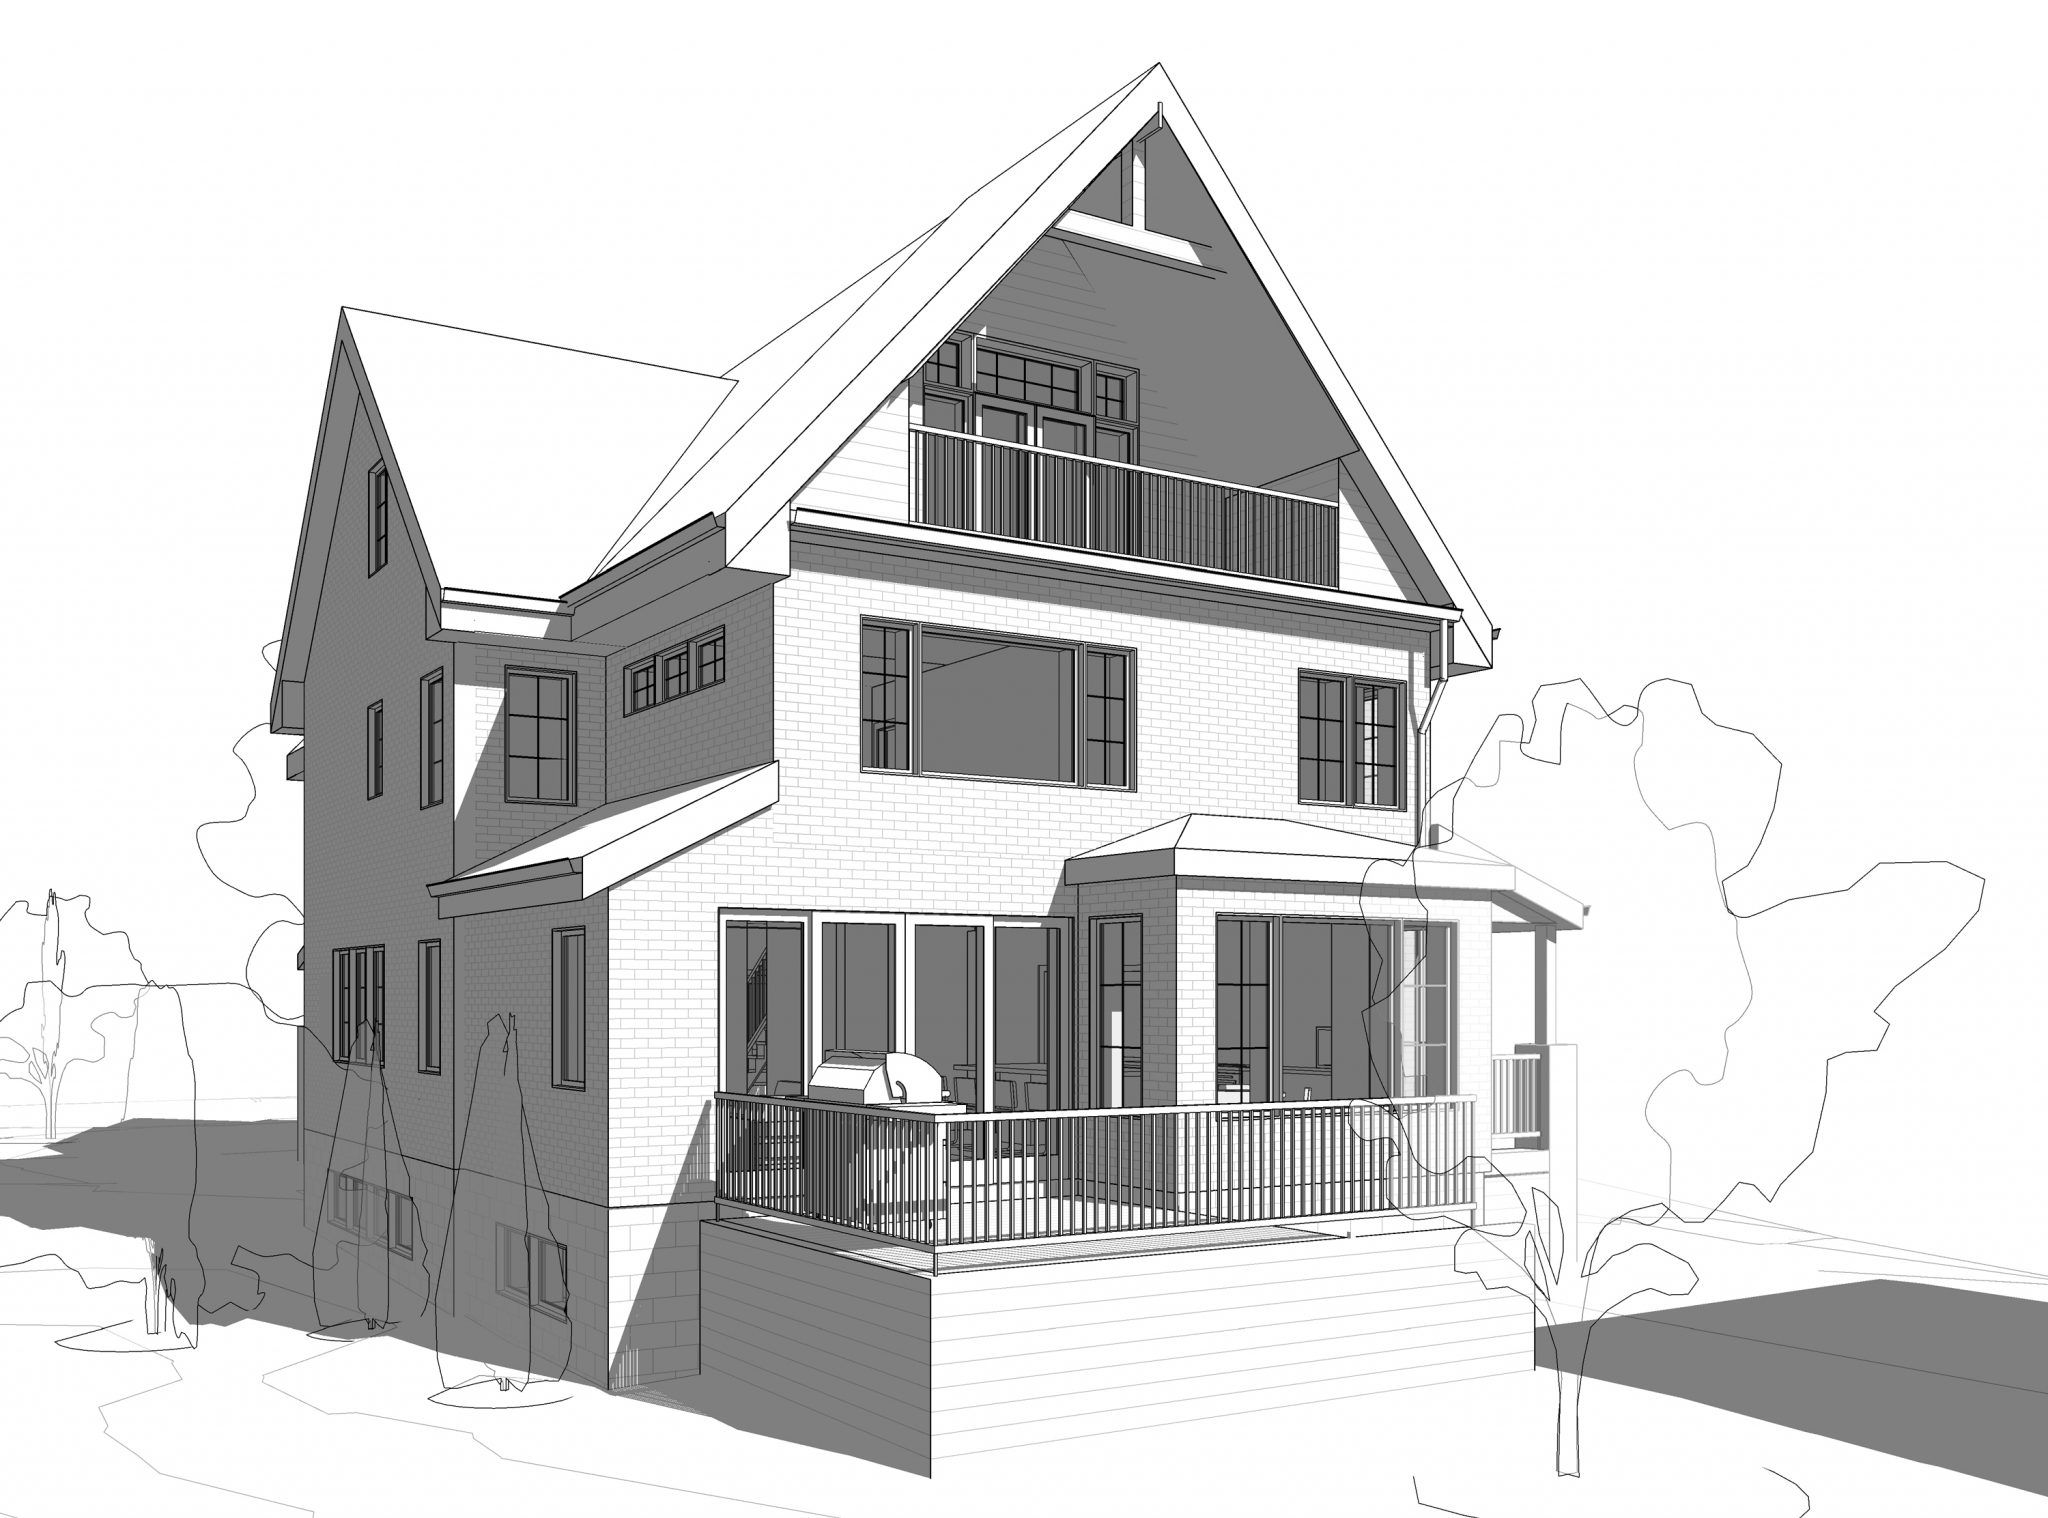
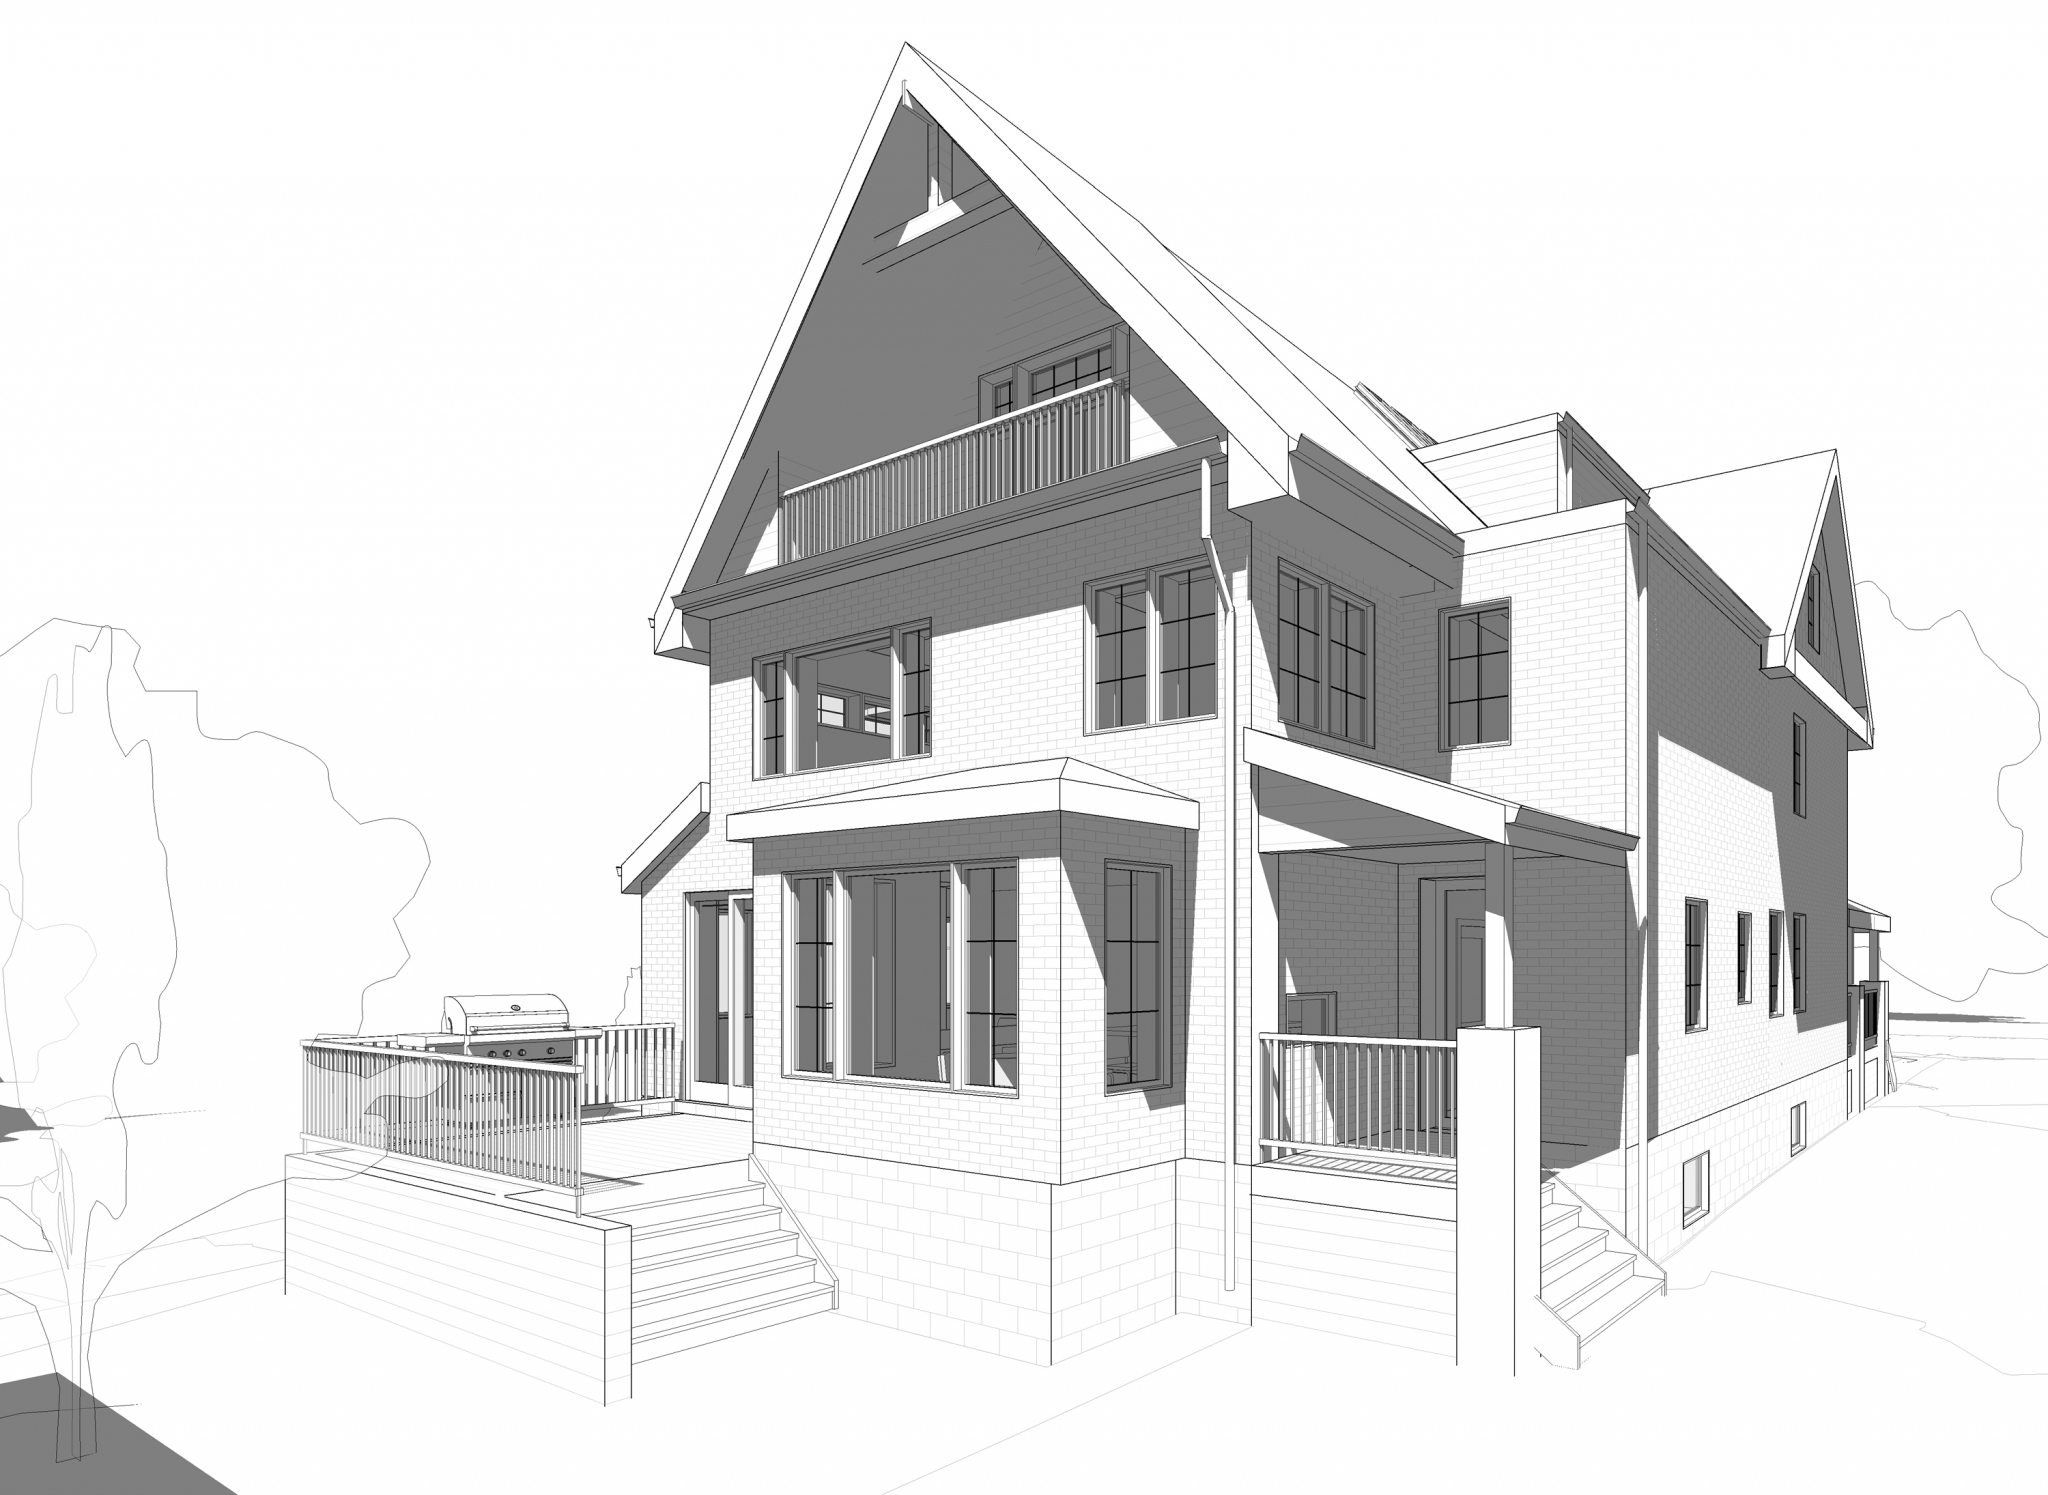
Creating the floor plan is my favourite part of any design project. The work that goes into this critical stage is a unique combination of technical and creative, and a successful floor plan must be the perfect integration of our client’s needs and our expert design skills. Before we sit down and design a comprehensive floor plan, our clients have homework to do! We ask them to complete a survey detailing their lifestyle and needs, as well as ask them to write about their perfect day in their new house, five years from now. This gives us the insight to build them a forever home they can enjoy now and for years to come. We want their house to not only look the part, but be functional and suited to their every need. Our Edwardian Renovation was an interesting project to redesign. The grand building, three storeys high plus basement, gave us tons of space to work with, but the disjointed rooms and stairs made the interiors unwieldy and dark. We wanted to create a cohesive flow through the spaces, and give every room as much access to natural light as possible. Which brings us to our first challenge: The stairs. Looking at the original layout, we found that it was hard to create an open, airy space while keeping all the crisscrossing stairways intact. Our proposal was to create one central stair which winds all the way from the basement to the third floor, acting as a vertical spine and linking all the levels together. At the top, two large skylights will allow natural light to cascade down to the floors below. Our clients wanted the option of installing an elevator in the future. To us, it’s important that an elevator and stairs are designed so that they “land” in the same place on each floor. Our clients didn’t want to install an elevator immediately, so we proposed that the shaft be filled in with temporary floors on each level and that the spaces be used as large closets for now. No one ever complains about having too much storage space! Another big plan we put forward to remove three old additions that were added onto the house at different times, squaring off the back wall, and building a new three-storey addition – the total length of the house remains the same so the backyard space will be preserved. This addition will add much needed space on the second and third floors and will provide easier access at the back of the home.Designing the Edwardian RenovationGo To Project Page
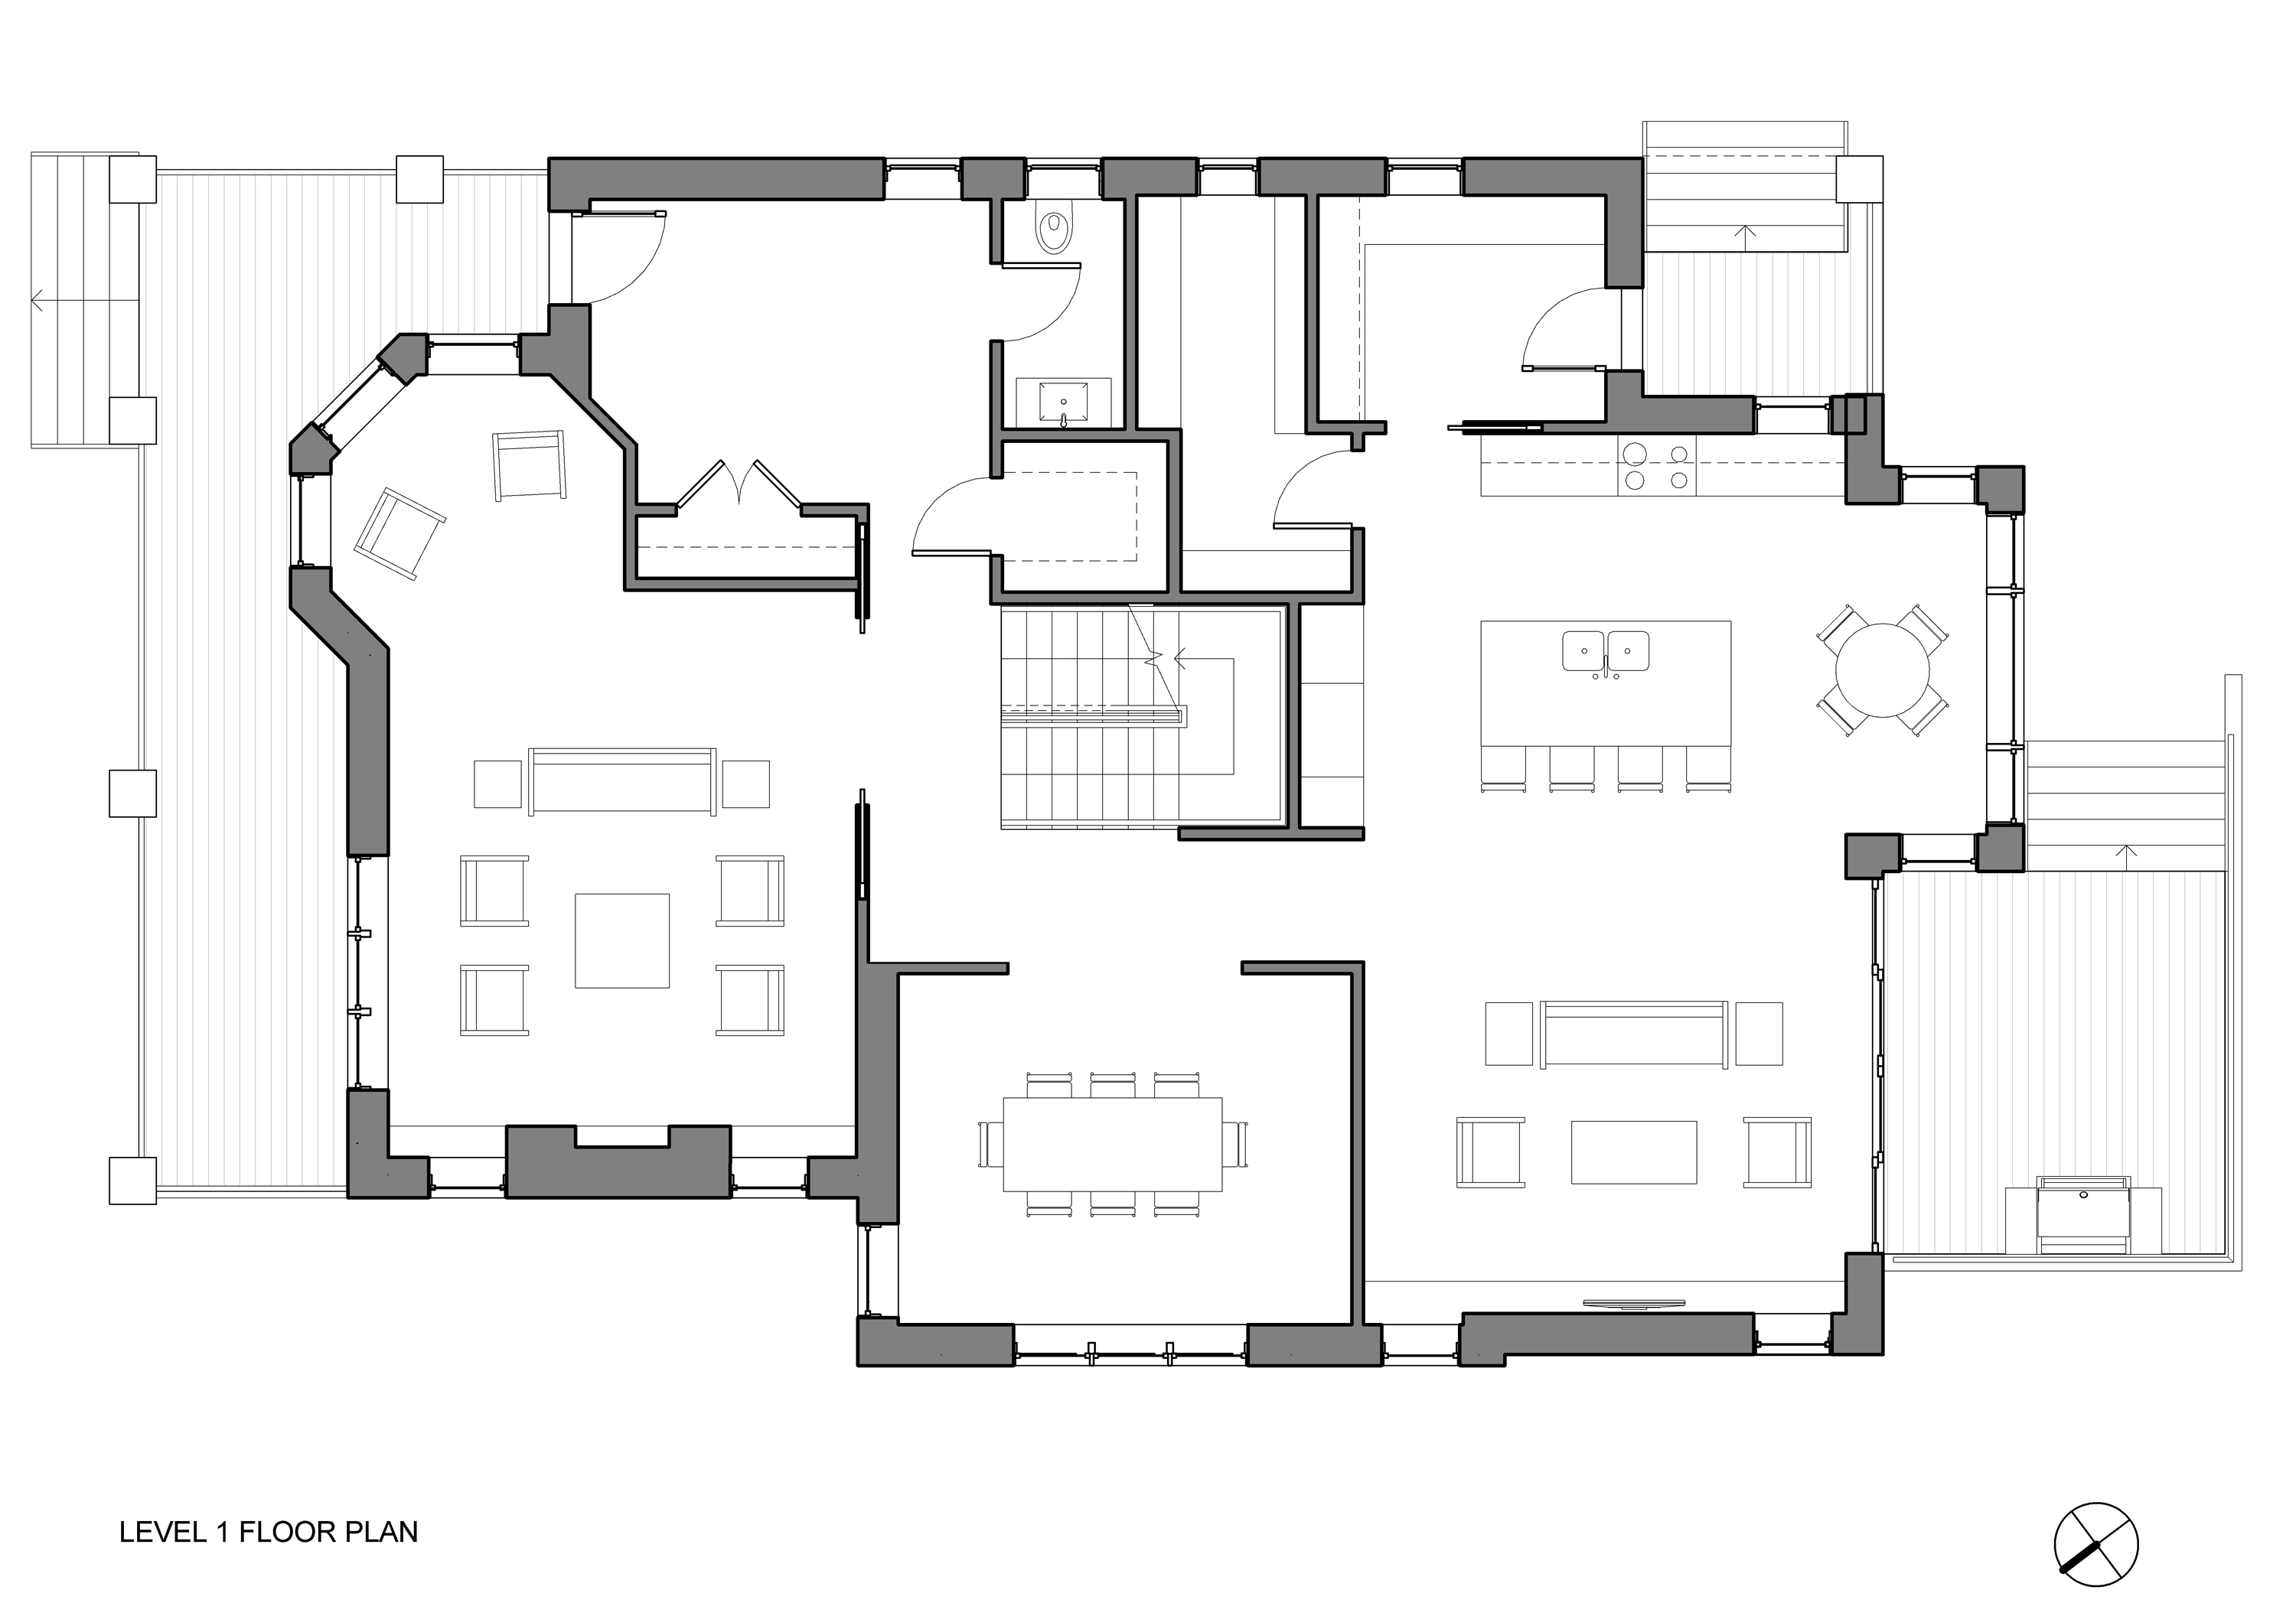
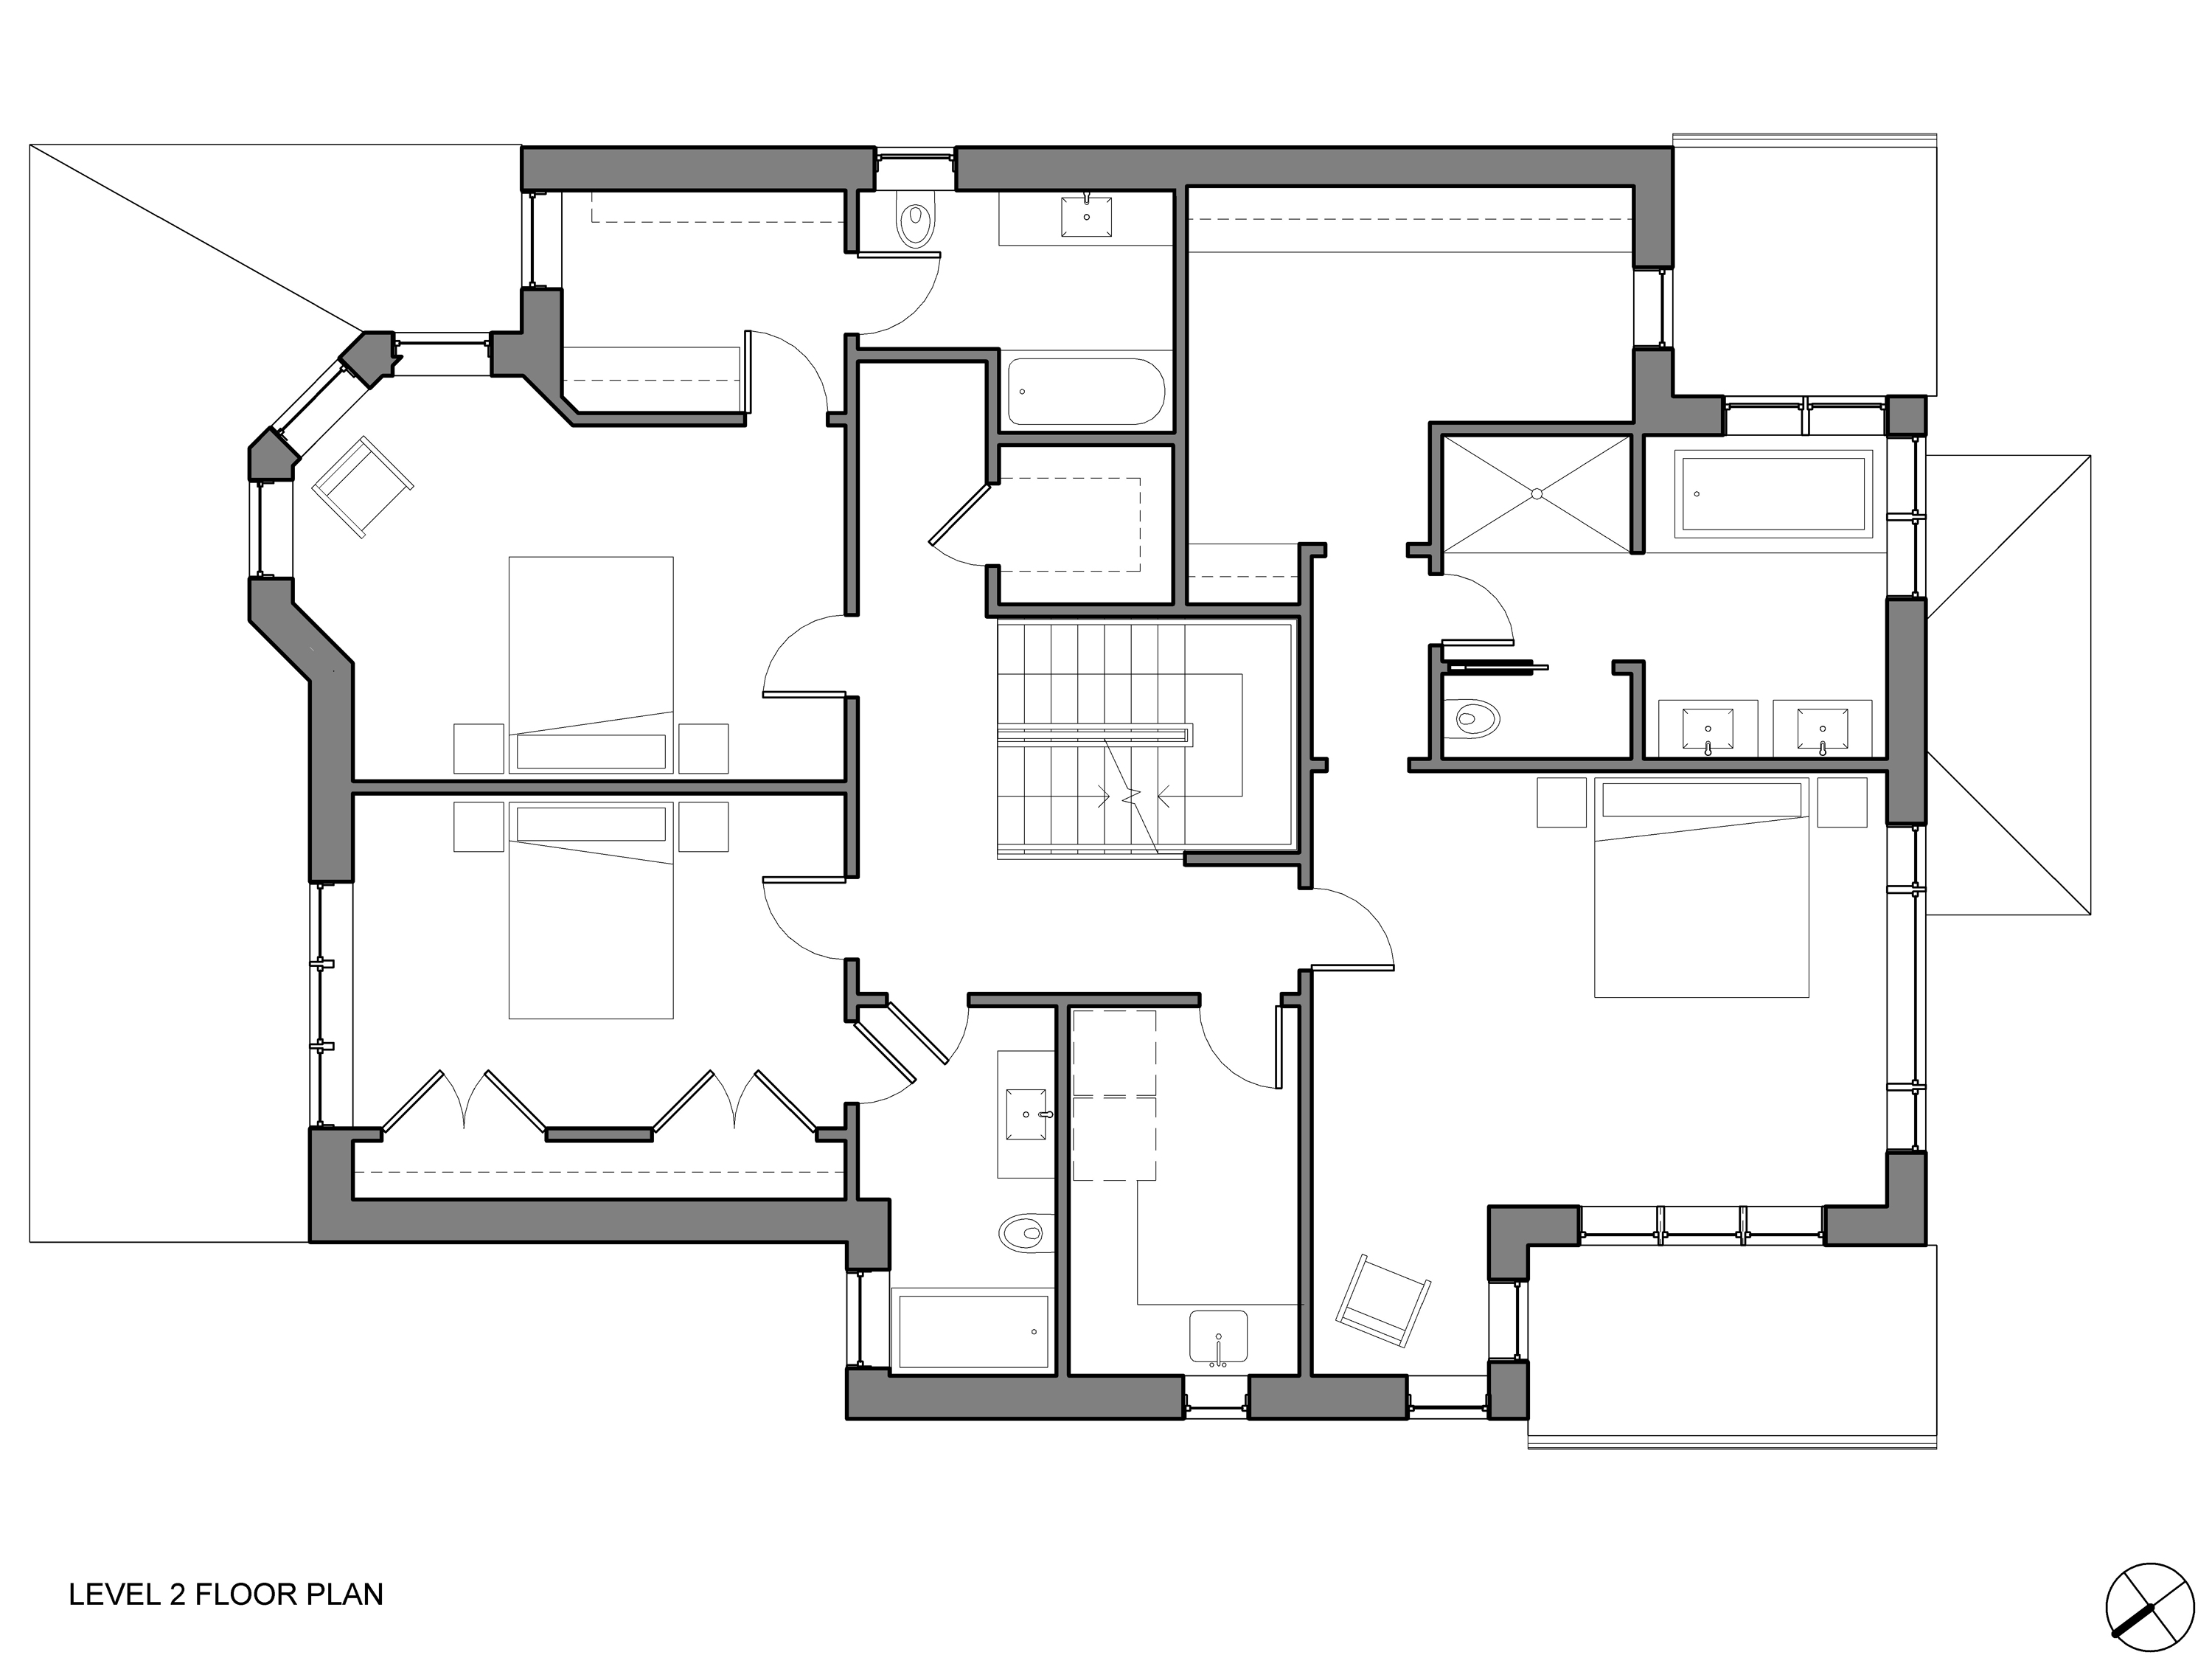
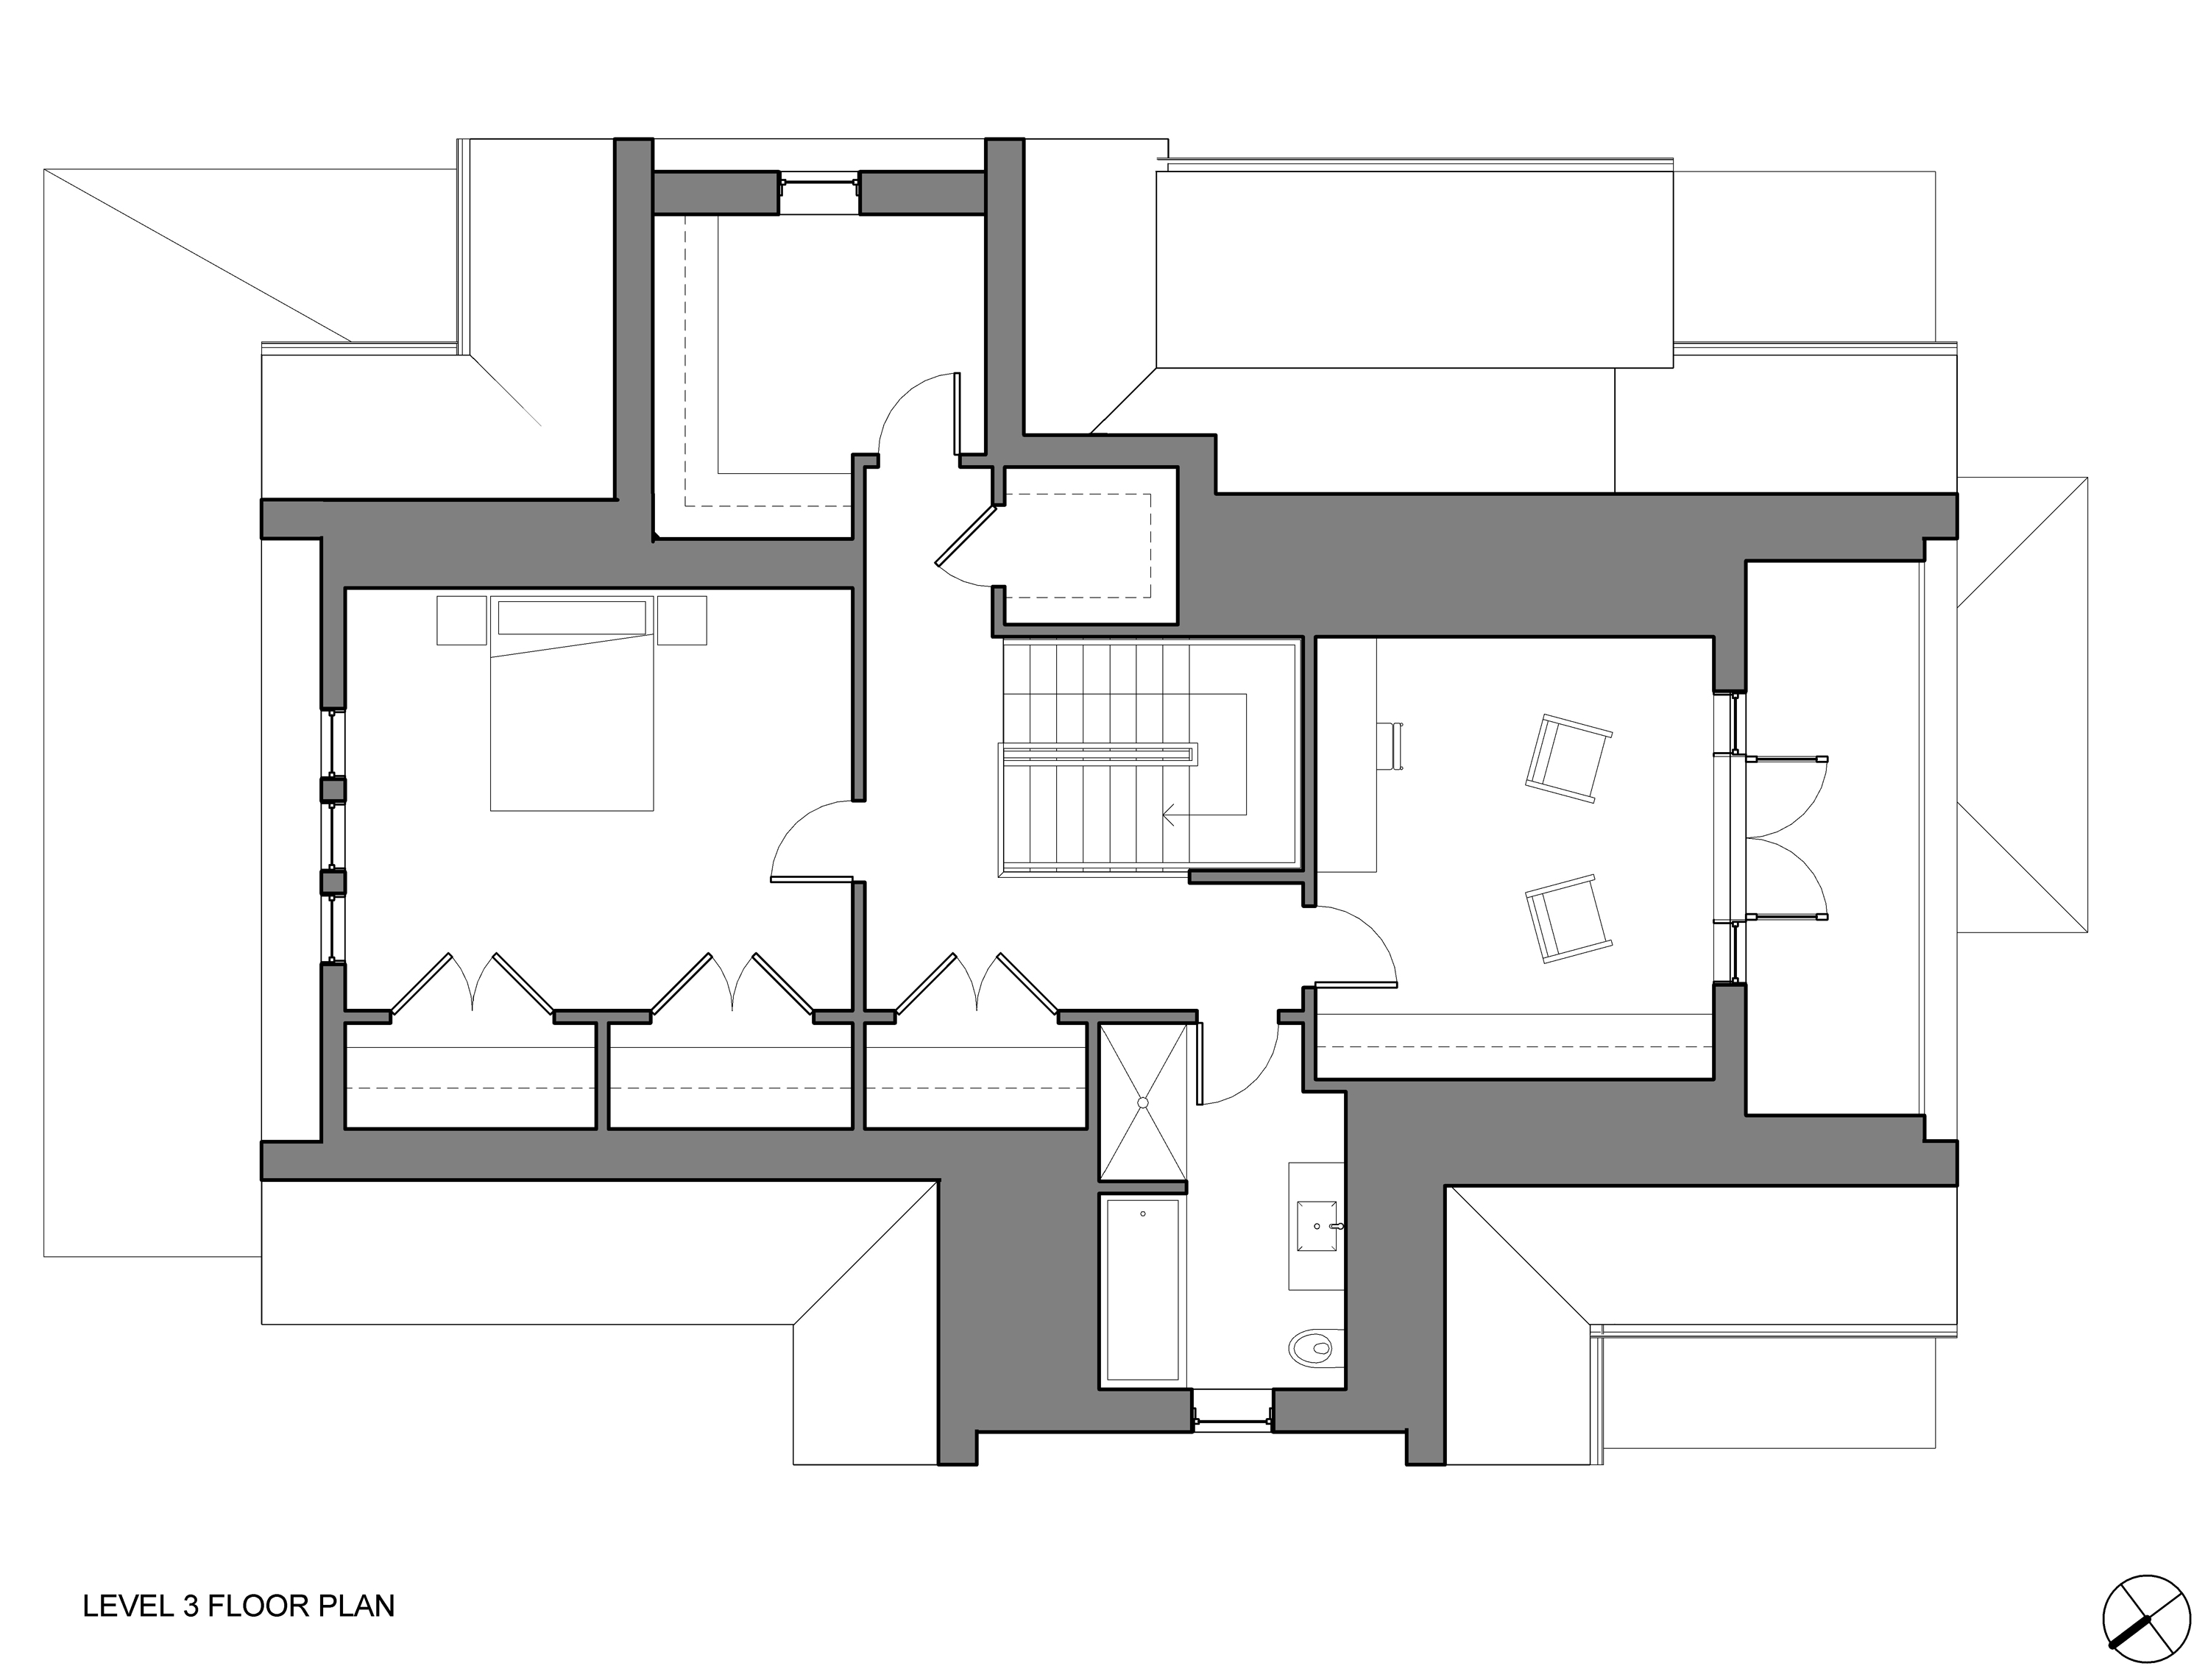
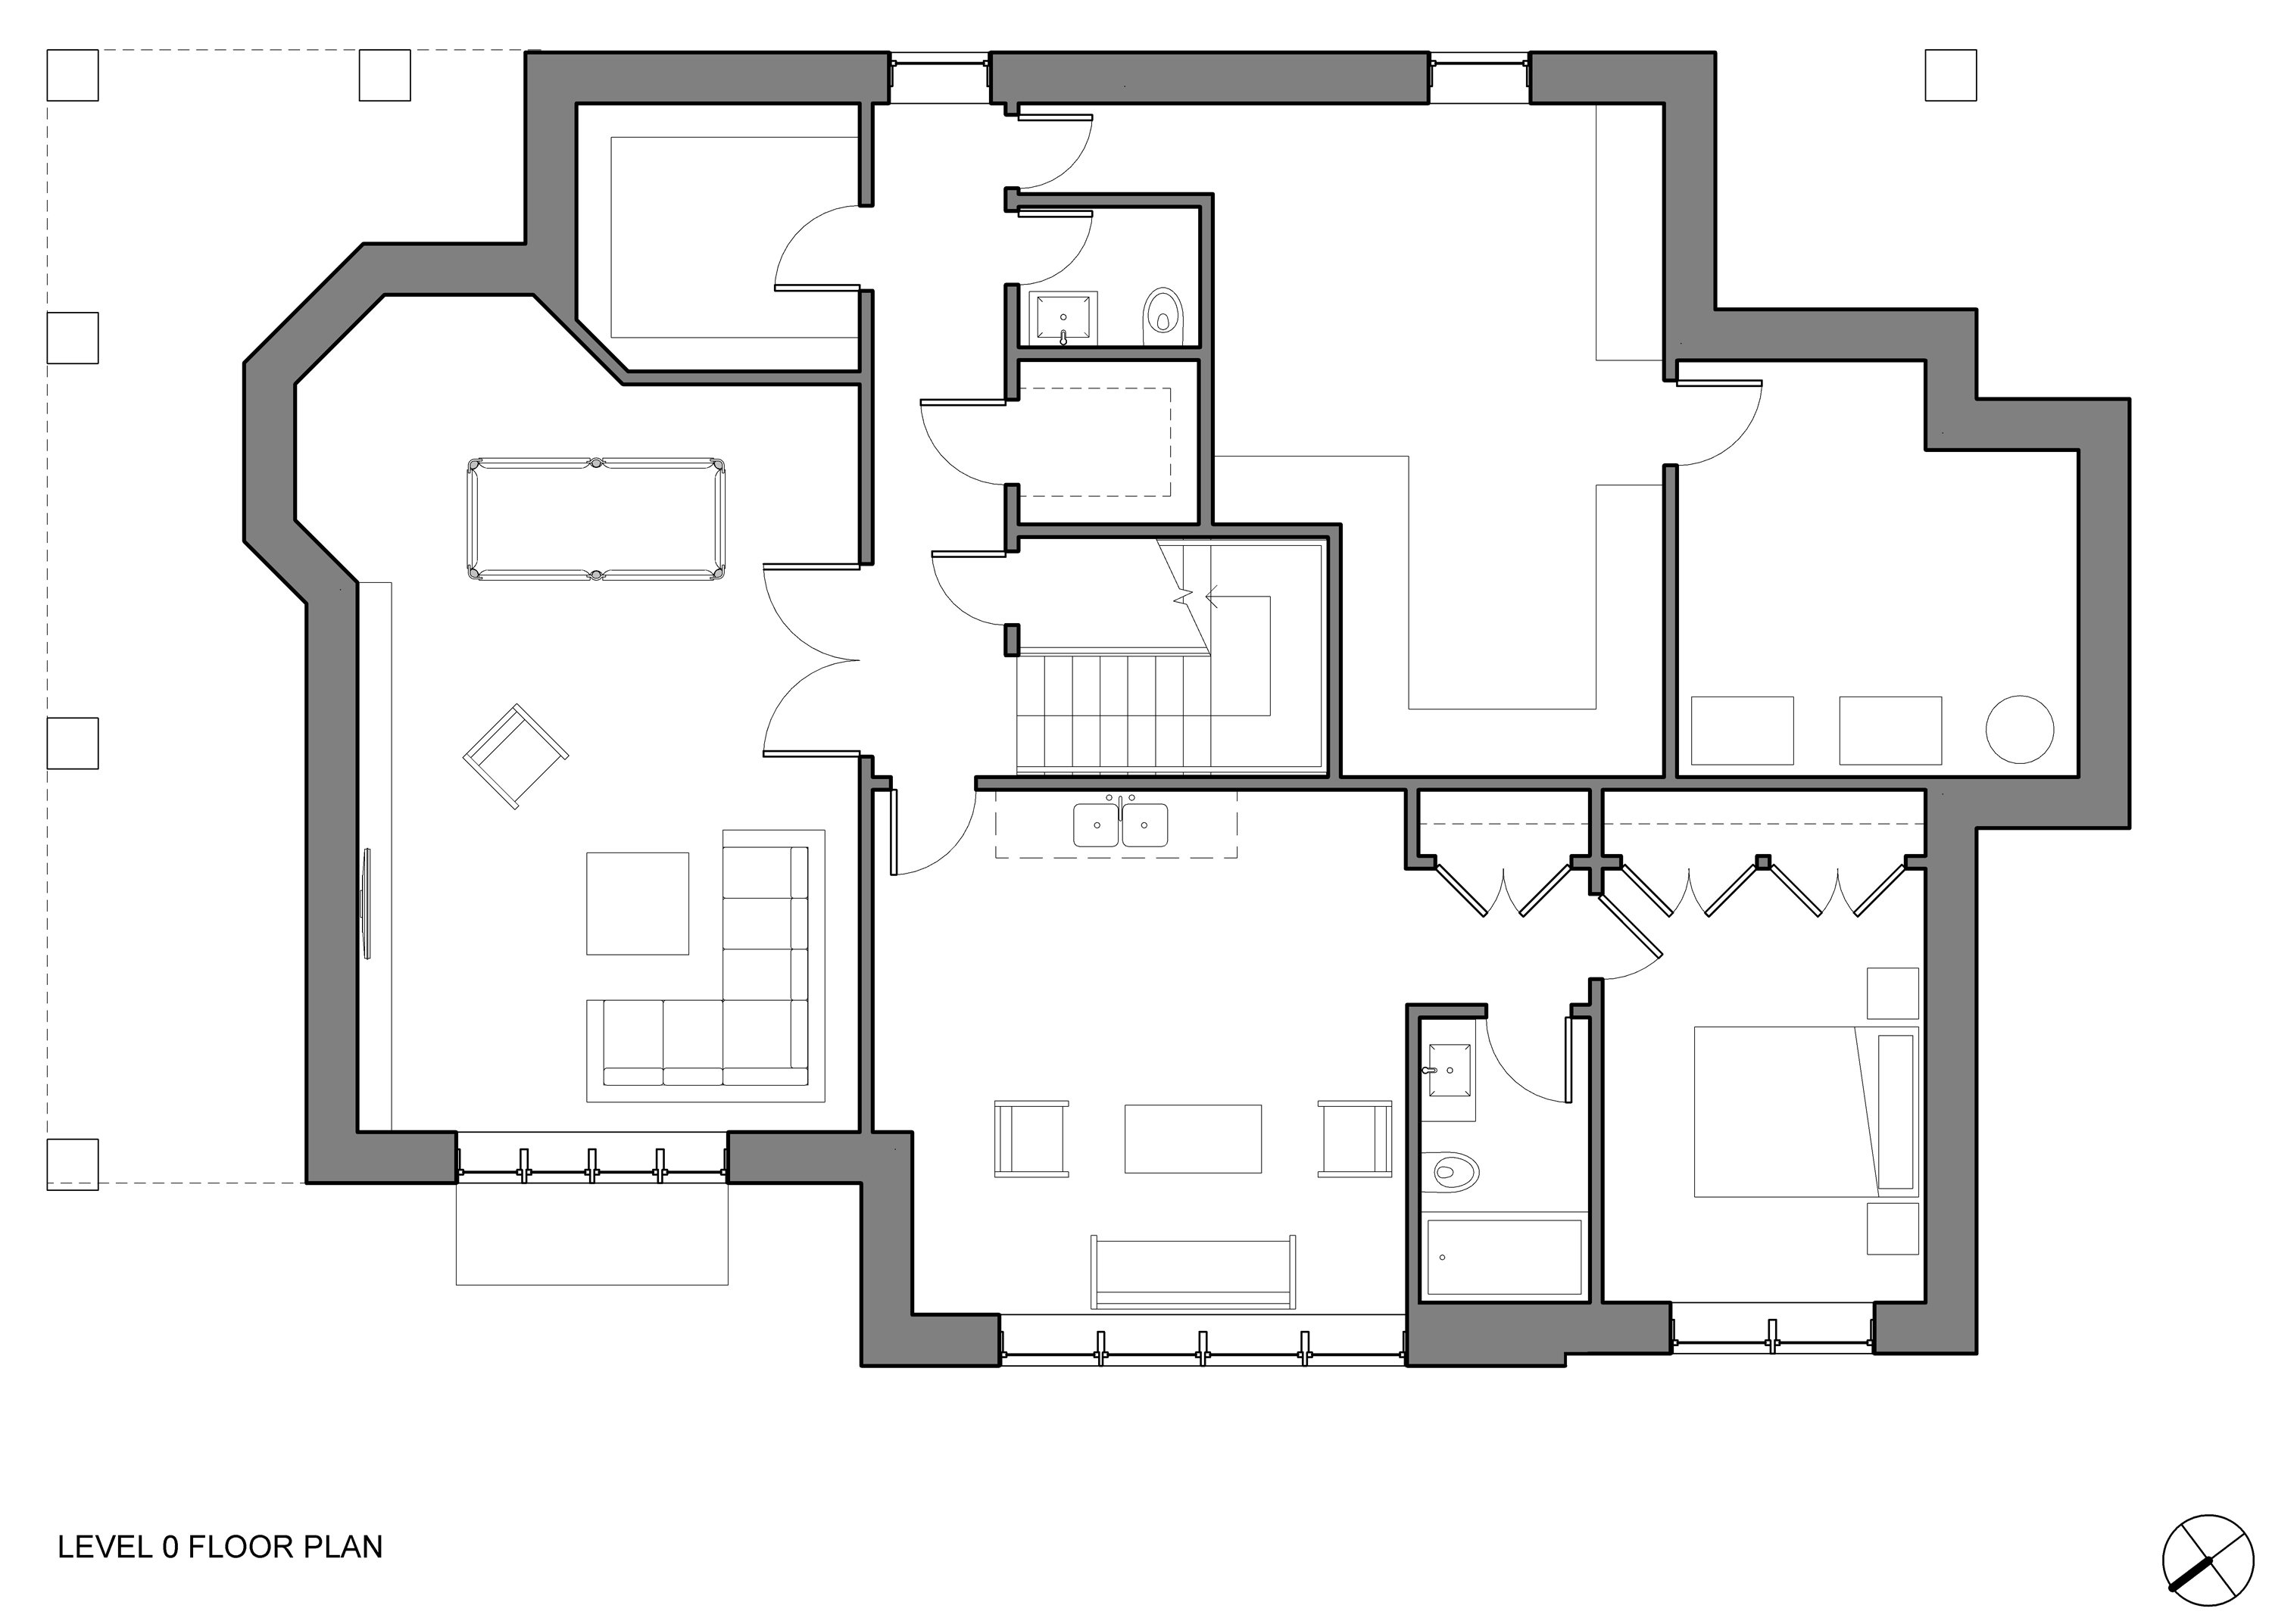
The Floor Plans
First Floor: Preserving the classic, formal appeal of the original building was important to our clients, so we’ve located formal spaces (front foyer, living room and formal dining room) at the front of the house on the first floor, which pairs nicely with the building’s traditional façade, front porch, and smaller windows. We’ve placed the more casual, open-concept kitchen and family room at the back of the house, and we’ll be adding large windows and doors on the south and west facades. The back patio leads off the family room, and off the kitchen is a walk-in pantry and mud room, with a door to the driveway. This back entry will be useful for unloading groceries from the car and getting kids out the door on school days.
Second Floor: The master bedroom and the two children’s bedrooms will be located on the second floor. To avoid sibling rivalry, we always try to make children’s bedrooms as equal as we can, but because of the original design of this house, one lucky kid gets the bedroom with the turret! The rooms are the same size, and each has lots of closet space and its own en-suite bathroom. The master bedroom sits at the back of the house with large windows on the south and a small sitting nook with a corner window. The luxurious master bathroom has a steam shower, separate toilet, flanking sinks and large soaker tub under south facing windows. Beyond the master bathroom is a large dressing room with built-in wardrobes and its own window.
Third Floor: The third floor hosts a room under each gable of the roof: a guest bedroom at the front of the house, a guest bathroom at the west, mechanical room on the east, and a home office at the back. A balcony opens off the office, boasting incredible views of the city.
Finally – let’s talk about the finished basement! We wanted the basement to have everything an independent apartment would, for possible future renters, short-term visitors, long-term guests, or a teenager’s paradise a few years down the line. It also has a large family room, exercise room, guest suite and wine cellar.
Underpinning the basement to create 9’ ceiling heights was a must. We wanted the basement to have as much natural light as possible, but the front porch and back deck, which span the width of the house, make that a challenge. To overcome that we’ve located large windows on the west façade and located the family room, exercise room and guest suite along that façade. In the darker spaces of the basement are the wine cellar, storage and mechanical rooms.
Once we’re finished, this Edwardian home will be beautiful, spacious, and bright. Every room will have tons of natural light, good flow, and the whole home will fit together seamlessly. In the next posts, I’ll update you on the demolition and structural work required to make this Edwardian dream home a reality. We can’t wait to see this project through to completion!
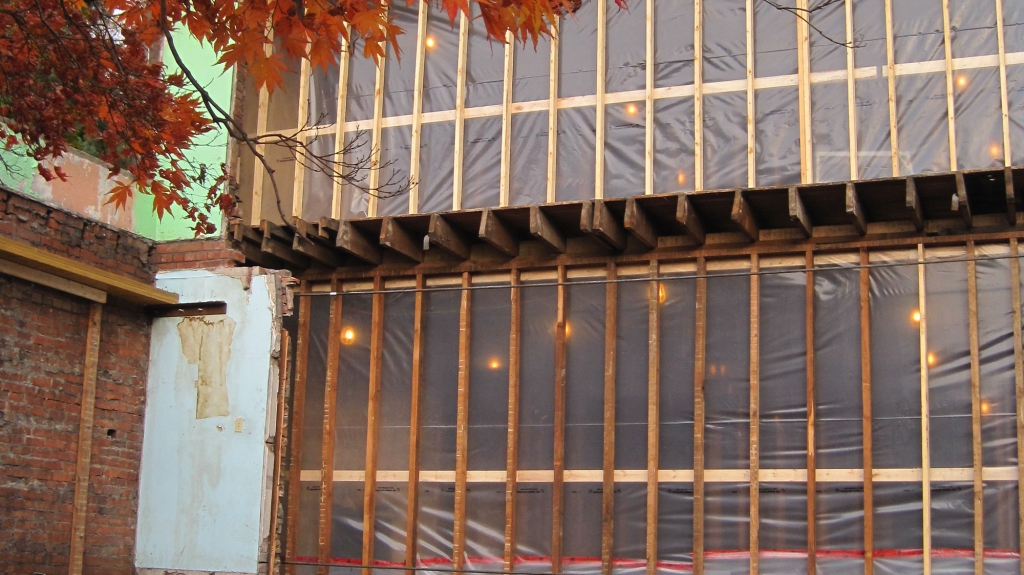
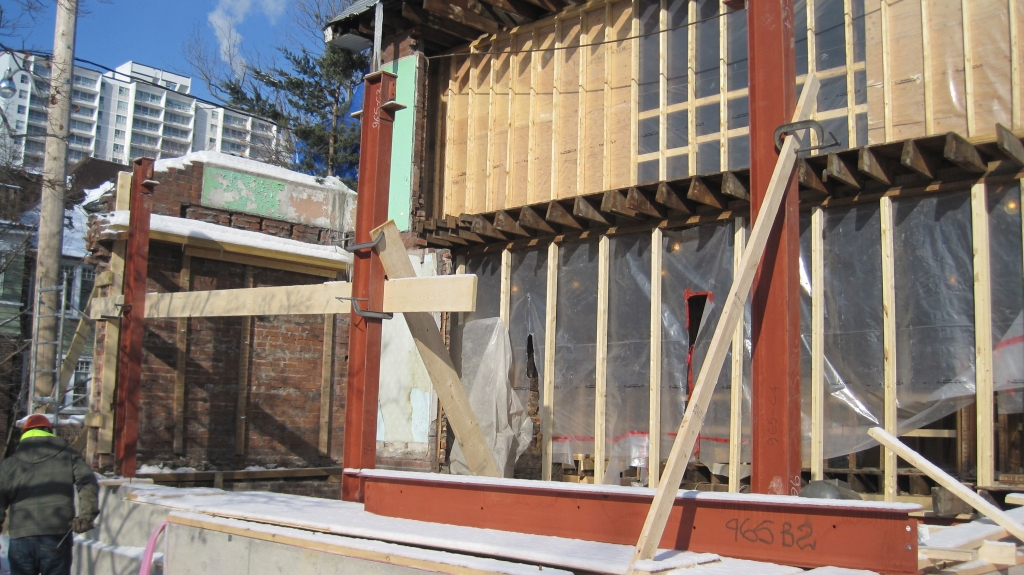
With permits in hand, we’ve started construction, which means mud, hard hats, and huge structural changes. We’ve been ambitious with this house: we’ve underpinned the basement, gutted the entire interior and removed the old, wonky rear additions completely, replacing them with a large, cohesive 3-storey addition Our builders, Equinox Developments, are very capable when it comes to these kinds of major renovations and additions. Working closely with Ed Kucab, the site supervisor, and Susan Hunter, the project manager, we felt confident to take on such a complicated and challenging project. One of the biggest challenges: taking off the back of the house. Ever wonder how to safely rip off the back wall of a house? When you remove a load-bearing wall during construction, the entire structure becomes unstable. The weight of the roof (and any upper storeys) becomes unevenly distributed between the remaining three walls, and with no anchoring rear wall, the side walls can buckle from the weight. In order to keep the house from collapsing, Equinox had to reinforce the structure with long steel rods, which run the entire width of the house on all three levels, helping keep the side walls from buckling outward. Eventually, these rods will be replaced with a steel moment frame, buried within the framing of the new addition at the back of the house which will transfer lateral loads to the foundations. The moment frame will also allow the house’s new back wall to be mostly windows and doors. After the steel rods were in place, Equinox built a temporary rear wall with wood studs and plastic to keep weather out while working on the interior.One Less WallGo To Project Page

One New Basement
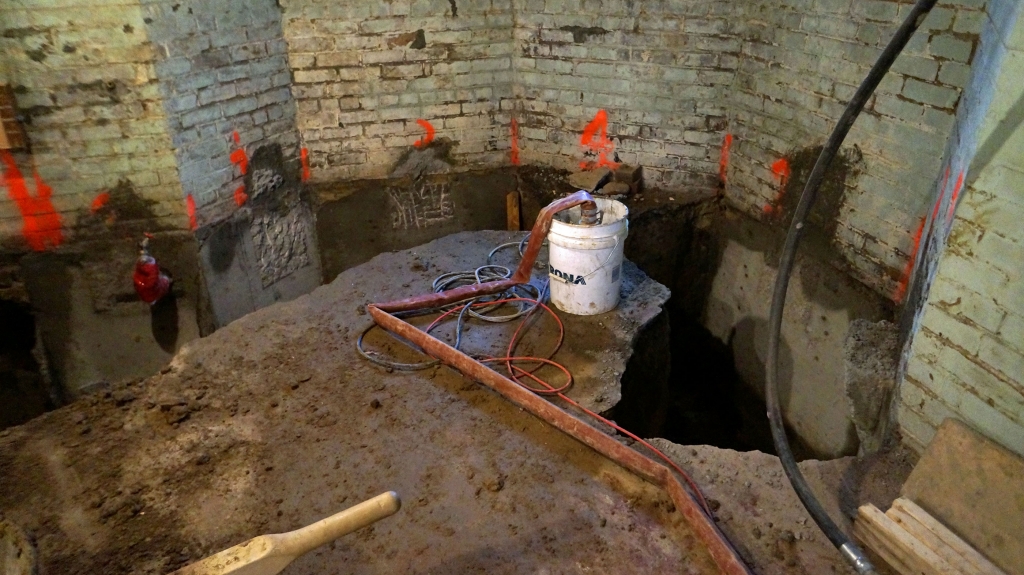
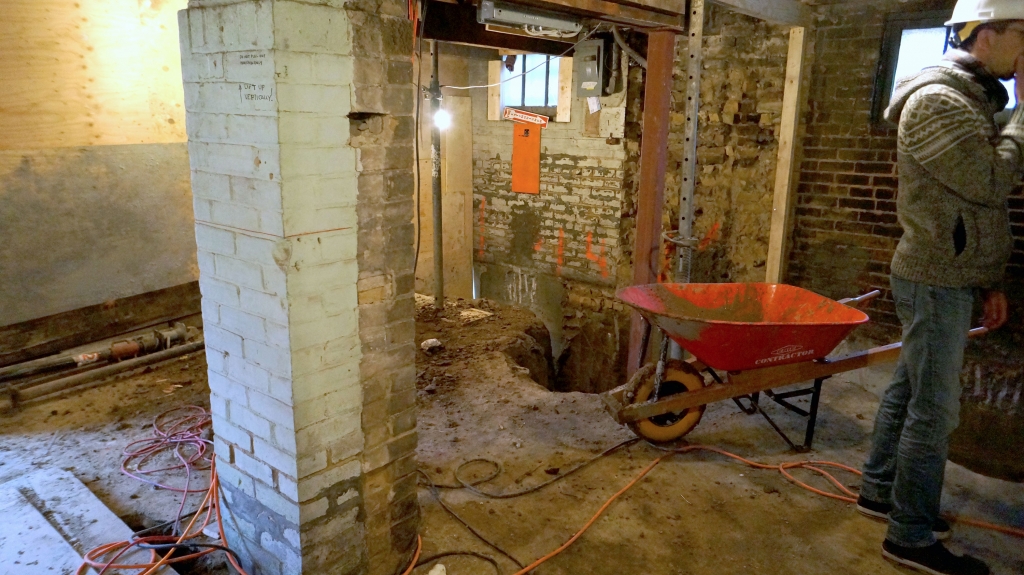
Without a rear wall, we had space to drive a bobcat right down into the basement through the backyard, which helped with removing the existing basement floor, excavating, and underpinning. We wanted the finished basement ceilings at 9 feet, about three feet taller than the original ceiling height. But under the new 4” concrete slab that would make up the new basement floor, we needed 4 inches of insulation and 4 inches of gravel for drainage and waterproofing. So we ended up excavating down 4 feet from the original floor level. We used the same “keyhole method” of underpinning we used in Tom and Christine’s house, where concrete is poured into small openings in the forms, filling up the space between the bottom of the existing foundation wall and the footing location.
In addition to the underpinning, another structural feat was sistering all the existing floor joists. These joists were old, undersized and most had been damaged during previous renovations. “Sistering” means scabbing a second joist onto the existing wooden joists down the entire length of the floor. Every single new joist had to be carefully fitted and nailed into place.
As if this demolition process wasn’t challenging enough – we had to be extra careful around all the mature trees on the lot, and we weren’t just morally obliged to keep them safe – they’re protected legally due to the City of Toronto’s Tree Protection Zones, which ensure that no construction, storage of construction materials, parked vehicles, machinery, or digging take place in the vicinity of protected trees. Luckily, we hate hurting trees so were happy to oblige the tough task.
Next time I’ll go into more detail about the envelope of the house, including our choice of insulation and air-barrier strategy. We’ve avoided spray foam insulation, due to our client’s wishes, and instead opted for an avant-garde alternative which we’ll be applying to the interior of the brick. Stay tuned!
We’ve installed Edwardian Renovation’s main envelope components – some in typical Solares fashion, others in unique ways suited to our client. There are lots of components that make up a building’s “envelope”, so before I explain this project’s unique details, I’m going to give you a crash course on all things envelope. Let’s pretend our house is a person. Their jacket (walls), hood (roof), and rubber boots (basement) protect them from the outside elements and keep their body warm and dry – that’s if it’s high quality outerwear! But, if their coat has holes, or their rubber boots aren’t waterproof, that outerwear will be ineffective. For a house, this means it would be drafty and inefficient. The envelope, just like a jacket, is everything that protects the structure from the outside elements: it’s the wall cladding, air barrier, vapour barrier, insulation, as well as the roof and the basement insulation, drainage and waterproofing. All of those put together keep the home warm, dry and efficient.The EnvelopeGo To Project Page
Edwardian Reno’s “Jacket”!
This was a complicated project not only because of its huge size, but for the insulation method we used on our load-bearing brick. Our clients were adamant that we avoid spray foam, due to personal concerns about its production and installation method. Even though foam does have a larger environmental impact than other insulations, it’s useful because it acts as both an air barrier and vapour barrier and has a much higher R-value (the capacity per inch to resist heat flow) than other forms of insulation. But we always respect our client’s wishes, and never turn down an opportunity to learn or try something new.
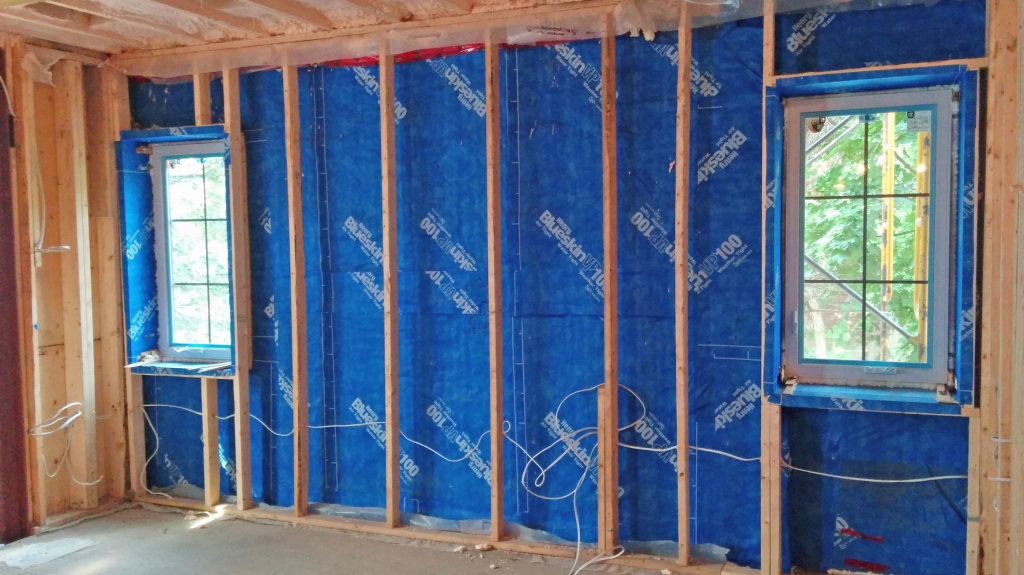
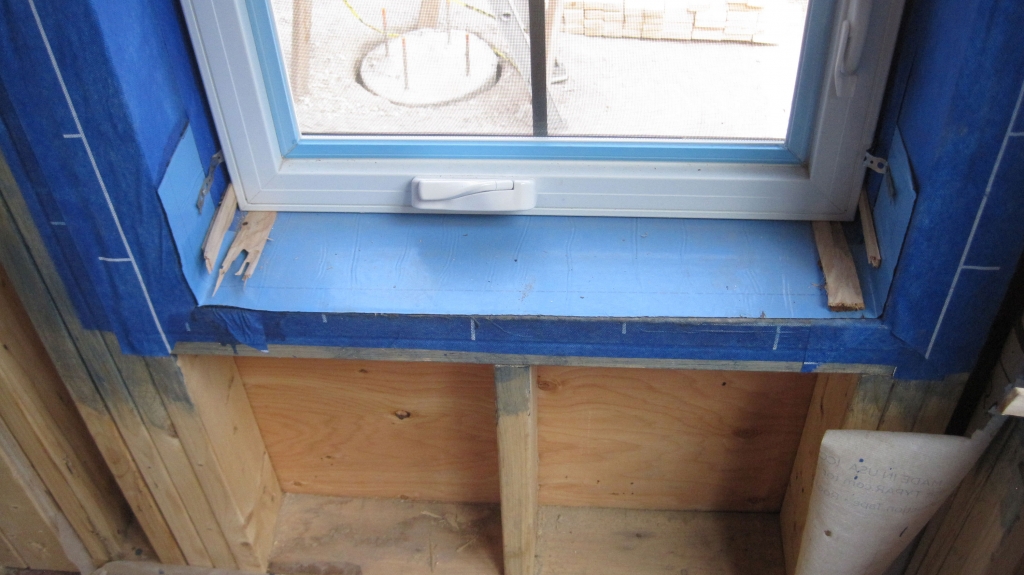
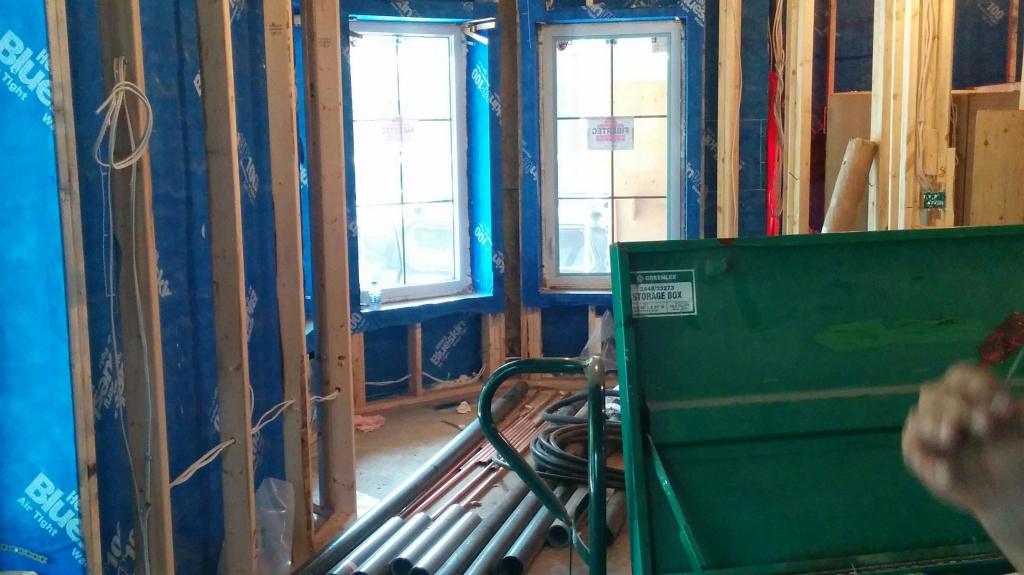
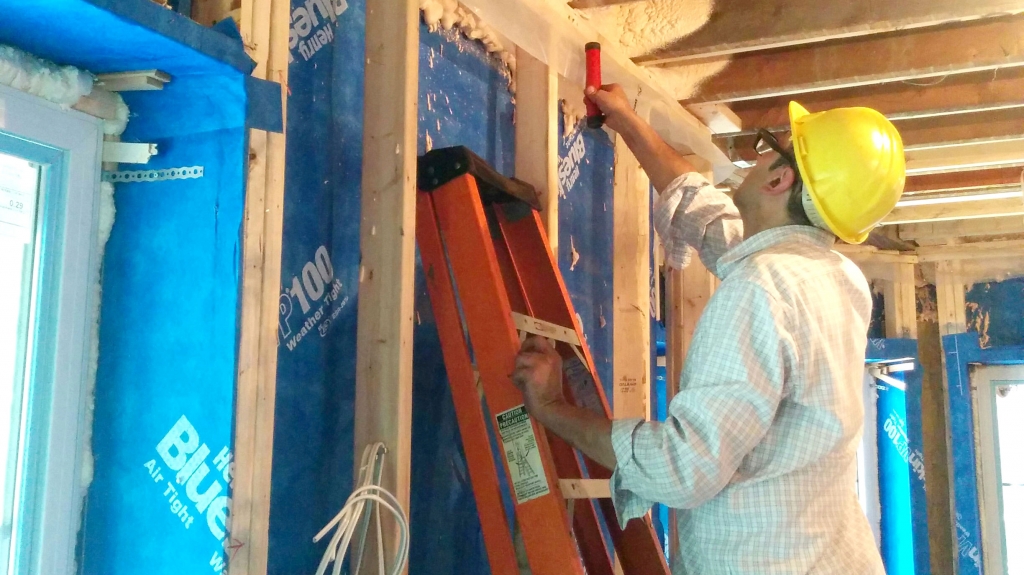
For our air barrier, we used a Henry Bakor membrane called Blueskin VP100. This material can be either spray-applied or stuck on in sheets to the surface of the brick. Equinox’s crew opted for the peel-and-stick sheets because the spray option couldn’t adhere to the brick properly in cold weather. This product is vapour open and air closed, which means it stops outside air from coming in and inside air from escaping, but allows moisture to escape. We installed a plastic sheet on the warm side of the insulation (just behind the drywall) to act as a vapour barrier to keep out most of the moisture, but we wanted to be sure that any moisture that does get trapped in the wall cavity can escape.
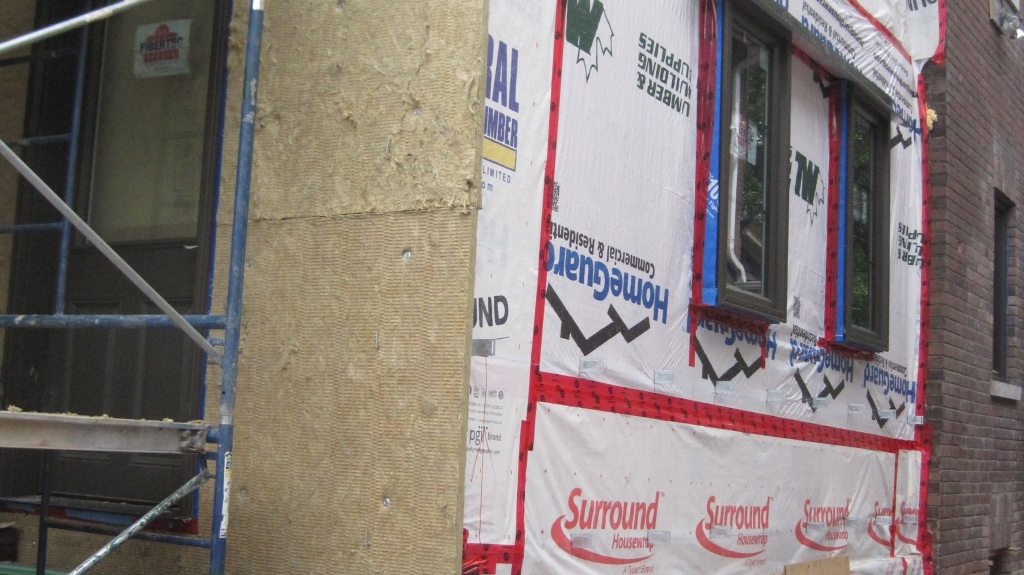
To insulate, we used a combination of Roxul products: mineral wool insulation made from rock slag, a by-product from the mining industry. Being a post-industrial product, it uses very little production waste and energy. Tight against the Blueskin air barrier is three inches of semi-rigid Roxul comfort boards, nailed right into the brick. Next is three and a half inches of Roxul batt between the 2×4 studs (at 24” on center instead of the usual 16”), followed by our conventional 6-mil, polyethylene vapour barrier to keep moisture out.
Installing the Blueskin was challenging, especially in such a complicated renovation. For it to be an airtight, efficient air barrier, it has to be seamlessly applied EVERYWHERE, from the roof right down to the footings. But wooden joists, small hard-to-reach corners, floorboards, and general bumps and irregularities are typical in an existing reno. It was a hard and painstaking job for Equinox’s crew to install seamlessly, but they did it!
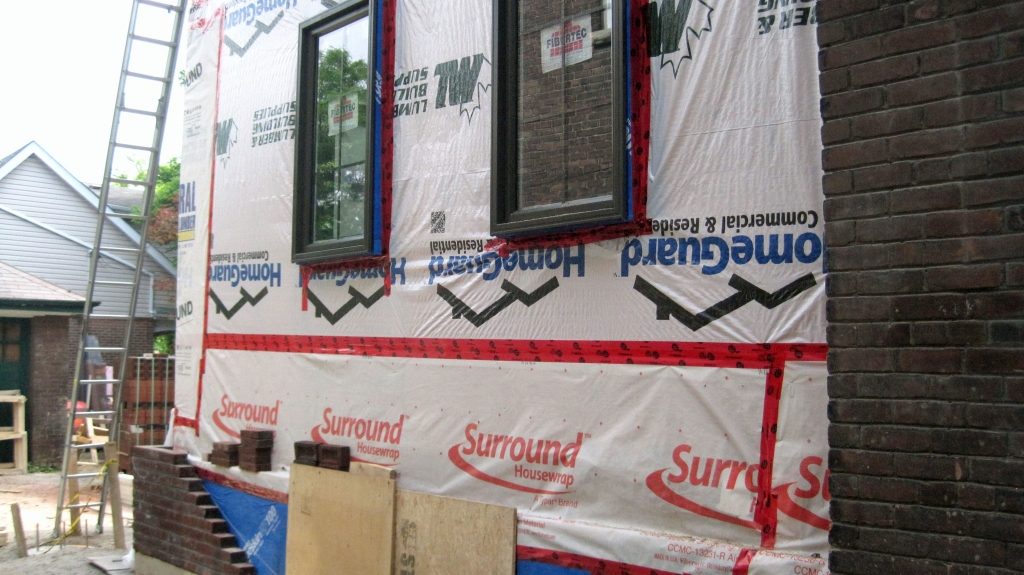
We also altered the envelope of the rear addition to better suit its stick-frame construction. We placed our air barrier on the outside of the sheathing, and outside of that we added three inches of Roxul Board. As opposed to our existing structure, our air barrier on the rear addition is protected by insulation on the outside. We also allowed for a one-inch air space before the brick veneer, and the one layer of bricks acts as a rain screen. On the inside sits three and half inches of Roxul Batts, then the standard 6-mil poly sheet.
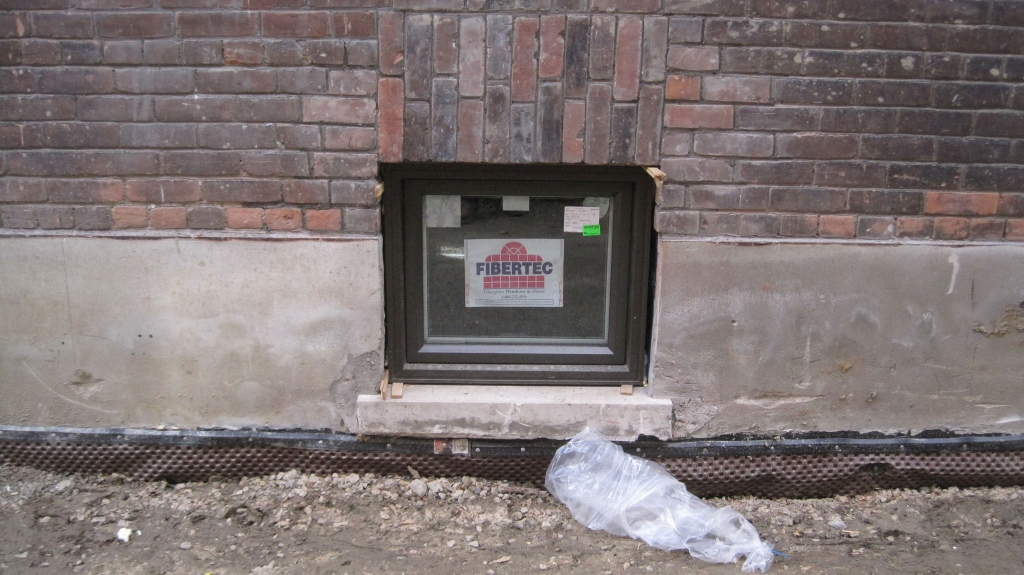
For the windows we used double-glazed, fiberglass framed units from Fibertec, a company from Concord that we have worked with on many occasions. We had to make sure our Blueskin was folded up and over the openings, to create an air-tight seal during installation.
The “Hood” and “Boots”
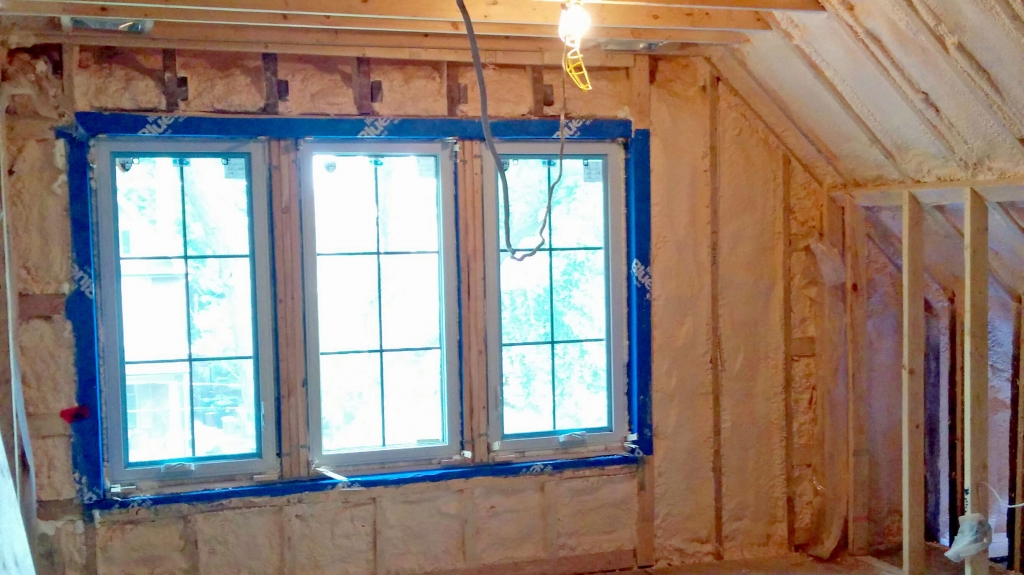
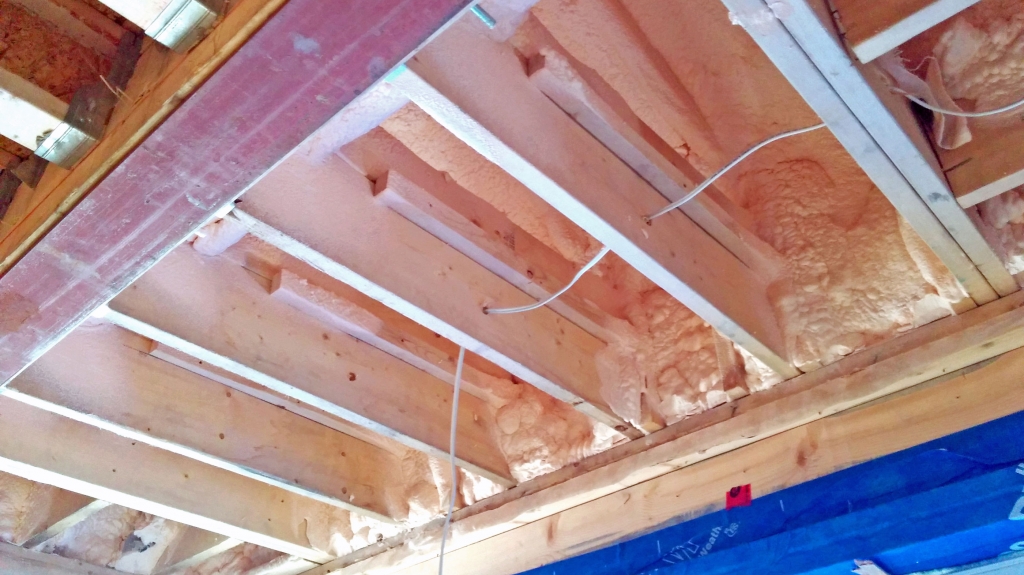
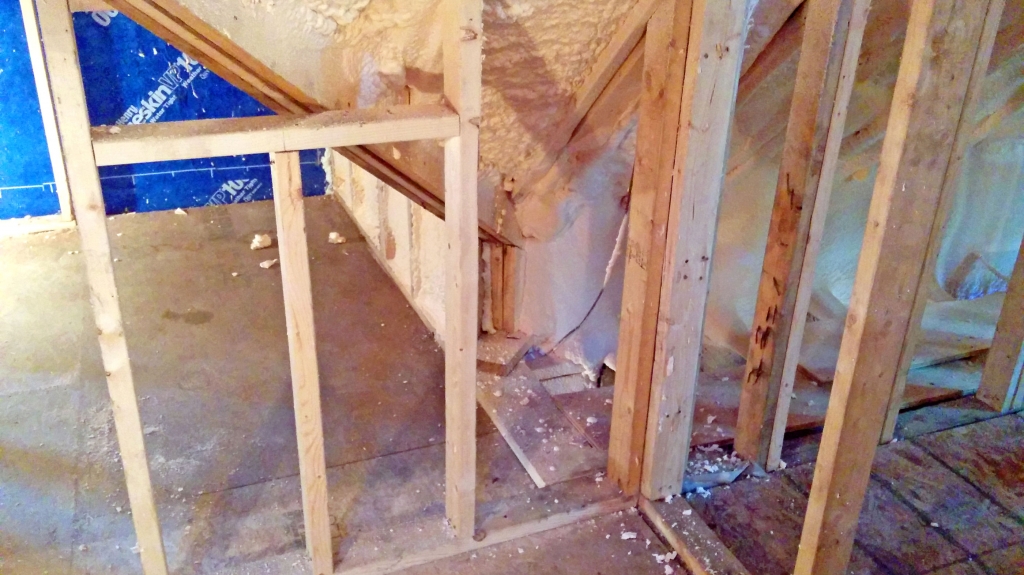
We wanted to apply the same principles to the roof that we used on the walls, because isn’t a roof just a horizontal wall? Unfortunately, the building permit office didn’t see it that way and rejected our original design. Since it wasn’t a vented roof, it was not an already proven condition for a roof assembly. We could have applied for an official altering of the building code, but the red-tape of a building code amendment can be extremely time-consuming and costly. So, in the interests of keeping the project moving, our client allowed us to use 8 inches of spray foam on the roof.
We wanted to apply the same principles to the roof that we used on the walls, because isn’t a roof just a horizontal wall? Unfortunately, the building permit office didn’t see it that way and rejected our original design. Since it wasn’t a vented roof, it was not an already proven condition for a roof assembly. We could have applied for an official altering of the building code, but the red-tape of a building code amendment can be extremely time-consuming and costly. So, in the interests of keeping the project moving, our client allowed us to use 8 inches of spray foam on the roof.
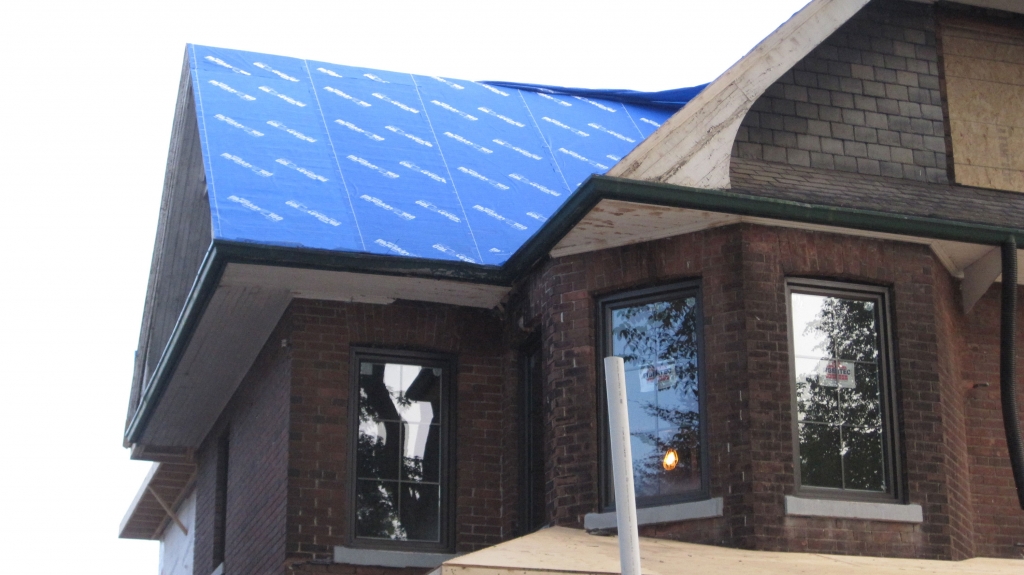
We also added Blueskin as a redundant layer over the roof sheathing and underneath the standing-seam steel roof (Solares loves back-up plans, which ensure our buildings are as air-tight as possible). Steel is a great material for roofs: It’s generally made up to 90% recycled steel, and is recyclable in itself. It’s also super durable and long lasting, and reflects heat.
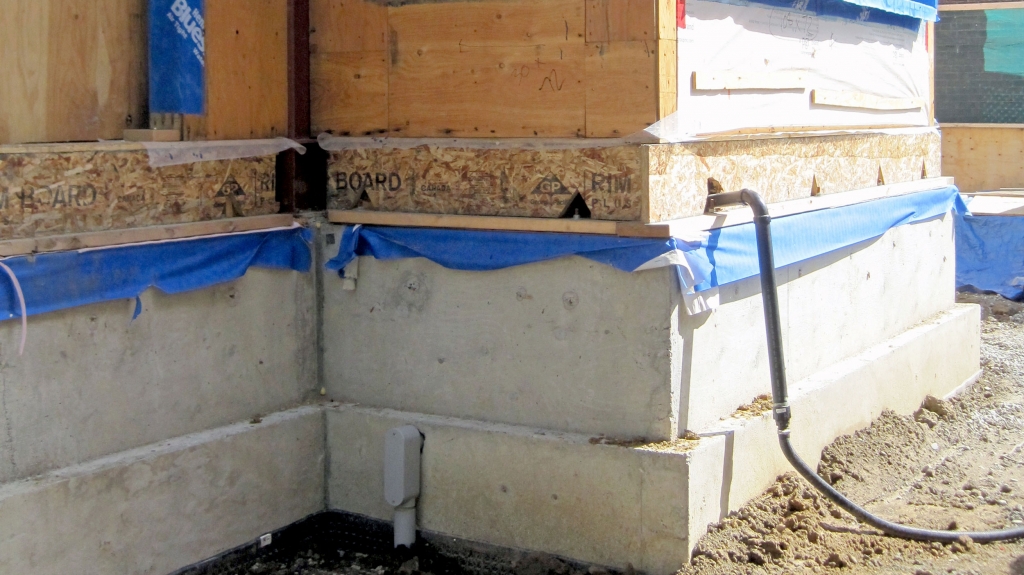
Our basement, the “boots”, then needed to be insulated, waterproofed and air-sealed. We waterproofed from the outside, by digging a trench around the house and using a dimpled drainage board and damproofing. We put our Blueskin membrane on the inside, again for redundancy, and then added the same amount of insulation as we did above grade. Under the basement slab, we installed weeping tiles, which collect moisture to send to the sump-pump, which pumps out to the back of the garden.
There you have it – a comprehensive, uber-technical explanation of an envelope, and now you’re caught up with everything we’re doing with our Edwardian Renovation. Stay tuned while we put in the mechanical systems that heat, cool, bring water and drain water on the insides of the house!
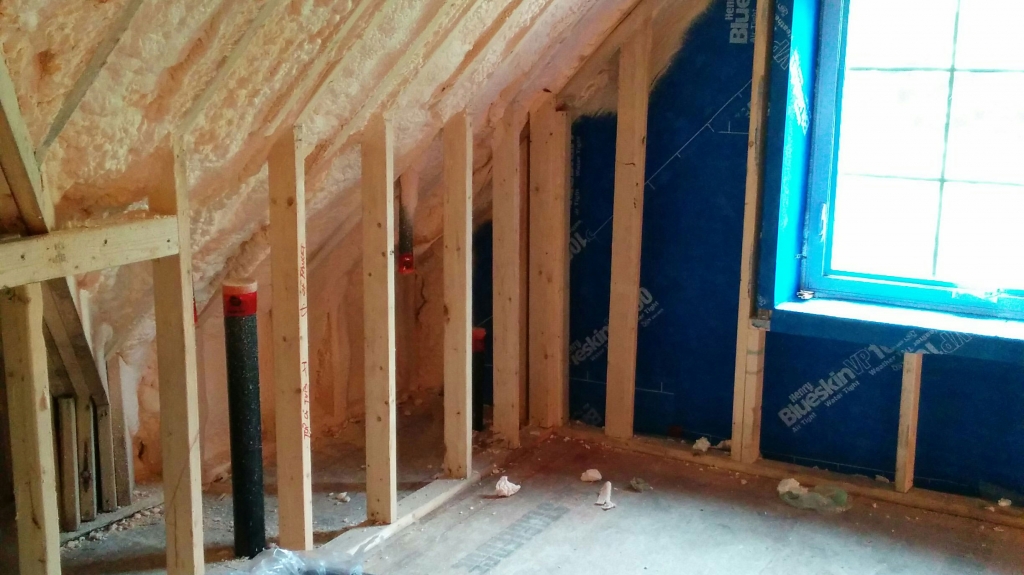
The Blower Door Challenge
We’ve talked before about pre-drywall Blower Door tests, and our affinity for them. You might also know that “Seal it tight” is a Solares motto – for a house to be truly high-performing, it has to be airtight! We decided to put our motto and love of Blower Door Tests to good use on this project.
As a refresher, here’s a brief explanation of blower door testing. A powerful variable-speed fan and pressure gauge is installed in an exterior door of the house, and all other exterior windows and doors are closed. The fan sucks air out of the house at a measured rate, which exaggerates any leaks in the air barrier so they can be felt by hand or seen with an infra-red camera or smoke puffer.
Shervin and Greg of Bluegreen Consulting Group set up our blower door test, and then they, along with Christine and Ed (our builder), went around the house, finding leaks and marking them with spray paint. Our client even helped too!
We used three different materials for our air barrier in different areas of the house: interior peel-and-stick Blueskin membrane on the existing brick walls and foundations, exterior Tyvek house wrap on the wood-framed addition, and closed-cell spray foam (which acts as vapour barrier, air barrier, and insulation) on the underside of the roof sheathing. Let’s see how they matched up against each other!
The most major leaks we found were located in the roof, where the spray foam couldn’t fit in the drafty holes between the roof and walls. The peel and stick membrane performed better and more consistently than the spray foam, but the spray foam had a more difficult job – the most difficult area to seal in a house is the roof, especially with the dips, holes and irregularities that inevitably occur where roof meets walls. Another leaky problem area was where the addition met the existing structure, and where the air barriers overlap, from the exterior face on the addition to the interior face on the original building.
We measured the ACH (Air Changes per Hour) of the house before hunting down our leaks. The house came up to 5 ACH – Our final project goal was to get under 2 ACH, so our work was cut out for us! After our builder and the spray foam installers sealed up all the leaks and micro leaks we had pinpointed, we tested our air barrier again and this time the result was ACH 2.3 – a huge improvement, and proof of how pre-drywall blower door tests are pivotal in creating a high-performance building envelope. Though a house’s structure may look fine, it’s amazing to see – and feel – how much a house can leak.
Thanks to our blower door tests, we were satisfied with our pre-drywall result – an air barrier you can trust won’t leave you out in the cold.
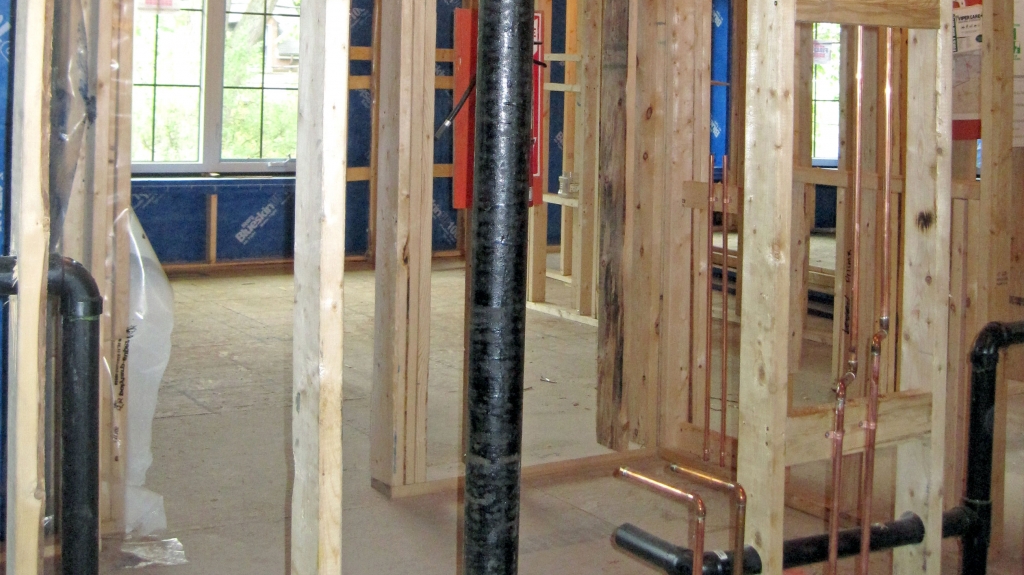
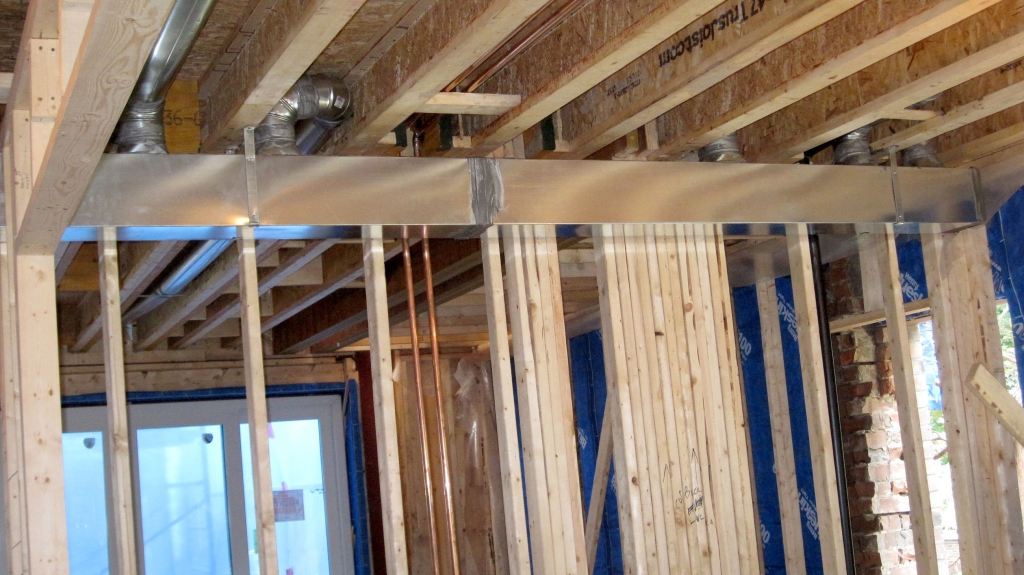
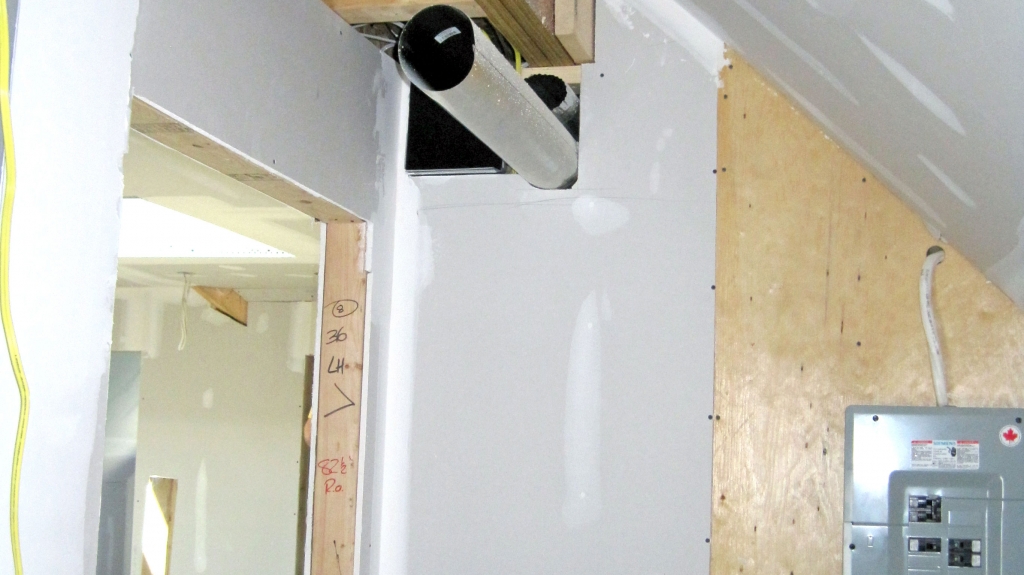
Our classy Edwardian Renovation project has received some equally classy heating and cooling systems. We’ve used conventional systems like forced air heating and air conditioning inside this building’s high performance envelope (thanks to our blower door tests!). The forced air heating system starts with a combination boiler, which heats water for domestic use and heating. The boiler’s pipework carries hot water to the heat exchanger in the Air Handling Unit (AHU) which in turn heats air. The fan in the AHU then blows the hot air through the house’s ductwork, delivering heat throughout the house. For efficiency, we have installed two AHUs: one in the basement, which serves the basement and main floor, and one in the third floor, which serves the second and third floors. Because of this house’s spacious floor plan, we wanted to make sure all floors were comfortable and had equal access to hot air. The AHU is also fitted with a humidifier which will prevent the house from getting too dry in the winter months. For our air conditioning, we’ve used an outdoor condenser unit, tied into the AHUs in the basement and on the third floor. To introduce fresh air and ventilation, we’ve installed an HRV unit as well. The HRV, air conditioning, and heating all utilize the same ductwork: that way heating, cooling, humidification, dehumidification, and fresh air are all distributed along the same path, eliminating the need for multiple or redundant ducts. The home’s fine fixtures bring a little old-school luxury to the space. Copper pipes and cast-iron drains take the place of contemporary PEX or plastic fixtures typical of contemporary renovations. Our client insisted on old-fashioned, elegant detail-work, and we were keen to oblige. Next comes this project’s stylized interiors, and we’ll of course keep you posted on all of the details!Edwardian Reno’s Elegant HVACGo To Project Page
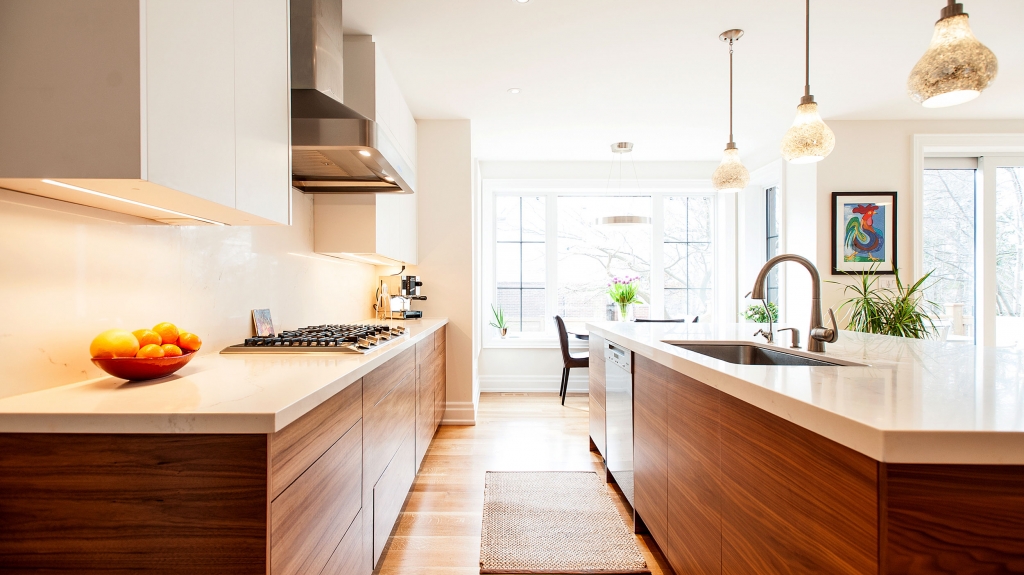
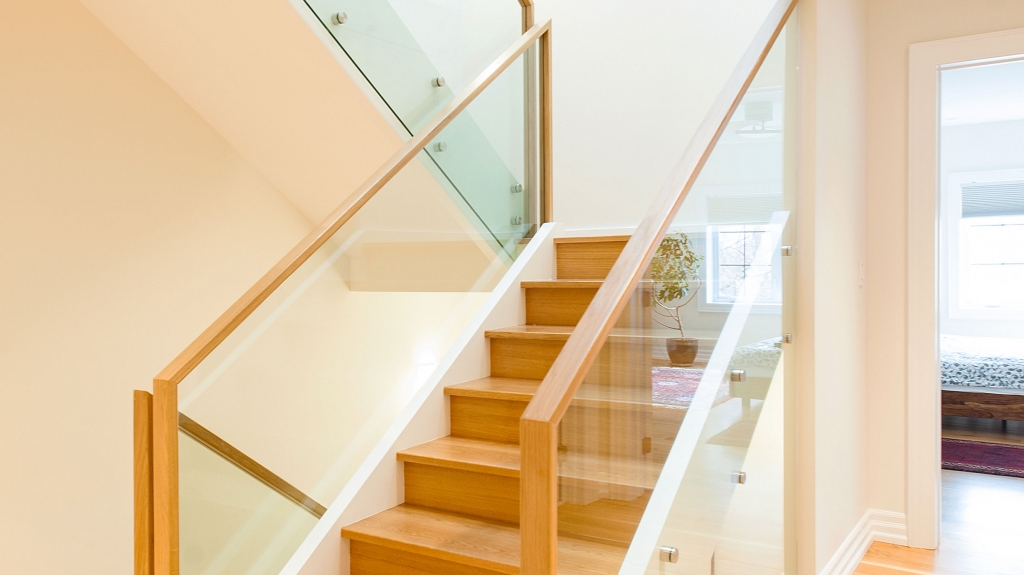
Choosing the interiors of a house is a bit like decorating homemade cookies: Sure, there’s still flour all over the counter, you spilled some sugar on the floor, and there are tons of dishes left to do. But the final step is in sight! Now comes the stage where the critical questions are dictated by aesthetic preferences and taste, not by structural soundness or stability. Edwardian Renovation’s sprinkles and icing are multiple and diverse, with myriad styles throughout all three levels and all wrapped up in a high performance envelope. The traditional dining room, living room, and foyer maintain a traditional, Edwardian aesthetic, with intricate trim and wood detailing. The mudroom hosts a solid walnut credenza, and a live-edge walnut bench. The other homage to the era is the third floor bathroom, with its vintage black-and-white tiles and a freestanding pedestal bath. The main floor’s powder room was kept simple, with a wallpapered niche opposite the door that can be changed up for less cost than a total re-paint. The open-concept and modern Great Room, located at the back of the house, has a more contemporary finish, with white glossy walnut kitchen cabinets. The solid, white oak flooring, which continues throughout the house, is made by Black Bear, a local company with a mill in Acton, ON. The stairs are also white oak, with an impressive modern glass railing. Our clients’ two children both have asthma, so the family wanted to be sure all plywood, furniture, countertops, and paints were made with as little VOC or formaldehyde as possible. Ikea uses no formaldehyde in their products, so we were luckily still able to use our favourite cabinetry in the kitchen, laundry room and pantry! The kids’ had their own say in their bedrooms upstairs, and each en-suite bathroom, though their features match, has an individual accent colour chosen by each of them. These upstairs bathrooms, including the master bathroom, are spa-like and serene, adorned with glass tile and limestone. This stately home is coming together beautifully, and it has the best of all style worlds. We’re excited to do the final clean-up and get the house ready for move-in day!Edwardian Reno’s Mix of Styles
Go To Project Page
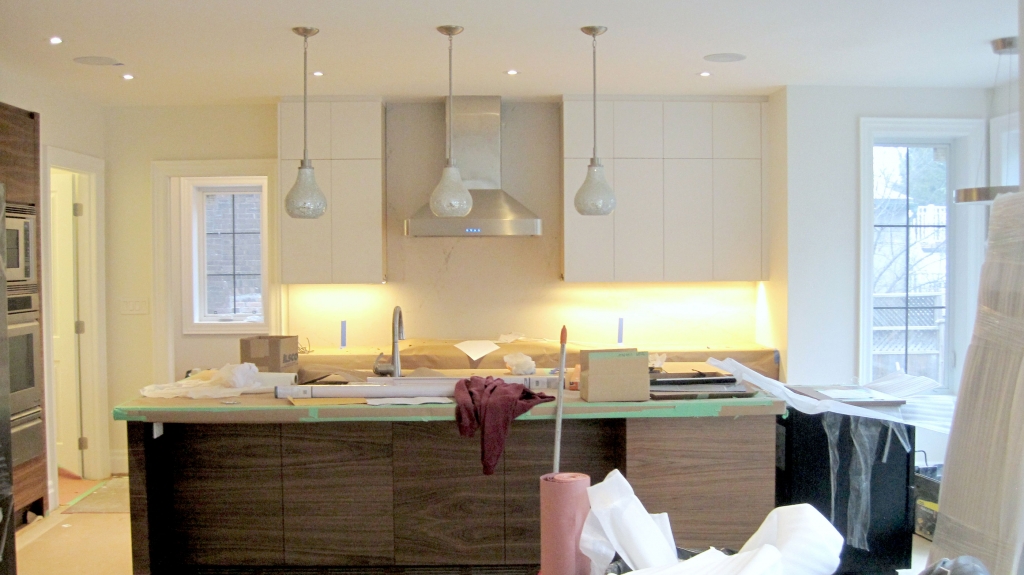
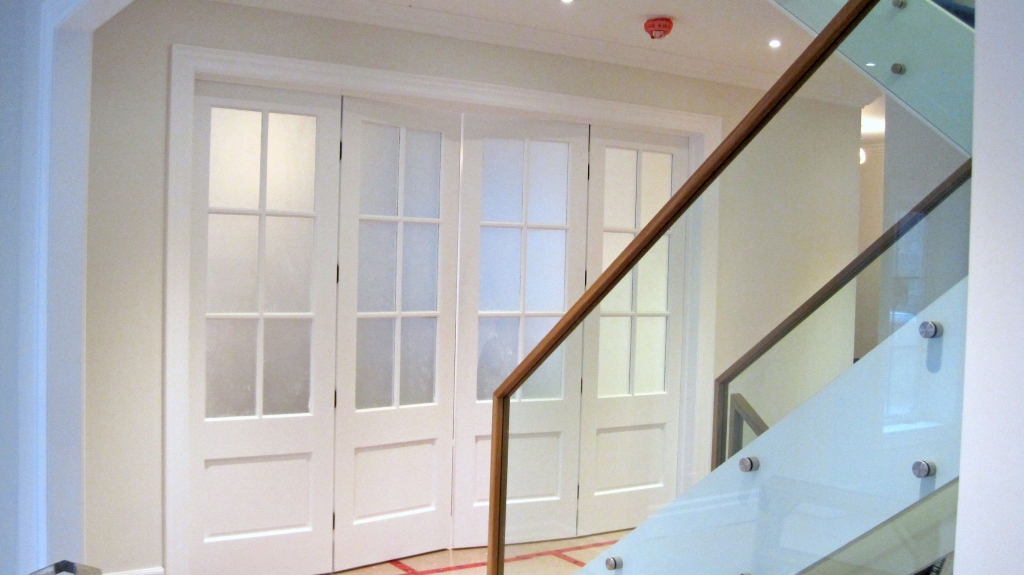
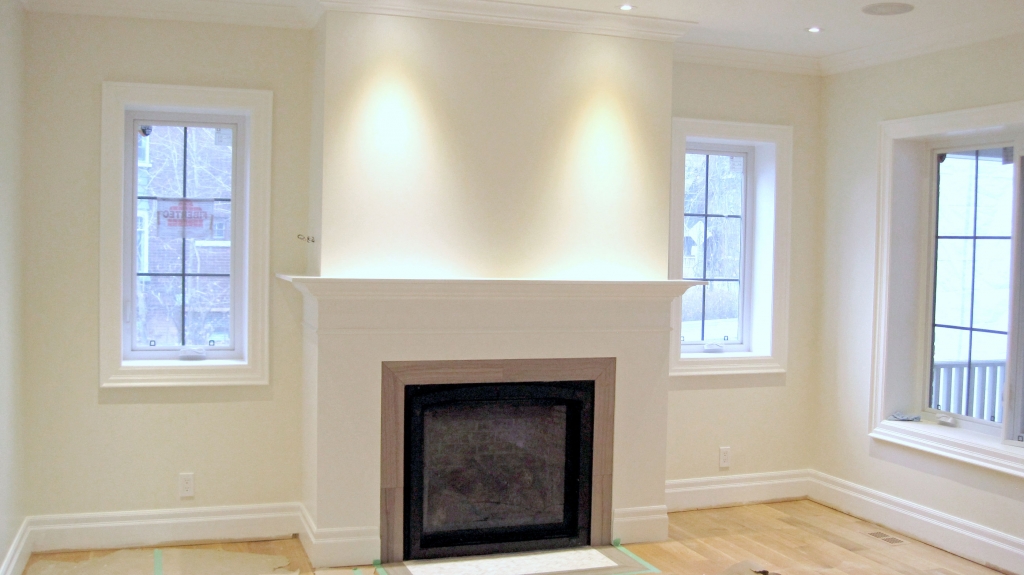
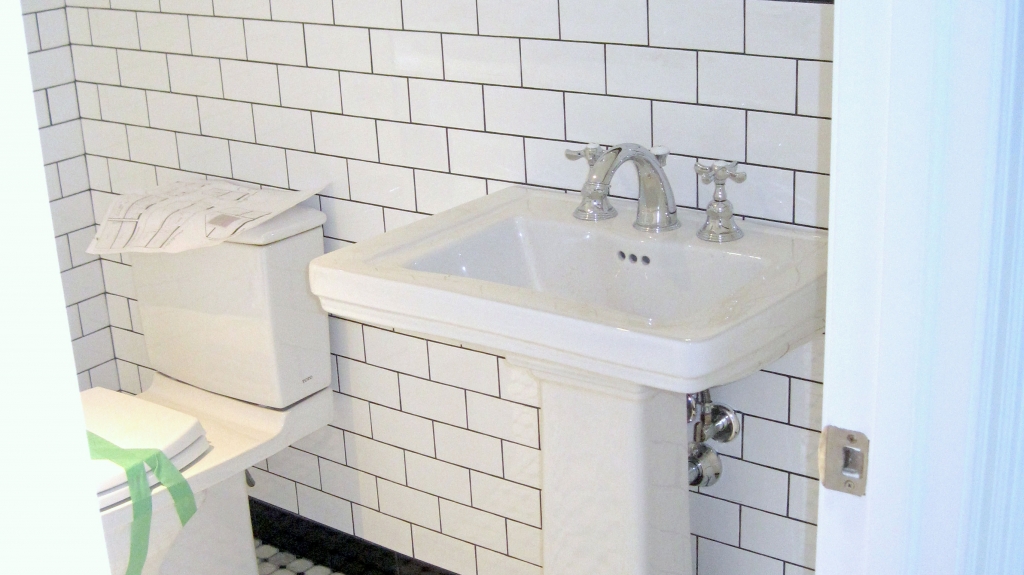
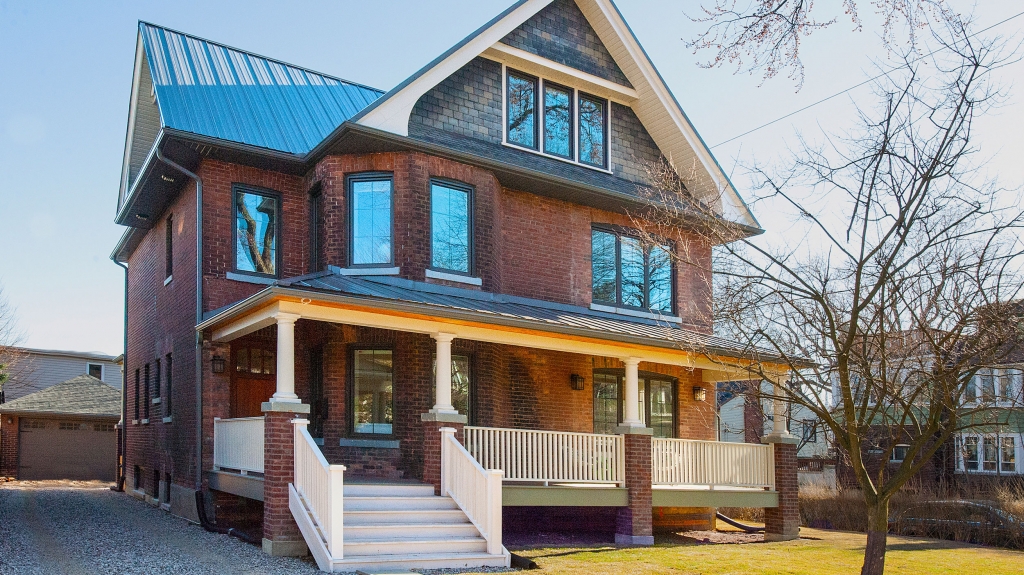
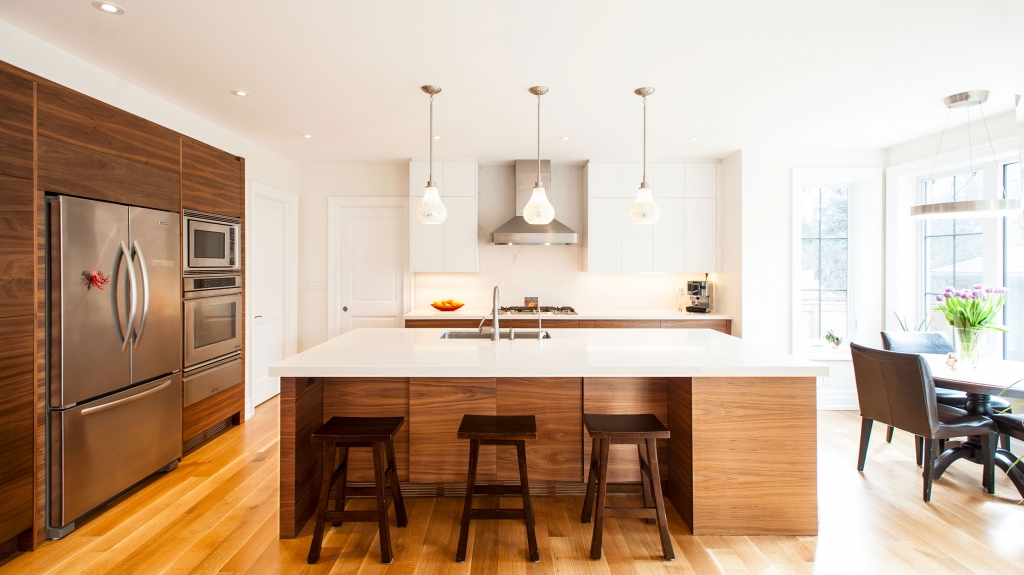
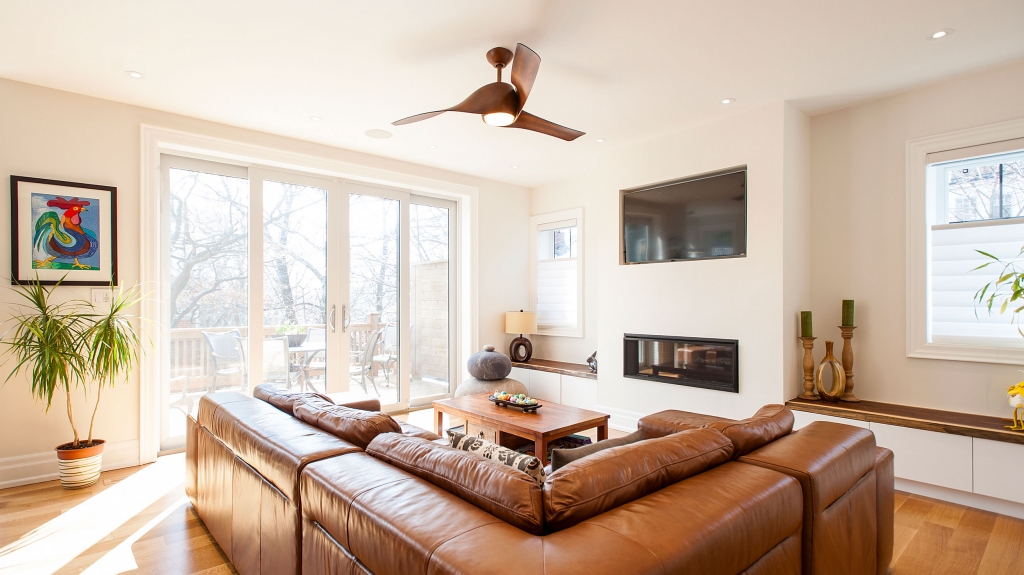
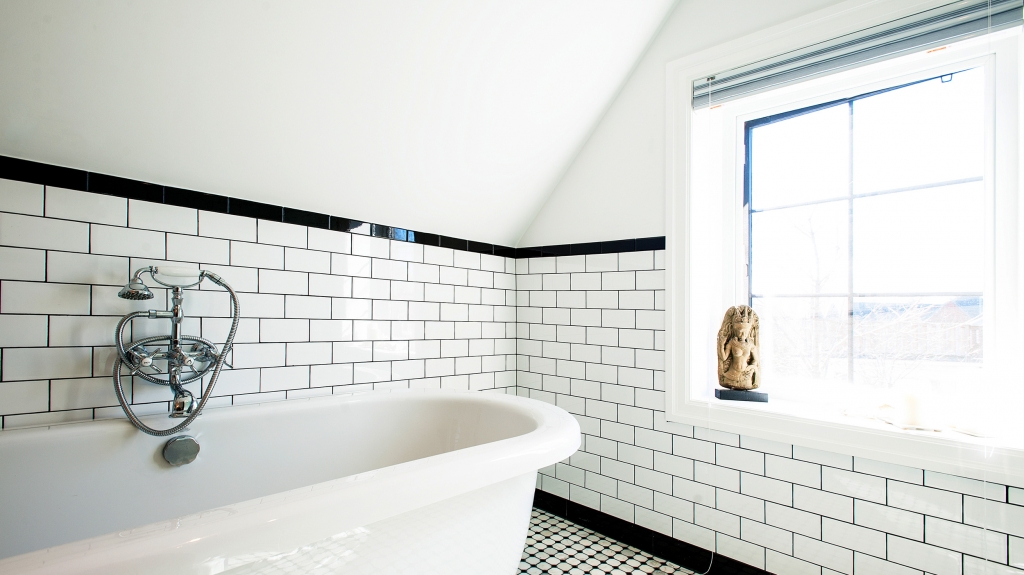
The long awaited Edwardian Renovation is finally finished! Our clients have filled it with gorgeous art, furniture and plenty of toys for the kids to play with in the basement. We are so happy with the results and are excited to show them off to all of you! The remix of contemporary and traditional styles throughout the home blends well to create a lively, modern feel. The formal sitting area, just beyond the front foyer has a snug, traditional feel, with a windowed enclave filled with a vintage chess table and two comfy wingback armchairs. The cozy fireplace is paired with cream couches and a warm and rustic woven rug. The central stacked staircase is a showstopper, with glass panels and white oak treads, risers and handrails. A western-facing dining room stands out to the side of the main stair. The dark circular table sits under a large chandelier and lush plants and artwork line the room. In the rear of the house, the gigantic kitchen island separates the kitchen from the less formal family sitting area and breakfast nook. The back deck sits just beyond, showcased through the large windows and set of sliding doors which fill the rear wall. Upstairs, the kids’ bedrooms – both with en-suite bathrooms! – reflect each child’s personality, with pale magenta and ice blue walls for her, and maps and sports paraphernalia for him. Also on the second floor sits the master bedroom. A hallway by the bed leads to the master bathroom with a freestanding tub, large steam shower and two sinks, effectively ending early morning sink-hogging. At the end of the hallway sits a stately walk-in closet with more than enough room for the couple’s wardrobe. The third floor consists of a large study with a balcony with views of Lake Ontario in the distance, a guest bedroom, and a bathroom. The third floor bathroom is a majorly retro and luxurious attraction, with small checkered tiles and gleaming chrome hardware on the white porcelain sink and freestanding bath.Final Reveal: Edwardian Renovation
Go To Project Page
Happy Client
Elyse Snyder, the project’s lead designer, did an amazing job working with our clients and our builders, Equinox Developments, to create the perfect house for our clients. Now, post-move in, we get to admire the personalized charm the family has endowed on this reno. We’re so happy their personalities are already shining through the three-storey estate.
Our client had such nice things to say about Solares and the whole renovation process that we just can’t help but share them!
“Solares recently helped us renovate our dilapidated Edwardian house become a functional, comfortable and contemporary family home, while still keeping the original look on the exterior. After interviewing a number of firms, Solares quickly became our first choice as we felt their priorities and philosophy was similar to ours and they practiced what they stood for. Christine, Elyse and the whole Solares team were knowledgeable, flexible, understood our needs, advised us well and were always pleasant to work with from the conceptual stage through to the final walkthrough. They supervised the execution of their design to meet their high standards in all areas, from energy efficiency to quality of workmanship for general trades. We couldn’t be more satisfied with the end product and are thankful for their attention to detail. We highly recommend Solares to anyone thinking of embarking on a renovation or new build. They will make the process enjoyable!”
This large renovation was a satisfying experience for both us and our clients – thank you to the family for the opportunity of making over such a large and beautiful home. Now it’s time for them to go enjoy their new energy efficient lives in Riverdale!
- + Intro
- Introducing the Edwardian Renovation
With construction underway, I’m excited to introduce to you our Edwardian Renovation Project! This project is interesting and unique in many ways, and we’re looking forward to upgrading this 1800s Toronto house into a sustainable, energy-efficient home.
Our clients, a family of four, were drawn to the house’s exterior appeal, yet the interiors lacked the open-concept aesthetic and functionality they wanted in their forever home. The exterior of the house, though old, had wonderful and unique elements characteristic of its age, like the double brick, load-bearing walls, which we wanted to keep intact as much as possible. The house sits on a corner lot, and the back faces south, boasting a beautiful view of downtown Toronto.
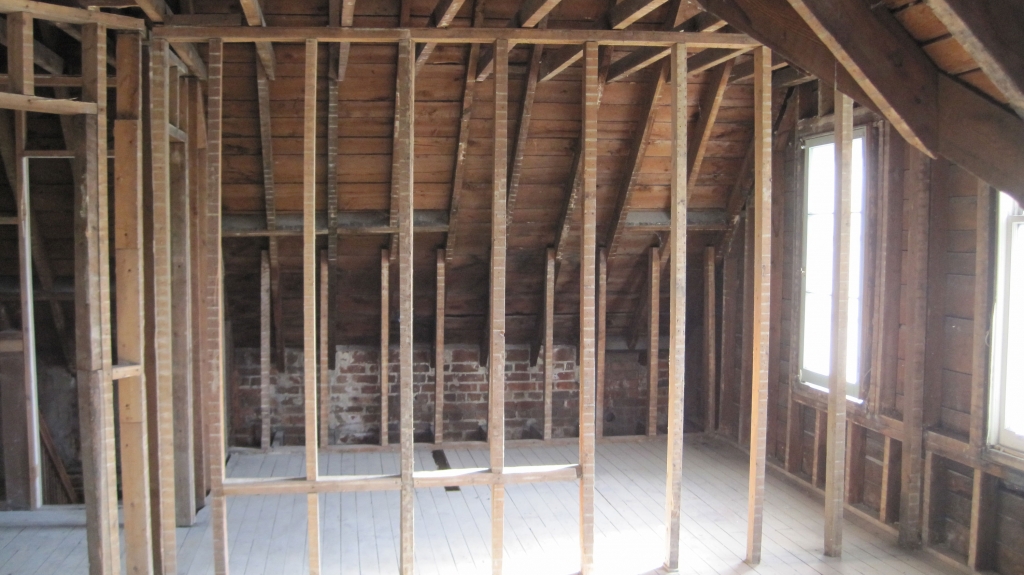
Before we began demolition, the interior was broken up into many different rooms and units, with multiple stairways crisscrossing the various zones of the house. Some areas of the house were only accessible in roundabout ways, which gave the house a multi-unit feel, even though it had not been used as one for years. The oppressive dark rooms, awkward stairways and an excess of doors sound ideal for a game of Hide-and-Seek, but might become frustrating and exhausting for long-term, day-to-day living. The house was really starting to show its age – a lack of upkeep, updating or any renovations over many years had caused the original condition to wear down drastically.
With our clients’ vision and collaboration, we started the project of turning this house into a bright and open single-family home, while maintaining its historical character and as much of the original detailing as possible.
I’ll be keeping you posted as renovations continue on this Edwardian home. When I return to this project in a few weeks’ time, I’ll fill you in on our ideas and design constraints (teaser: no use of spray-foam insulation!). Our plans for this big, beautiful building are ambitious, but what’s a worthwhile renovation without some juicy challenges?
Go To Project Page


- + Design
- Designing the Edwardian Renovation
Creating the floor plan is my favourite part of any design project. The work that goes into this critical stage is a unique combination of technical and creative, and a successful floor plan must be the perfect integration of our client’s needs and our expert design skills.
Before we sit down and design a comprehensive floor plan, our clients have homework to do! We ask them to complete a survey detailing their lifestyle and needs, as well as ask them to write about their perfect day in their new house, five years from now. This gives us the insight to build them a forever home they can enjoy now and for years to come. We want their house to not only look the part, but be functional and suited to their every need.
Our Edwardian Renovation was an interesting project to redesign. The grand building, three storeys high plus basement, gave us tons of space to work with, but the disjointed rooms and stairs made the interiors unwieldy and dark. We wanted to create a cohesive flow through the spaces, and give every room as much access to natural light as possible. Which brings us to our first challenge: The stairs.
Looking at the original layout, we found that it was hard to create an open, airy space while keeping all the crisscrossing stairways intact. Our proposal was to create one central stair which winds all the way from the basement to the third floor, acting as a vertical spine and linking all the levels together. At the top, two large skylights will allow natural light to cascade down to the floors below.
Our clients wanted the option of installing an elevator in the future. To us, it’s important that an elevator and stairs are designed so that they “land” in the same place on each floor. Our clients didn’t want to install an elevator immediately, so we proposed that the shaft be filled in with temporary floors on each level and that the spaces be used as large closets for now. No one ever complains about having too much storage space!
Another big plan we put forward to remove three old additions that were added onto the house at different times, squaring off the back wall, and building a new three-storey addition – the total length of the house remains the same so the backyard space will be preserved. This addition will add much needed space on the second and third floors and will provide easier access at the back of the home.
Go To Project Page
The Floor PlansFirst Floor: Preserving the classic, formal appeal of the original building was important to our clients, so we’ve located formal spaces (front foyer, living room and formal dining room) at the front of the house on the first floor, which pairs nicely with the building’s traditional façade, front porch, and smaller windows. We’ve placed the more casual, open-concept kitchen and family room at the back of the house, and we’ll be adding large windows and doors on the south and west facades. The back patio leads off the family room, and off the kitchen is a walk-in pantry and mud room, with a door to the driveway. This back entry will be useful for unloading groceries from the car and getting kids out the door on school days.
Second Floor: The master bedroom and the two children’s bedrooms will be located on the second floor. To avoid sibling rivalry, we always try to make children’s bedrooms as equal as we can, but because of the original design of this house, one lucky kid gets the bedroom with the turret! The rooms are the same size, and each has lots of closet space and its own en-suite bathroom. The master bedroom sits at the back of the house with large windows on the south and a small sitting nook with a corner window. The luxurious master bathroom has a steam shower, separate toilet, flanking sinks and large soaker tub under south facing windows. Beyond the master bathroom is a large dressing room with built-in wardrobes and its own window.
Third Floor: The third floor hosts a room under each gable of the roof: a guest bedroom at the front of the house, a guest bathroom at the west, mechanical room on the east, and a home office at the back. A balcony opens off the office, boasting incredible views of the city.
Finally – let’s talk about the finished basement! We wanted the basement to have everything an independent apartment would, for possible future renters, short-term visitors, long-term guests, or a teenager’s paradise a few years down the line. It also has a large family room, exercise room, guest suite and wine cellar.
Underpinning the basement to create 9’ ceiling heights was a must. We wanted the basement to have as much natural light as possible, but the front porch and back deck, which span the width of the house, make that a challenge. To overcome that we’ve located large windows on the west façade and located the family room, exercise room and guest suite along that façade. In the darker spaces of the basement are the wine cellar, storage and mechanical rooms.
Once we’re finished, this Edwardian home will be beautiful, spacious, and bright. Every room will have tons of natural light, good flow, and the whole home will fit together seamlessly. In the next posts, I’ll update you on the demolition and structural work required to make this Edwardian dream home a reality. We can’t wait to see this project through to completion!
- + Structure
- One Less Wall
With permits in hand, we’ve started construction, which means mud, hard hats, and huge structural changes.
We’ve been ambitious with this house: we’ve underpinned the basement, gutted the entire interior and removed the old, wonky rear additions completely, replacing them with a large, cohesive 3-storey addition Our builders, Equinox Developments, are very capable when it comes to these kinds of major renovations and additions. Working closely with Ed Kucab, the site supervisor, and Susan Hunter, the project manager, we felt confident to take on such a complicated and challenging project. One of the biggest challenges: taking off the back of the house.
Ever wonder how to safely rip off the back wall of a house? When you remove a load-bearing wall during construction, the entire structure becomes unstable. The weight of the roof (and any upper storeys) becomes unevenly distributed between the remaining three walls, and with no anchoring rear wall, the side walls can buckle from the weight.
In order to keep the house from collapsing, Equinox had to reinforce the structure with long steel rods, which run the entire width of the house on all three levels, helping keep the side walls from buckling outward. Eventually, these rods will be replaced with a steel moment frame, buried within the framing of the new addition at the back of the house which will transfer lateral loads to the foundations. The moment frame will also allow the house’s new back wall to be mostly windows and doors. After the steel rods were in place, Equinox built a temporary rear wall with wood studs and plastic to keep weather out while working on the interior.
Go To Project Page


 One New Basement
Without a rear wall, we had space to drive a bobcat right down into the basement through the backyard, which helped with removing the existing basement floor, excavating, and underpinning. We wanted the finished basement ceilings at 9 feet, about three feet taller than the original ceiling height. But under the new 4” concrete slab that would make up the new basement floor, we needed 4 inches of insulation and 4 inches of gravel for drainage and waterproofing. So we ended up excavating down 4 feet from the original floor level. We used the same “keyhole method” of underpinning we used in Tom and Christine’s house, where concrete is poured into small openings in the forms, filling up the space between the bottom of the existing foundation wall and the footing location.
In addition to the underpinning, another structural feat was sistering all the existing floor joists. These joists were old, undersized and most had been damaged during previous renovations. “Sistering” means scabbing a second joist onto the existing wooden joists down the entire length of the floor. Every single new joist had to be carefully fitted and nailed into place.
As if this demolition process wasn’t challenging enough – we had to be extra careful around all the mature trees on the lot, and we weren’t just morally obliged to keep them safe – they’re protected legally due to the City of Toronto’s Tree Protection Zones, which ensure that no construction, storage of construction materials, parked vehicles, machinery, or digging take place in the vicinity of protected trees. Luckily, we hate hurting trees so were happy to oblige the tough task.
Next time I’ll go into more detail about the envelope of the house, including our choice of insulation and air-barrier strategy. We’ve avoided spray foam insulation, due to our client’s wishes, and instead opted for an avant-garde alternative which we’ll be applying to the interior of the brick. Stay tuned!
- + Envelope
- The Envelope
We’ve installed Edwardian Renovation’s main envelope components – some in typical Solares fashion, others in unique ways suited to our client. There are lots of components that make up a building’s “envelope”, so before I explain this project’s unique details, I’m going to give you a crash course on all things envelope.
Let’s pretend our house is a person. Their jacket (walls), hood (roof), and rubber boots (basement) protect them from the outside elements and keep their body warm and dry – that’s if it’s high quality outerwear! But, if their coat has holes, or their rubber boots aren’t waterproof, that outerwear will be ineffective. For a house, this means it would be drafty and inefficient.
The envelope, just like a jacket, is everything that protects the structure from the outside elements: it’s the wall cladding, air barrier, vapour barrier, insulation, as well as the roof and the basement insulation, drainage and waterproofing. All of those put together keep the home warm, dry and efficient.
Go To Project Page


 Edwardian Reno’s “Jacket”!
This was a complicated project not only because of its huge size, but for the insulation method we used on our load-bearing brick. Our clients were adamant that we avoid spray foam, due to personal concerns about its production and installation method. Even though foam does have a larger environmental impact than other insulations, it’s useful because it acts as both an air barrier and vapour barrier and has a much higher R-value (the capacity per inch to resist heat flow) than other forms of insulation. But we always respect our client’s wishes, and never turn down an opportunity to learn or try something new.
For our air barrier, we used a Henry Bakor membrane called Blueskin VP100. This material can be either spray-applied or stuck on in sheets to the surface of the brick. Equinox’s crew opted for the peel-and-stick sheets because the spray option couldn’t adhere to the brick properly in cold weather. This product is vapour open and air closed, which means it stops outside air from coming in and inside air from escaping, but allows moisture to escape. We installed a plastic sheet on the warm side of the insulation (just behind the drywall) to act as a vapour barrier to keep out most of the moisture, but we wanted to be sure that any moisture that does get trapped in the wall cavity can escape.
To insulate, we used a combination of Roxul products: mineral wool insulation made from rock slag, a by-product from the mining industry. Being a post-industrial product, it uses very little production waste and energy. Tight against the Blueskin air barrier is three inches of semi-rigid Roxul comfort boards, nailed right into the brick. Next is three and a half inches of Roxul batt between the 2×4 studs (at 24” on center instead of the usual 16”), followed by our conventional 6-mil, polyethylene vapour barrier to keep moisture out.
Installing the Blueskin was challenging, especially in such a complicated renovation. For it to be an airtight, efficient air barrier, it has to be seamlessly applied EVERYWHERE, from the roof right down to the footings. But wooden joists, small hard-to-reach corners, floorboards, and general bumps and irregularities are typical in an existing reno. It was a hard and painstaking job for Equinox’s crew to install seamlessly, but they did it!
We also altered the envelope of the rear addition to better suit its stick-frame construction. We placed our air barrier on the outside of the sheathing, and outside of that we added three inches of Roxul Board. As opposed to our existing structure, our air barrier on the rear addition is protected by insulation on the outside. We also allowed for a one-inch air space before the brick veneer, and the one layer of bricks acts as a rain screen. On the inside sits three and half inches of Roxul Batts, then the standard 6-mil poly sheet.
For the windows we used double-glazed, fiberglass framed units from Fibertec, a company from Concord that we have worked with on many occasions. We had to make sure our Blueskin was folded up and over the openings, to create an air-tight seal during installation.
The “Hood” and “Boots”
We wanted to apply the same principles to the roof that we used on the walls, because isn’t a roof just a horizontal wall? Unfortunately, the building permit office didn’t see it that way and rejected our original design. Since it wasn’t a vented roof, it was not an already proven condition for a roof assembly. We could have applied for an official altering of the building code, but the red-tape of a building code amendment can be extremely time-consuming and costly. So, in the interests of keeping the project moving, our client allowed us to use 8 inches of spray foam on the roof.We also added Blueskin as a redundant layer over the roof sheathing and underneath the standing-seam steel roof (Solares loves back-up plans, which ensure our buildings are as air-tight as possible). Steel is a great material for roofs: It’s generally made up to 90% recycled steel, and is recyclable in itself. It’s also super durable and long lasting, and reflects heat.
Our basement, the “boots”, then needed to be insulated, waterproofed and air-sealed. We waterproofed from the outside, by digging a trench around the house and using a dimpled drainage board and damproofing. We put our Blueskin membrane on the inside, again for redundancy, and then added the same amount of insulation as we did above grade. Under the basement slab, we installed weeping tiles, which collect moisture to send to the sump-pump, which pumps out to the back of the garden.
There you have it – a comprehensive, uber-technical explanation of an envelope, and now you’re caught up with everything we’re doing with our Edwardian Renovation. Stay tuned while we put in the mechanical systems that heat, cool, bring water and drain water on the insides of the house!


 The Blower Door Challenge
We’ve talked before about pre-drywall Blower Door tests, and our affinity for them. You might also know that “Seal it tight” is a Solares motto – for a house to be truly high-performing, it has to be airtight! We decided to put our motto and love of Blower Door Tests to good use on this project.
As a refresher, here’s a brief explanation of blower door testing. A powerful variable-speed fan and pressure gauge is installed in an exterior door of the house, and all other exterior windows and doors are closed. The fan sucks air out of the house at a measured rate, which exaggerates any leaks in the air barrier so they can be felt by hand or seen with an infra-red camera or smoke puffer.
Shervin and Greg of Bluegreen Consulting Group set up our blower door test, and then they, along with Christine and Ed (our builder), went around the house, finding leaks and marking them with spray paint. Our client even helped too!
We used three different materials for our air barrier in different areas of the house: interior peel-and-stick Blueskin membrane on the existing brick walls and foundations, exterior Tyvek house wrap on the wood-framed addition, and closed-cell spray foam (which acts as vapour barrier, air barrier, and insulation) on the underside of the roof sheathing. Let’s see how they matched up against each other!
The most major leaks we found were located in the roof, where the spray foam couldn’t fit in the drafty holes between the roof and walls. The peel and stick membrane performed better and more consistently than the spray foam, but the spray foam had a more difficult job – the most difficult area to seal in a house is the roof, especially with the dips, holes and irregularities that inevitably occur where roof meets walls. Another leaky problem area was where the addition met the existing structure, and where the air barriers overlap, from the exterior face on the addition to the interior face on the original building.
We measured the ACH (Air Changes per Hour) of the house before hunting down our leaks. The house came up to 5 ACH – Our final project goal was to get under 2 ACH, so our work was cut out for us! After our builder and the spray foam installers sealed up all the leaks and micro leaks we had pinpointed, we tested our air barrier again and this time the result was ACH 2.3 – a huge improvement, and proof of how pre-drywall blower door tests are pivotal in creating a high-performance building envelope. Though a house’s structure may look fine, it’s amazing to see – and feel – how much a house can leak.
Thanks to our blower door tests, we were satisfied with our pre-drywall result – an air barrier you can trust won’t leave you out in the cold.
- + Systems
- Edwardian Reno’s Elegant HVAC
Our classy Edwardian Renovation project has received some equally classy heating and cooling systems. We’ve used conventional systems like forced air heating and air conditioning inside this building’s high performance envelope (thanks to our blower door tests!).
The forced air heating system starts with a combination boiler, which heats water for domestic use and heating. The boiler’s pipework carries hot water to the heat exchanger in the Air Handling Unit (AHU) which in turn heats air. The fan in the AHU then blows the hot air through the house’s ductwork, delivering heat throughout the house. For efficiency, we have installed two AHUs: one in the basement, which serves the basement and main floor, and one in the third floor, which serves the second and third floors. Because of this house’s spacious floor plan, we wanted to make sure all floors were comfortable and had equal access to hot air. The AHU is also fitted with a humidifier which will prevent the house from getting too dry in the winter months.
For our air conditioning, we’ve used an outdoor condenser unit, tied into the AHUs in the basement and on the third floor. To introduce fresh air and ventilation, we’ve installed an HRV unit as well. The HRV, air conditioning, and heating all utilize the same ductwork: that way heating, cooling, humidification, dehumidification, and fresh air are all distributed along the same path, eliminating the need for multiple or redundant ducts.
The home’s fine fixtures bring a little old-school luxury to the space. Copper pipes and cast-iron drains take the place of contemporary PEX or plastic fixtures typical of contemporary renovations. Our client insisted on old-fashioned, elegant detail-work, and we were keen to oblige.
Next comes this project’s stylized interiors, and we’ll of course keep you posted on all of the details!
Go To Project Page


- + Interiors
- Edwardian Reno’s Mix of Styles
Choosing the interiors of a house is a bit like decorating homemade cookies: Sure, there’s still flour all over the counter, you spilled some sugar on the floor, and there are tons of dishes left to do. But the final step is in sight! Now comes the stage where the critical questions are dictated by aesthetic preferences and taste, not by structural soundness or stability.
Edwardian Renovation’s sprinkles and icing are multiple and diverse, with myriad styles throughout all three levels and all wrapped up in a high performance envelope.
The traditional dining room, living room, and foyer maintain a traditional, Edwardian aesthetic, with intricate trim and wood detailing. The mudroom hosts a solid walnut credenza, and a live-edge walnut bench. The other homage to the era is the third floor bathroom, with its vintage black-and-white tiles and a freestanding pedestal bath. The main floor’s powder room was kept simple, with a wallpapered niche opposite the door that can be changed up for less cost than a total re-paint.
The open-concept and modern Great Room, located at the back of the house, has a more contemporary finish, with white glossy walnut kitchen cabinets. The solid, white oak flooring, which continues throughout the house, is made by Black Bear, a local company with a mill in Acton, ON. The stairs are also white oak, with an impressive modern glass railing.
Our clients’ two children both have asthma, so the family wanted to be sure all plywood, furniture, countertops, and paints were made with as little VOC or formaldehyde as possible. Ikea uses no formaldehyde in their products, so we were luckily still able to use our favourite cabinetry in the kitchen, laundry room and pantry!
The kids’ had their own say in their bedrooms upstairs, and each en-suite bathroom, though their features match, has an individual accent colour chosen by each of them. These upstairs bathrooms, including the master bathroom, are spa-like and serene, adorned with glass tile and limestone.
This stately home is coming together beautifully, and it has the best of all style worlds. We’re excited to do the final clean-up and get the house ready for move-in day!
Go To Project Page


- + Reveal
- Final Reveal: Edwardian Renovation
The long awaited Edwardian Renovation is finally finished! Our clients have filled it with gorgeous art, furniture and plenty of toys for the kids to play with in the basement. We are so happy with the results and are excited to show them off to all of you!
The remix of contemporary and traditional styles throughout the home blends well to create a lively, modern feel. The formal sitting area, just beyond the front foyer has a snug, traditional feel, with a windowed enclave filled with a vintage chess table and two comfy wingback armchairs. The cozy fireplace is paired with cream couches and a warm and rustic woven rug.
The central stacked staircase is a showstopper, with glass panels and white oak treads, risers and handrails. A western-facing dining room stands out to the side of the main stair. The dark circular table sits under a large chandelier and lush plants and artwork line the room.
In the rear of the house, the gigantic kitchen island separates the kitchen from the less formal family sitting area and breakfast nook. The back deck sits just beyond, showcased through the large windows and set of sliding doors which fill the rear wall.
Upstairs, the kids’ bedrooms – both with en-suite bathrooms! – reflect each child’s personality, with pale magenta and ice blue walls for her, and maps and sports paraphernalia for him. Also on the second floor sits the master bedroom. A hallway by the bed leads to the master bathroom with a freestanding tub, large steam shower and two sinks, effectively ending early morning sink-hogging. At the end of the hallway sits a stately walk-in closet with more than enough room for the couple’s wardrobe.
The third floor consists of a large study with a balcony with views of Lake Ontario in the distance, a guest bedroom, and a bathroom. The third floor bathroom is a majorly retro and luxurious attraction, with small checkered tiles and gleaming chrome hardware on the white porcelain sink and freestanding bath.
Go To Project Page


 Happy Client
Elyse Snyder, the project’s lead designer, did an amazing job working with our clients and our builders, Equinox Developments, to create the perfect house for our clients. Now, post-move in, we get to admire the personalized charm the family has endowed on this reno. We’re so happy their personalities are already shining through the three-storey estate.
Our client had such nice things to say about Solares and the whole renovation process that we just can’t help but share them!
“Solares recently helped us renovate our dilapidated Edwardian house become a functional, comfortable and contemporary family home, while still keeping the original look on the exterior. After interviewing a number of firms, Solares quickly became our first choice as we felt their priorities and philosophy was similar to ours and they practiced what they stood for. Christine, Elyse and the whole Solares team were knowledgeable, flexible, understood our needs, advised us well and were always pleasant to work with from the conceptual stage through to the final walkthrough. They supervised the execution of their design to meet their high standards in all areas, from energy efficiency to quality of workmanship for general trades. We couldn’t be more satisfied with the end product and are thankful for their attention to detail. We highly recommend Solares to anyone thinking of embarking on a renovation or new build. They will make the process enjoyable!”
This large renovation was a satisfying experience for both us and our clients – thank you to the family for the opportunity of making over such a large and beautiful home. Now it’s time for them to go enjoy their new energy efficient lives in Riverdale!

