SHARE THIS
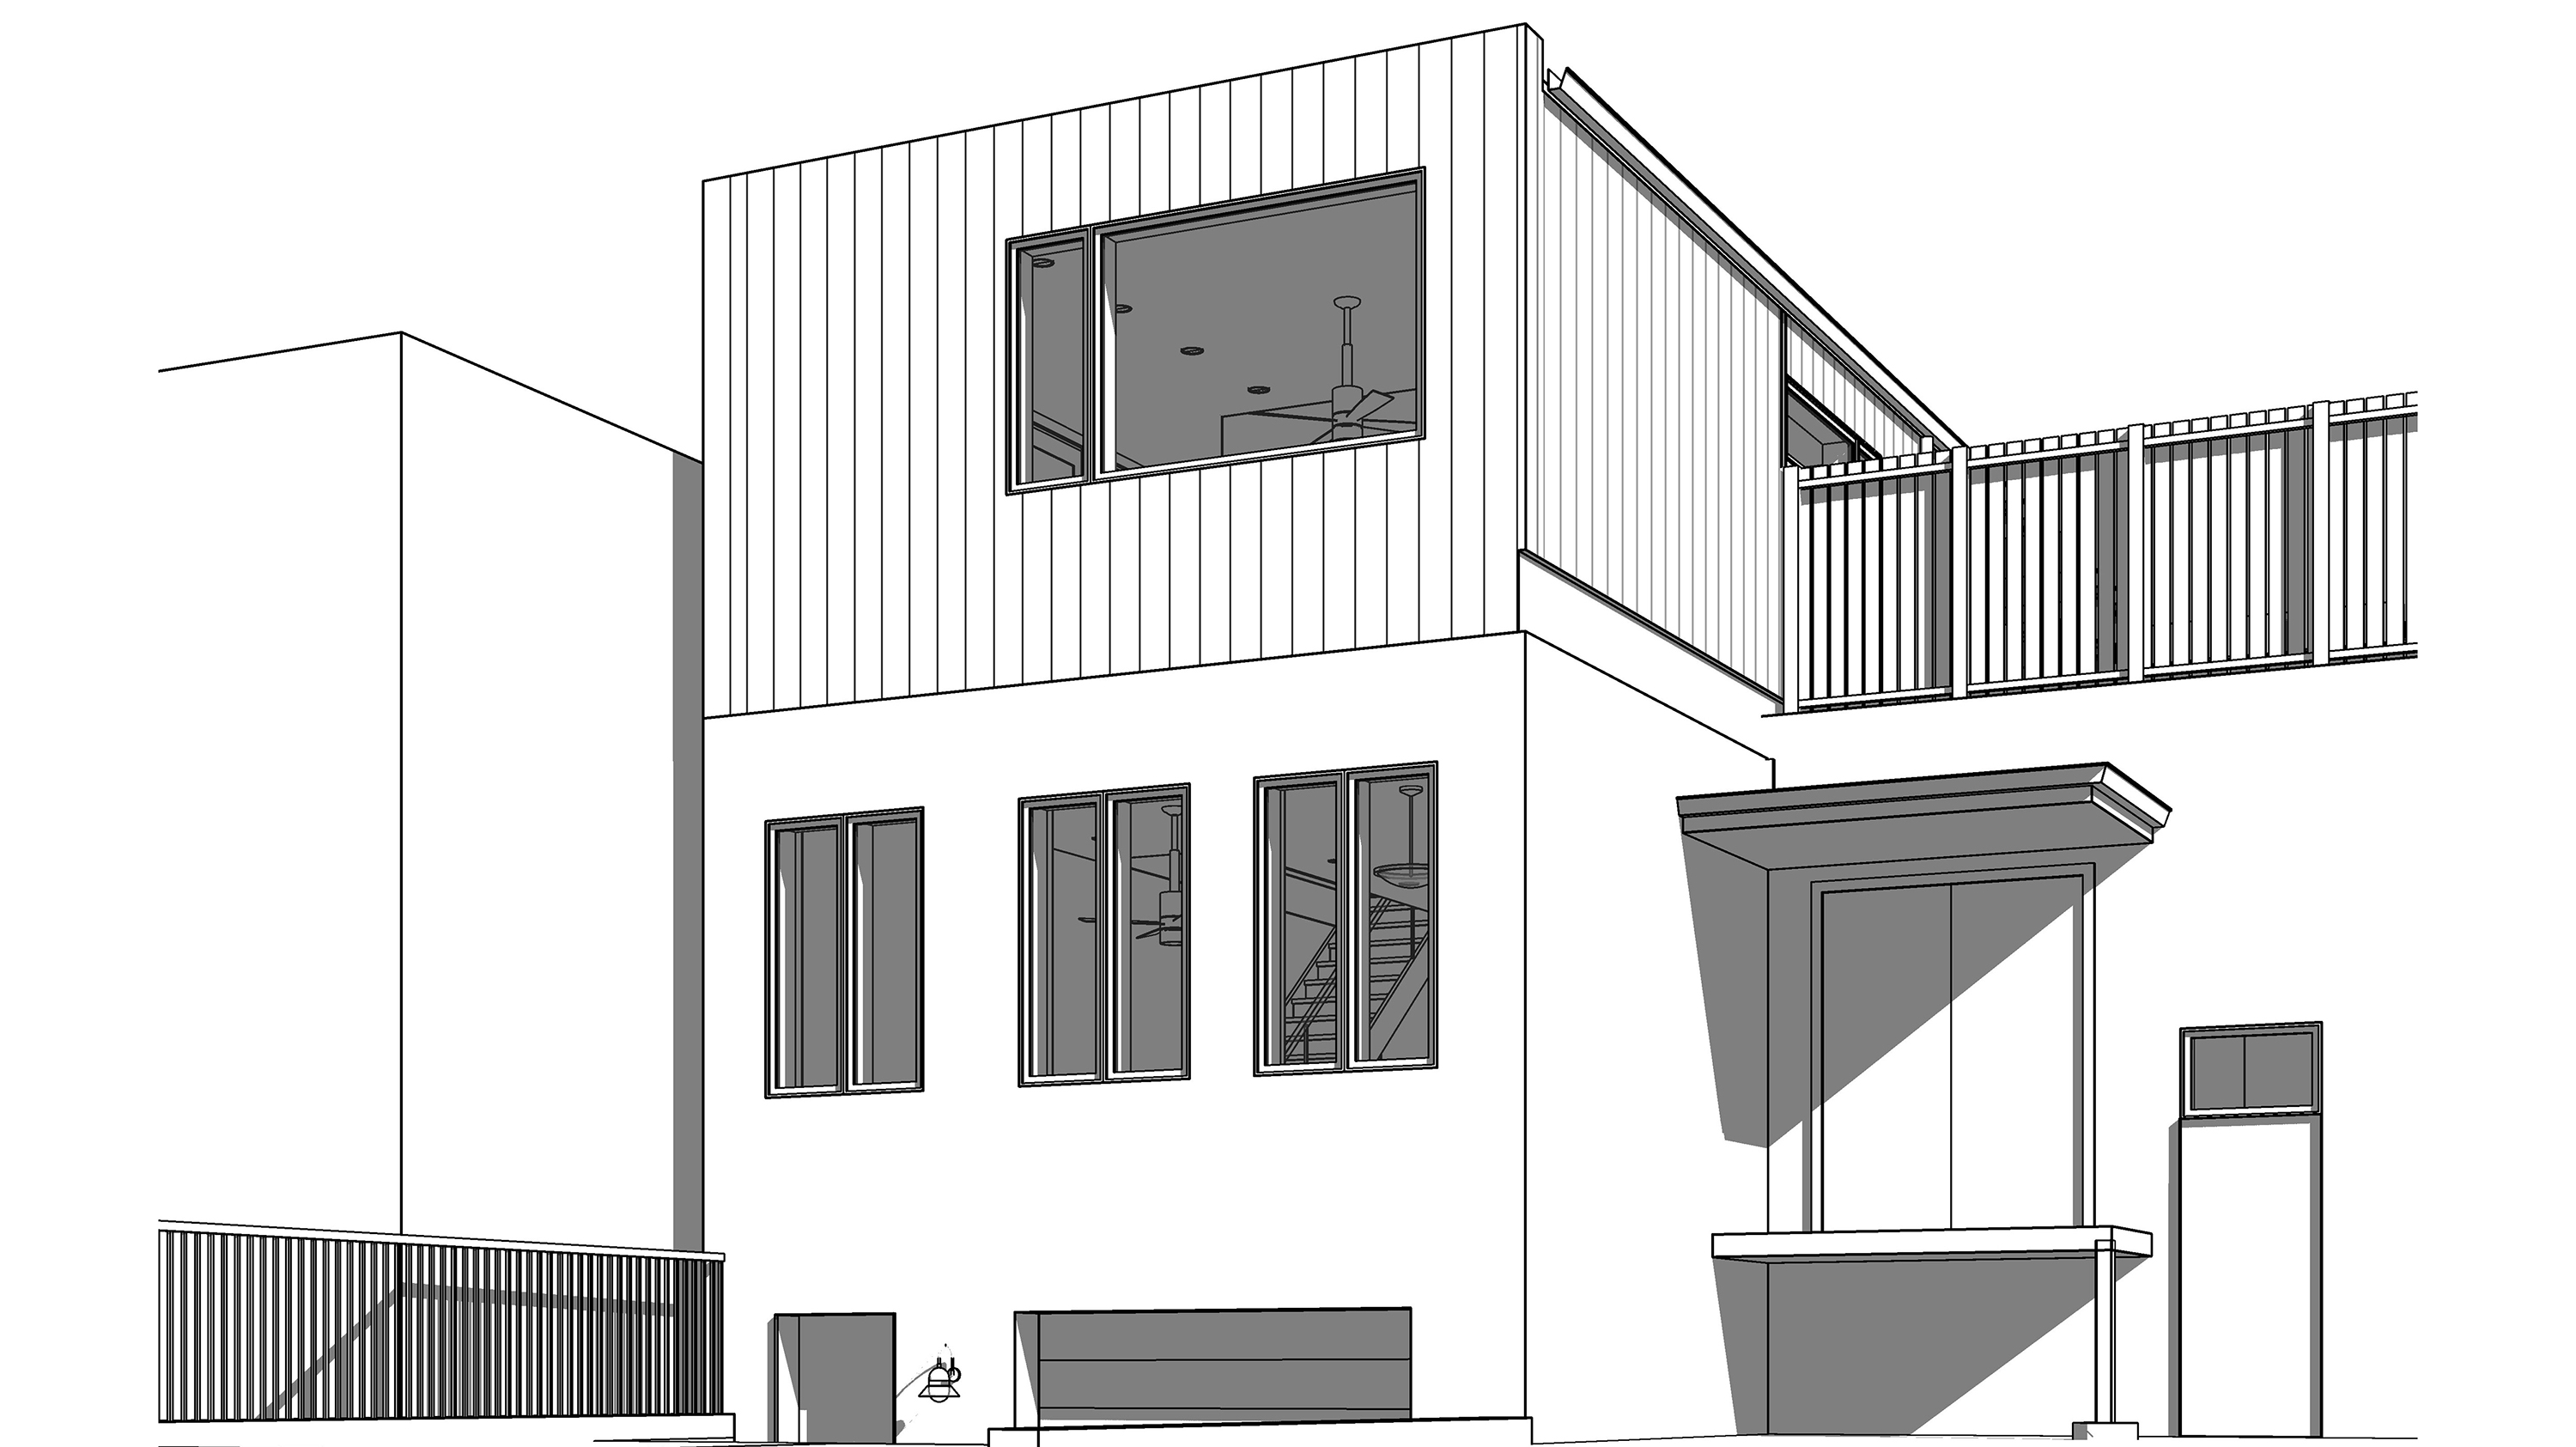
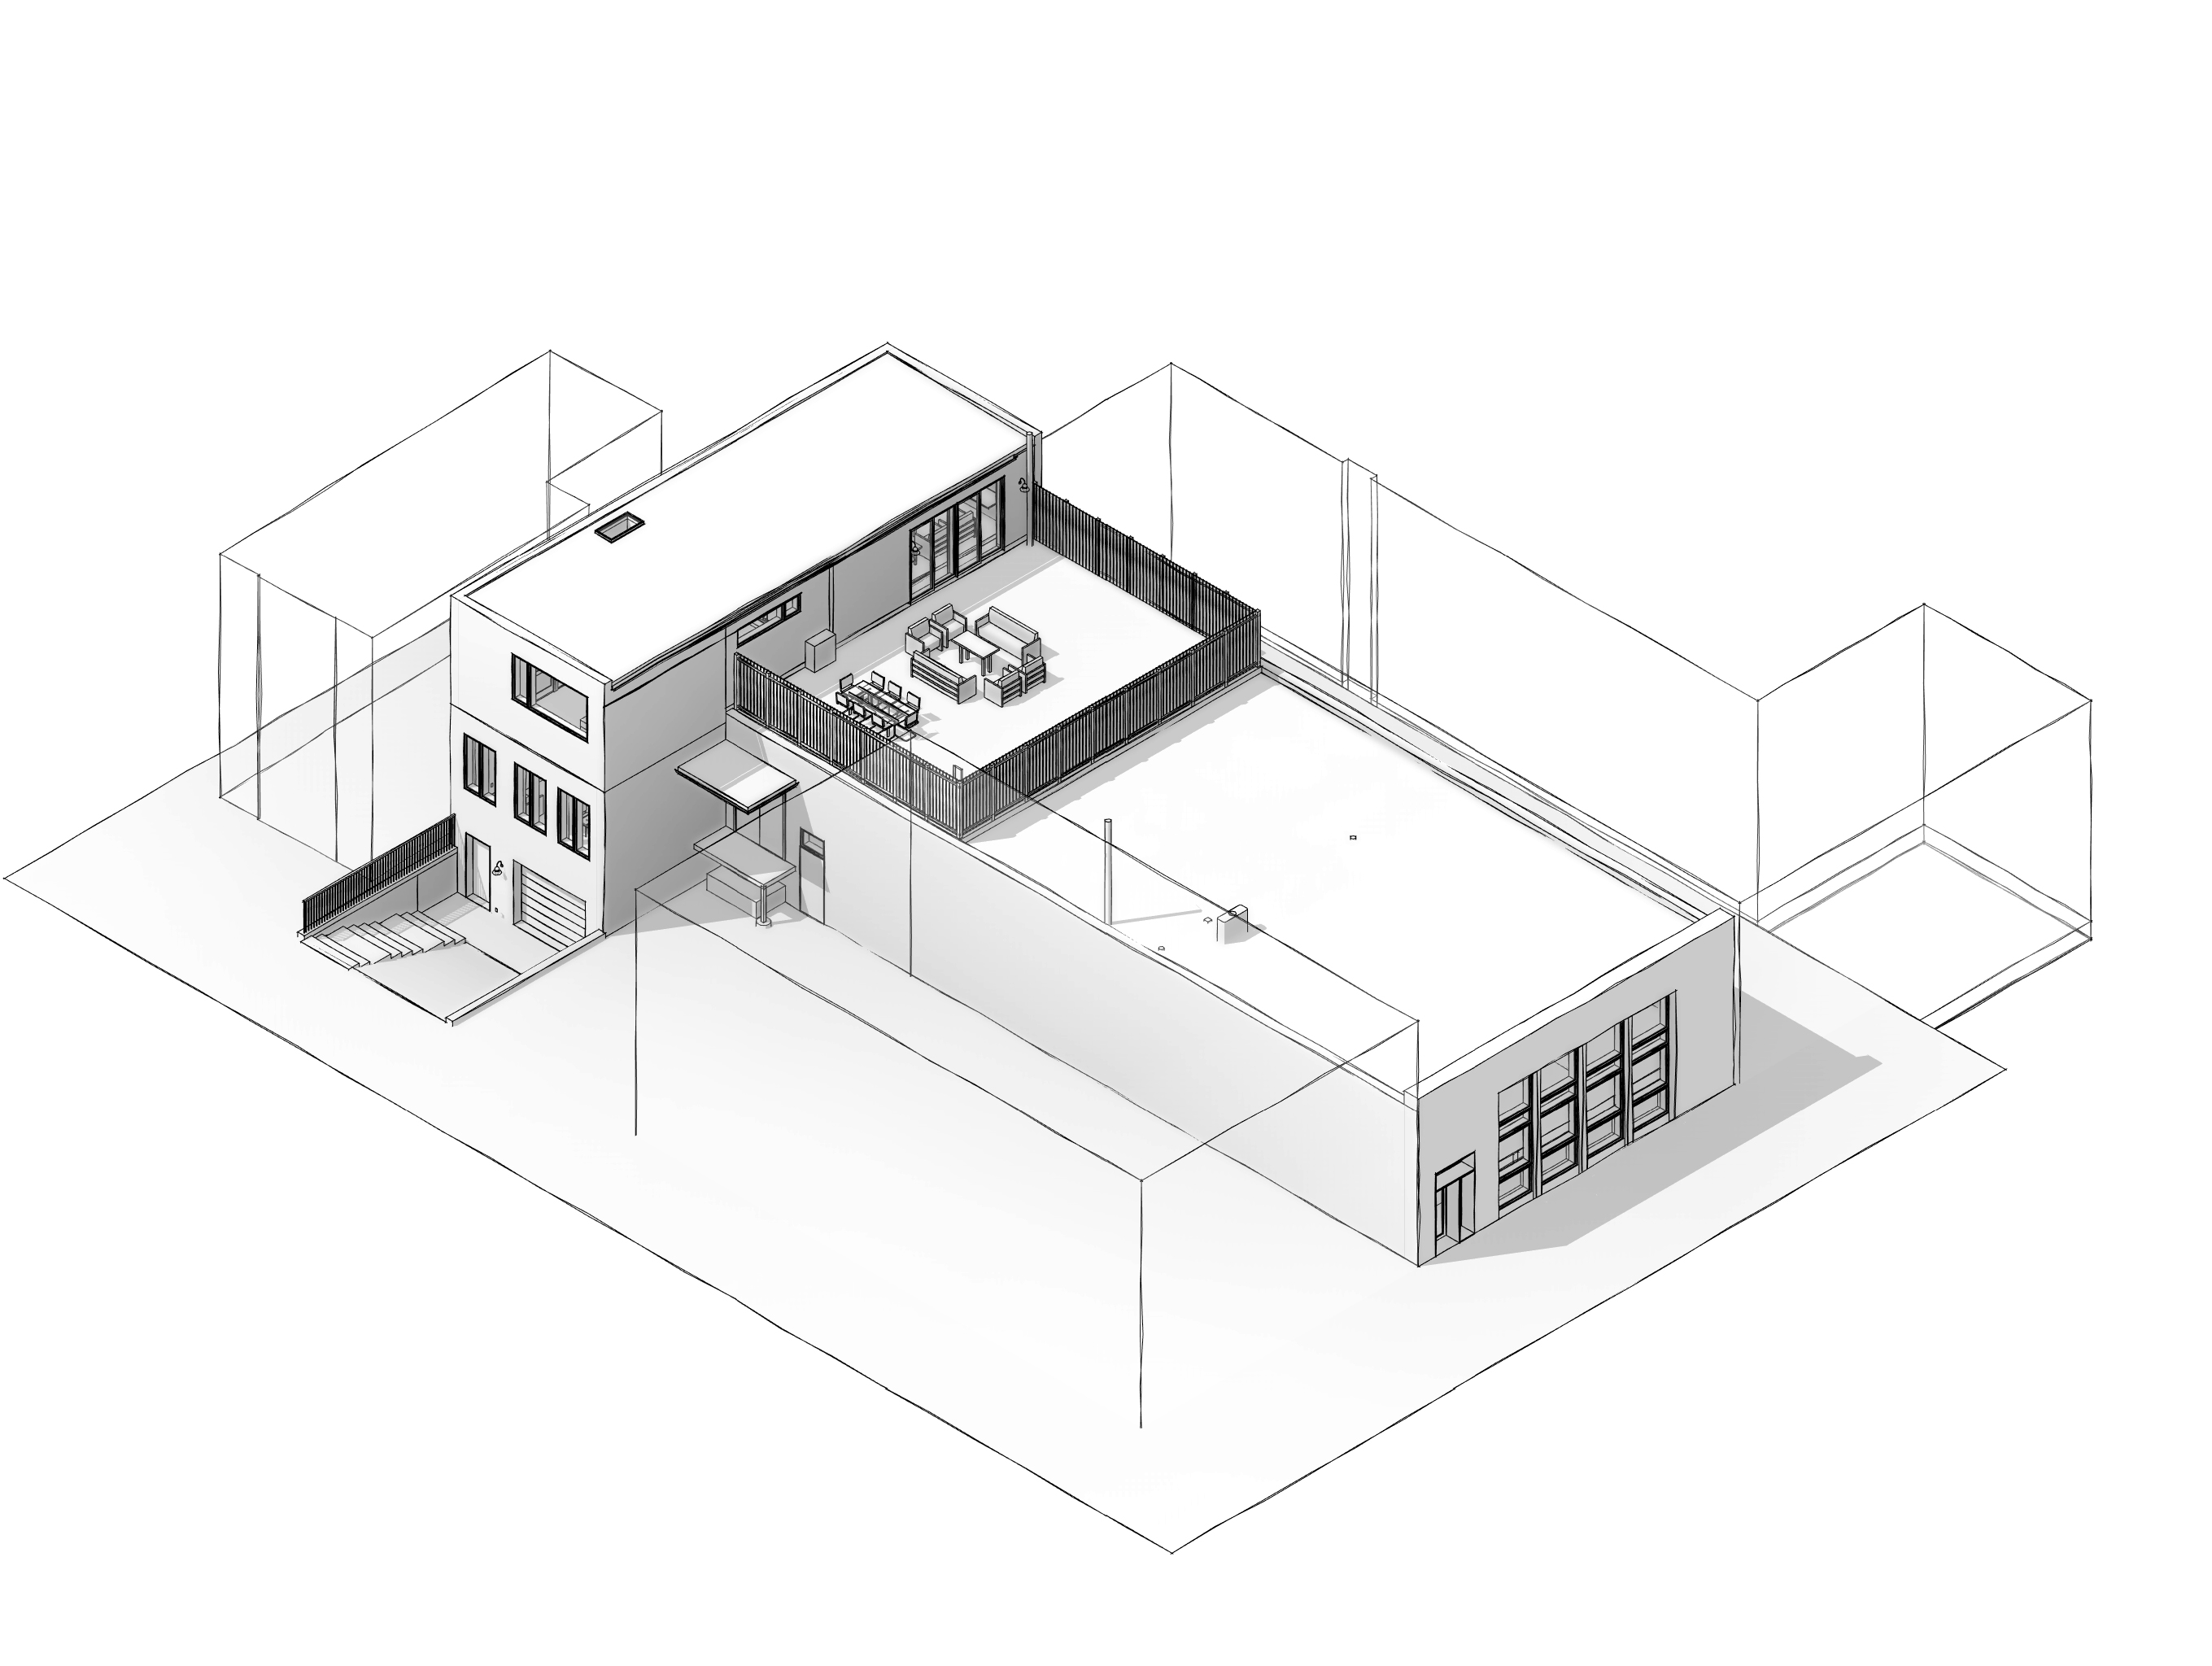
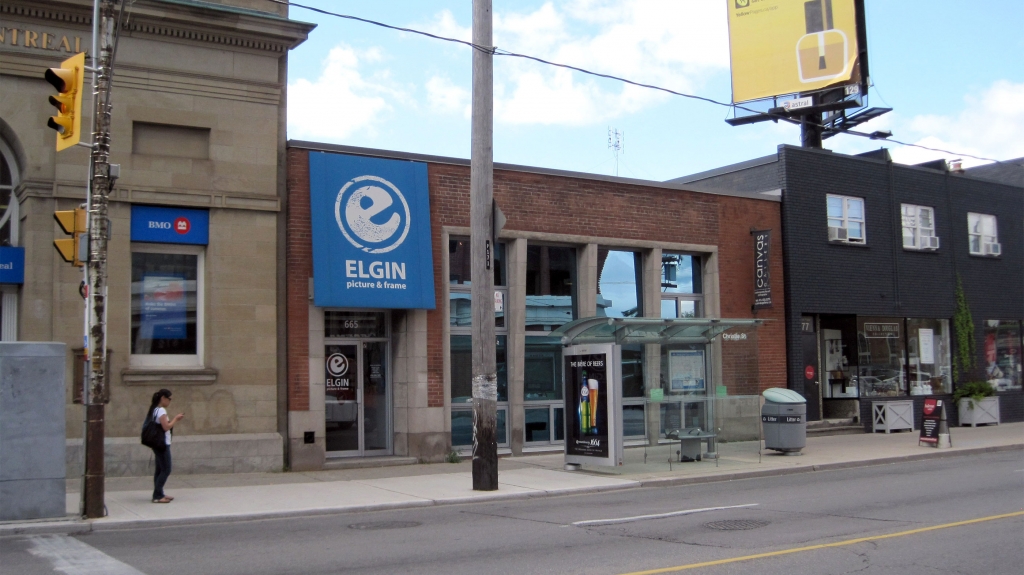
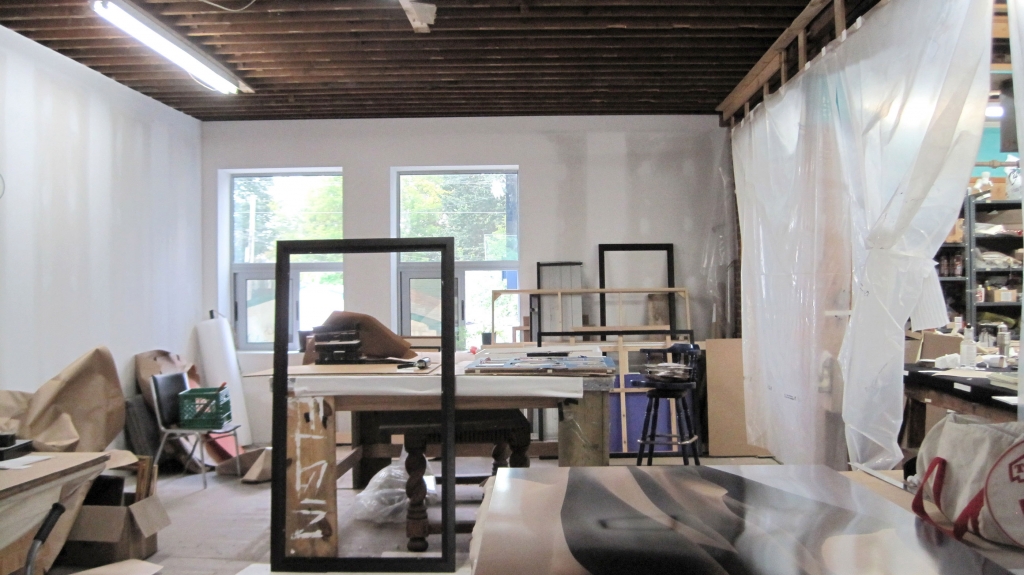
This new project, which we’ve called the Elgin Loft, is a unique combination of industrial, retail and residential space in downtown Toronto. This building has been the home of our client’s picture framing company for years, but he is now looking to convert part of it into a home for his family of four. The beautiful and unique L-shaped lot opens onto two main Toronto streets, encircling a historic bank building which sits right on the corner. The building’s shape allows us to use one wing of the building for residential use without intruding on our client’s retail areas, which will take up the remaining building space. This gives the family their own entrance off one of the main streets while keeping the company’s existing entrance intact at the other end of the building. The company’s main entrance splits at street level into a main floor upstairs, and a lower floor in the basement. His picture-framing workshop and retail space occupy the upper level, with a large gallery space for local artists on the lower level. The other wing of the “L”, which we’ll be converting into his family home, was previously underutilized, and was mainly used for storage and supplies. The building lives up to its “loft” title with high ceilings, art deco precast details, and heavy timber beams. The exterior walls are concrete block, giving the building an urban and industrial feel. What makes this project unique, and a bit tricky, is its multi-purpose use and occupancy. Building code qualifies the building as suitable for F-3, “light-industrial” use, and regulations differ between residential and industrial uses. These regulations affect everything from window locations and building materials to distances between indoor and outdoor walls. Fire safety and separation is also critical when constructing a multi-use building. Construction on this project is underway and we’re eager to share our progress with you. In a few weeks, I’ll be discussing the design plans in more detail, and how building code affects those designs (With fire regulations for multi-unit buildings, exposing those heavy timber beams requires special attention!). We love the idea and intention behind this multi-use project and can’t wait to see it complete!An Intro to Elgin LoftGo To Project Page
Multi-use buildings have their own sets of design and construction challenges. It takes careful planning to abide by the building, fire, electrical and zoning codes, while keeping in tune with a client’s needs and aesthetic. Enter the Elgin loft: our light-industrial, multi-use project. The L-shaped building currently houses our client’s picture framing shop with main entries on two sides. Once construction is complete, the property will double as a home for his family. Our proposed design is to split the building vertically at the “foot” of the L-shape. This would locate the main entry of the residence on the east side of the building, preserving the north entry for the existing retail and gallery space. Our second “big idea” is to then add a partial 3rd storey addition above the residence and turn the roof over the industrial shop into a massive outdoor space. At around 800 square feet, this magnificent deck will act as the backyard replacement, continuing the relaxed, urban theme of this family dwelling. The existing two levels below the addition will be fully renovated to meet our clients’ needs and make the new home as energy efficient as possible. The challenge of designing this “urban loft” is adding family functionality, sound and visual breaks while keeping the space as open-concept and communal as possible.Elgin Loft’s Urban DesignGo To Project Page
The Floor Plans
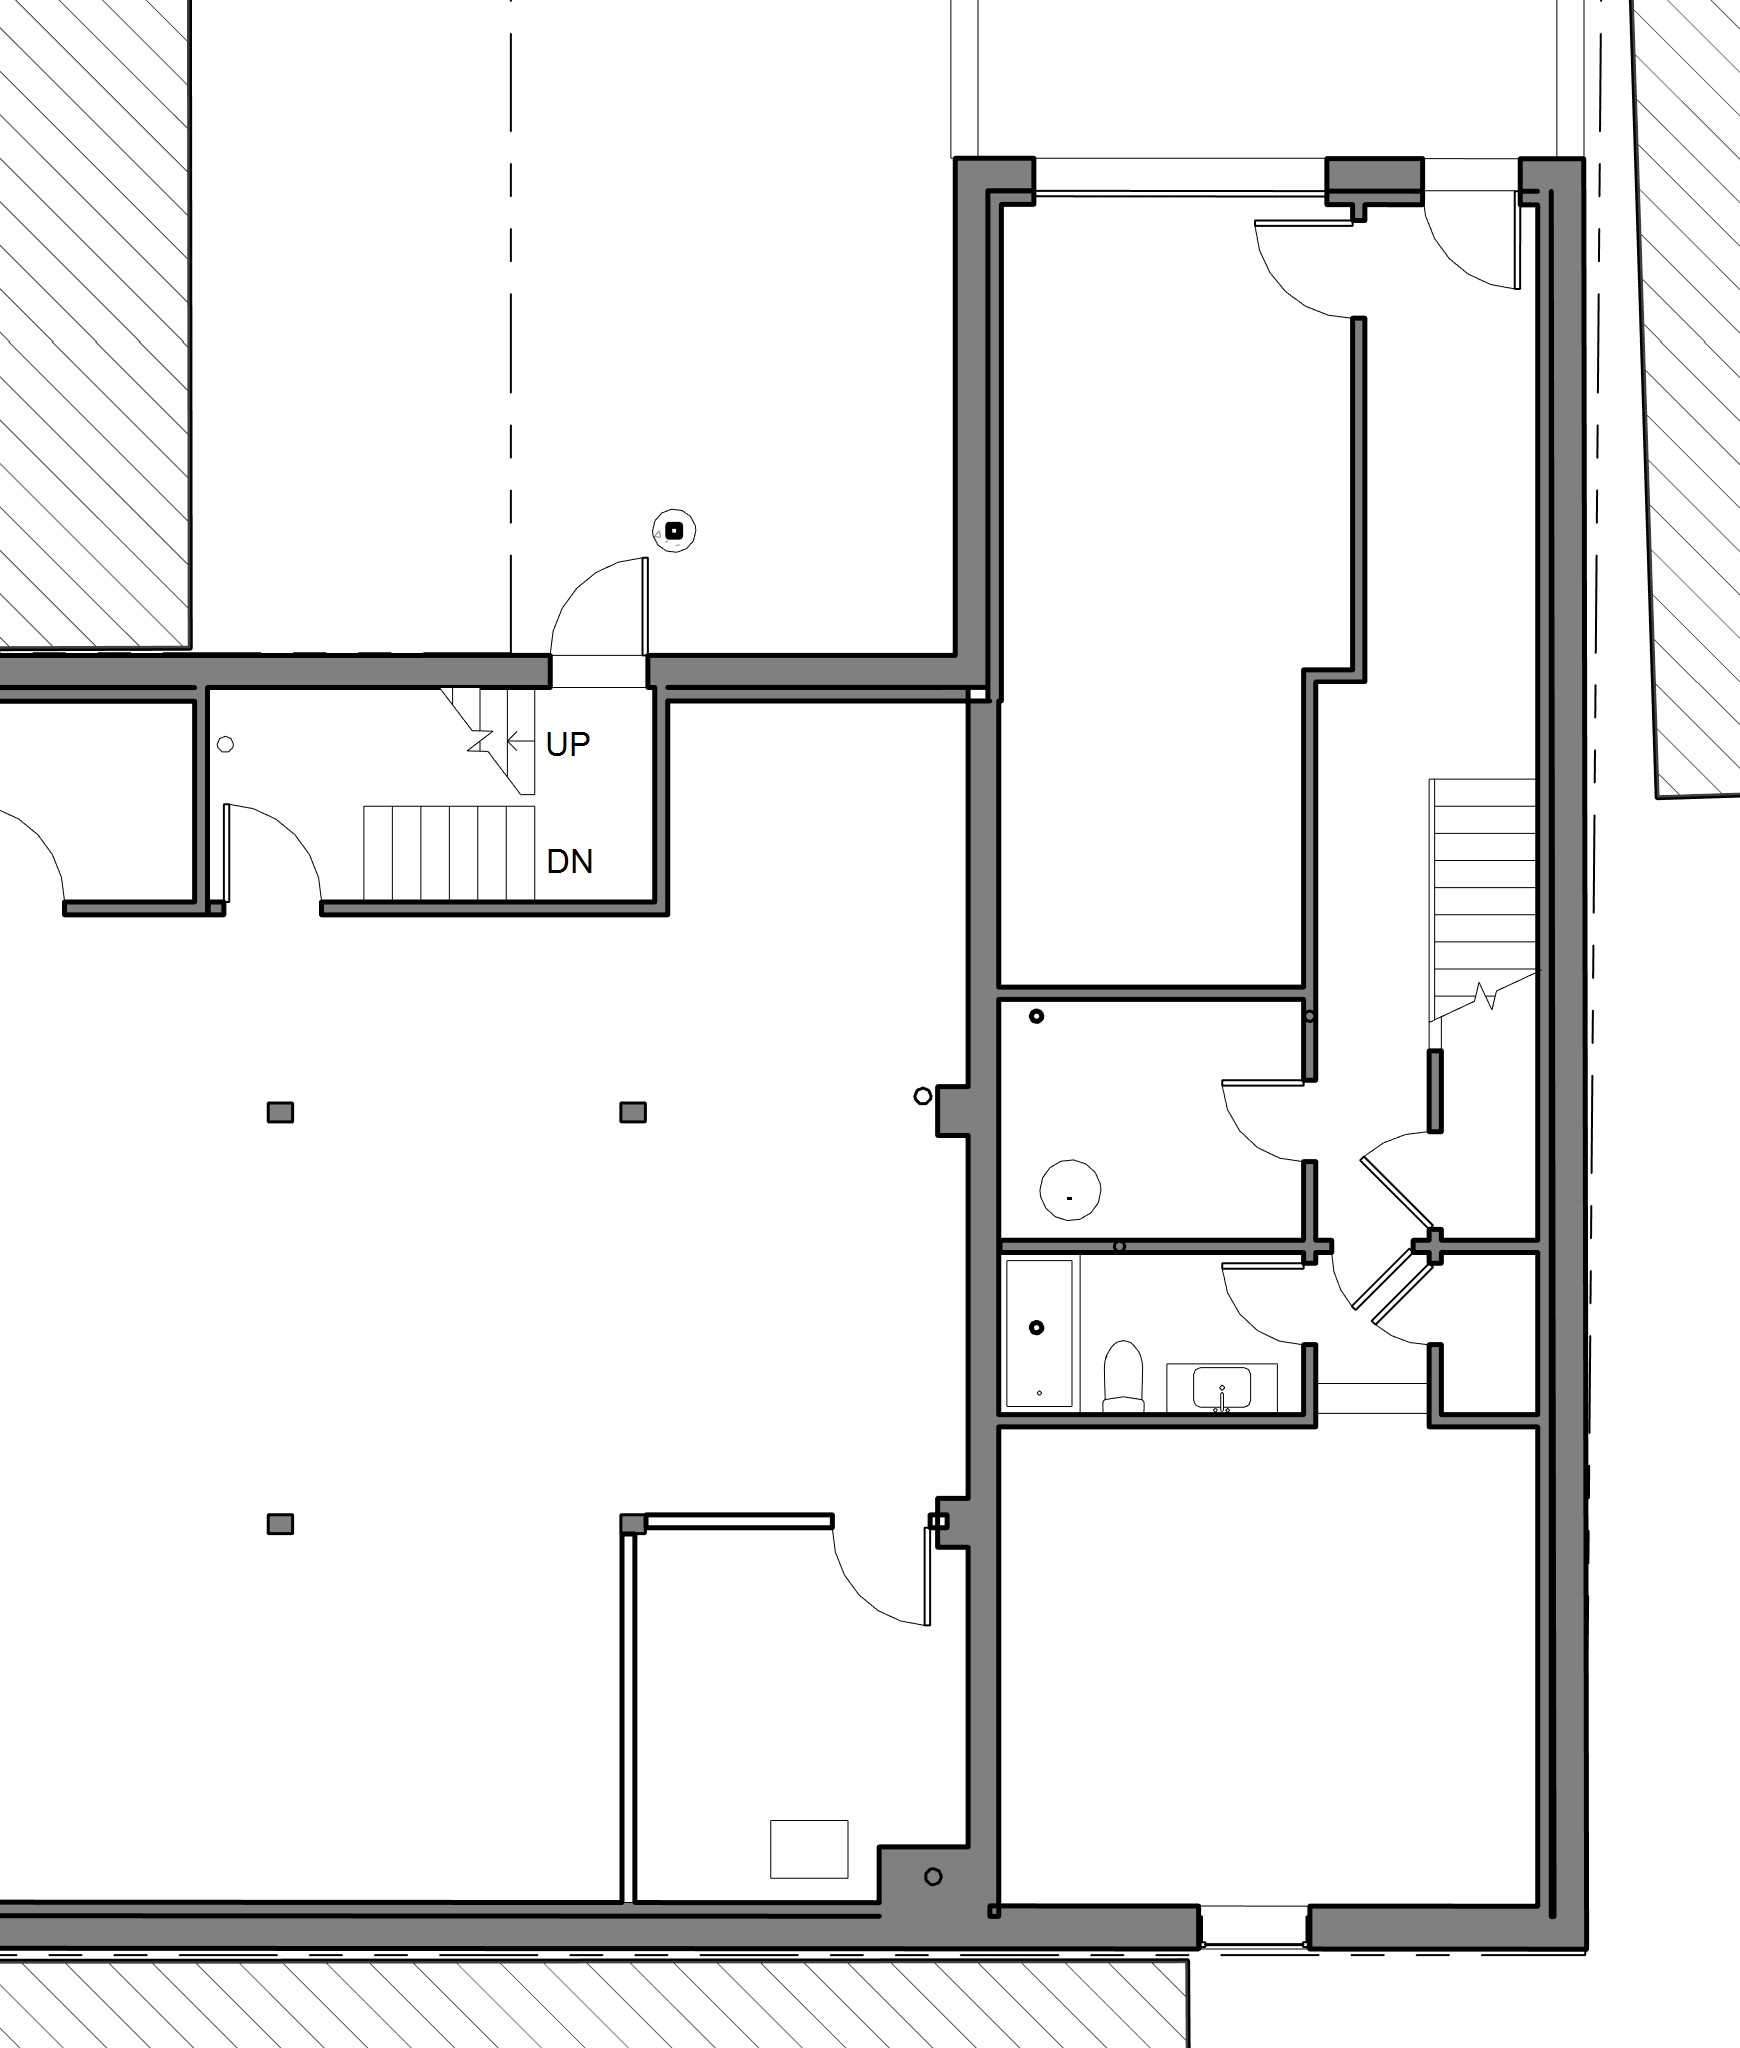
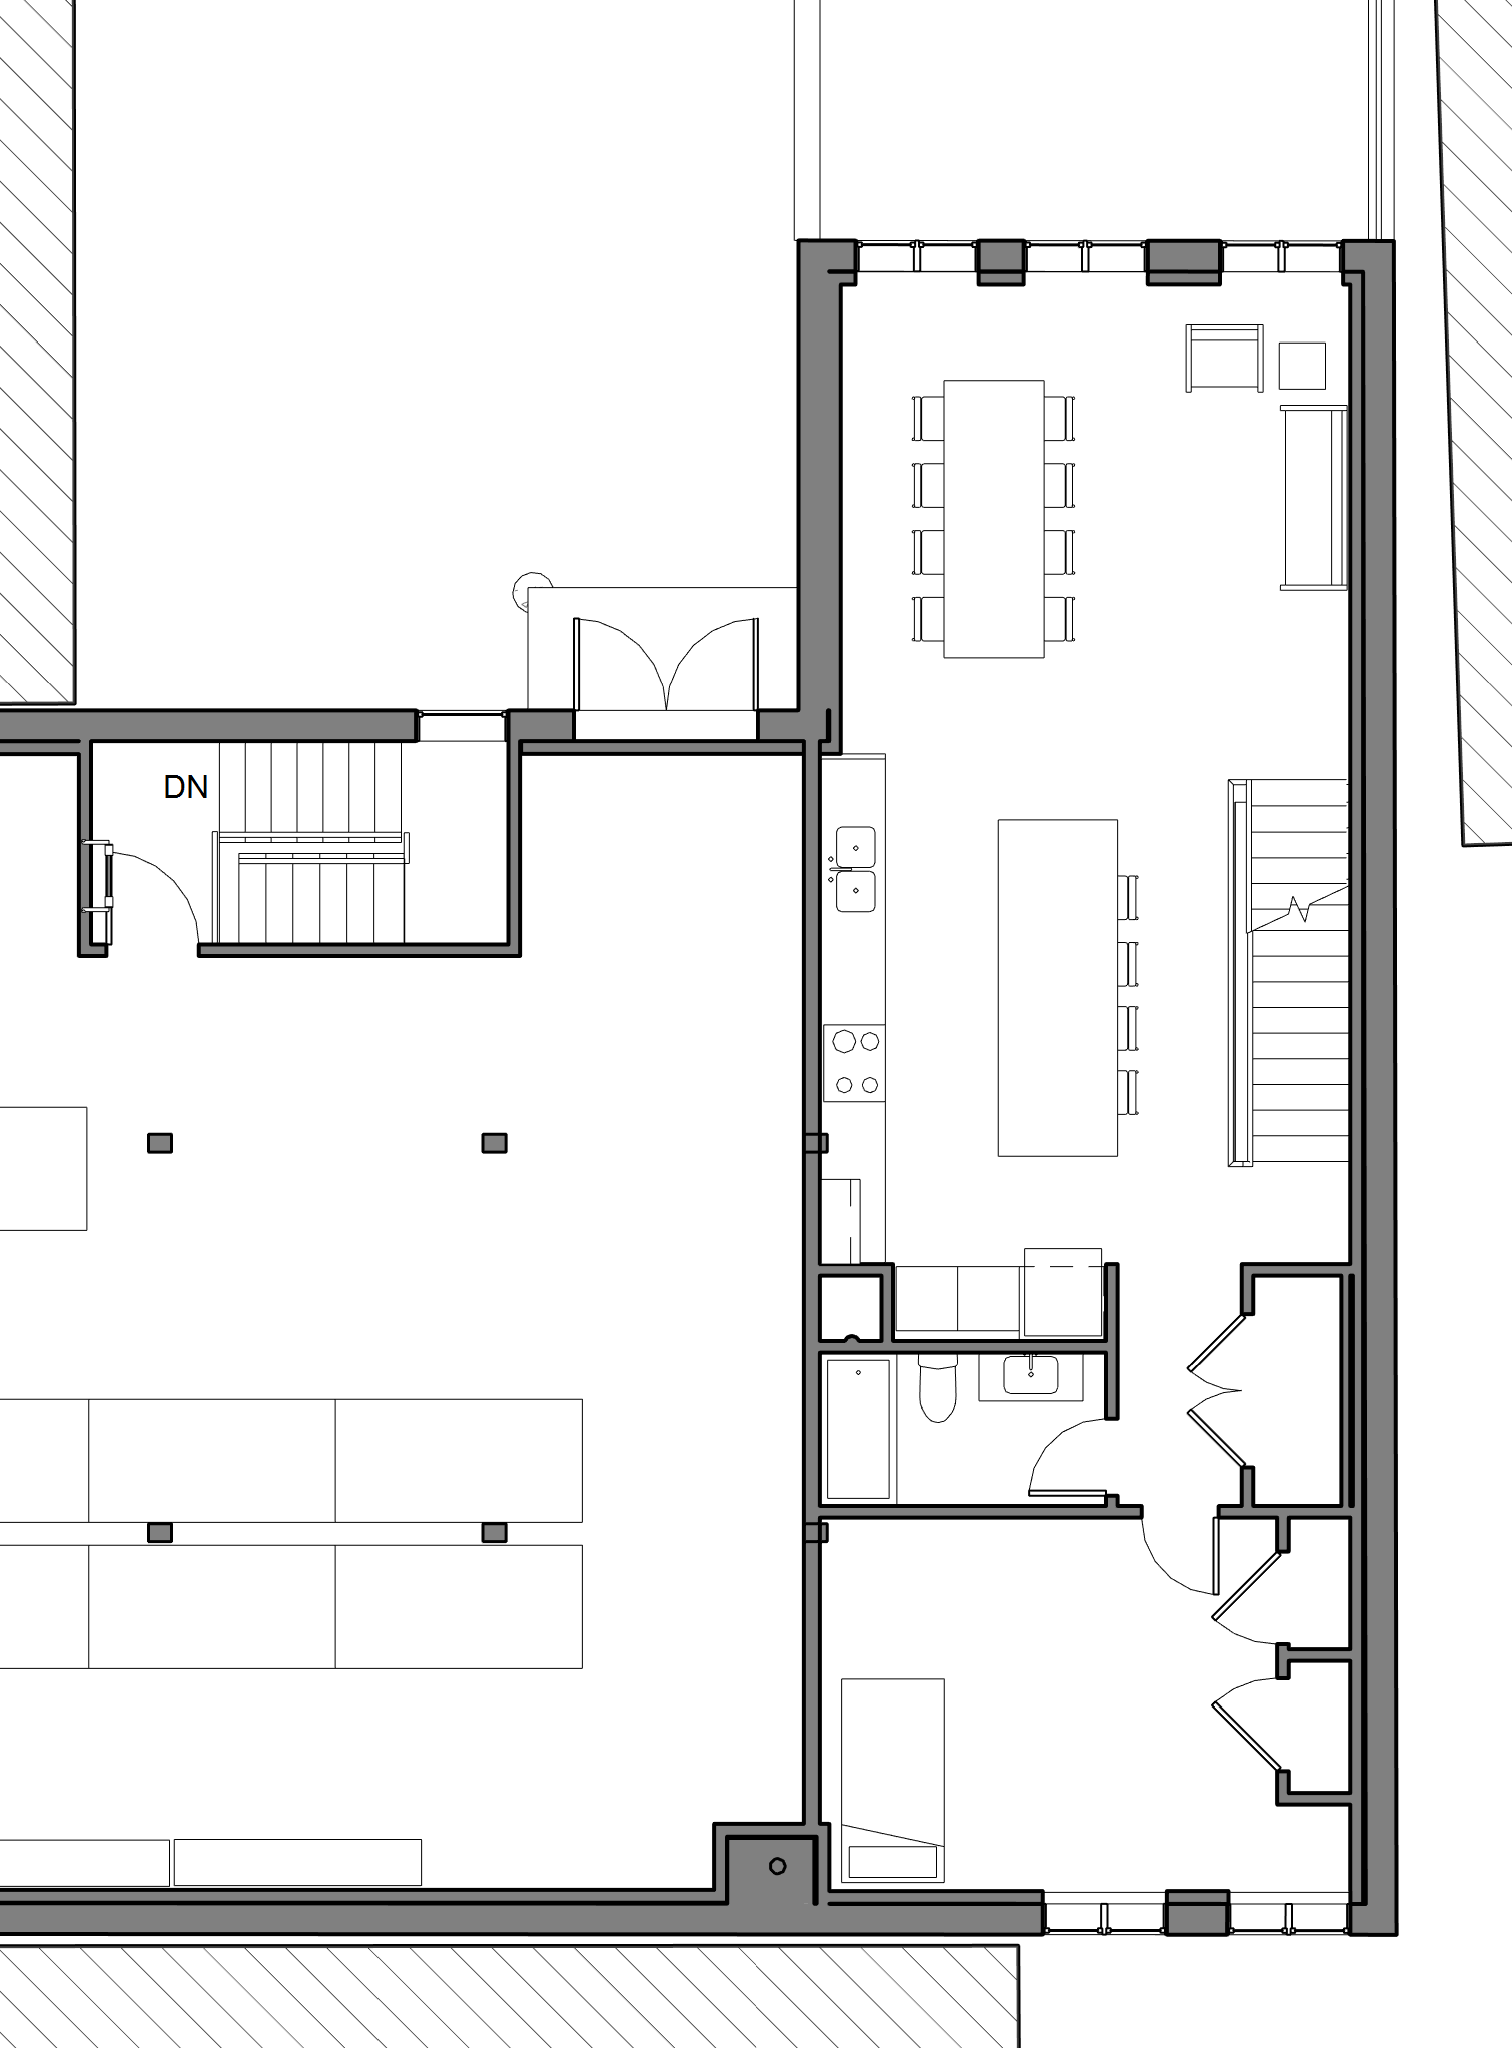
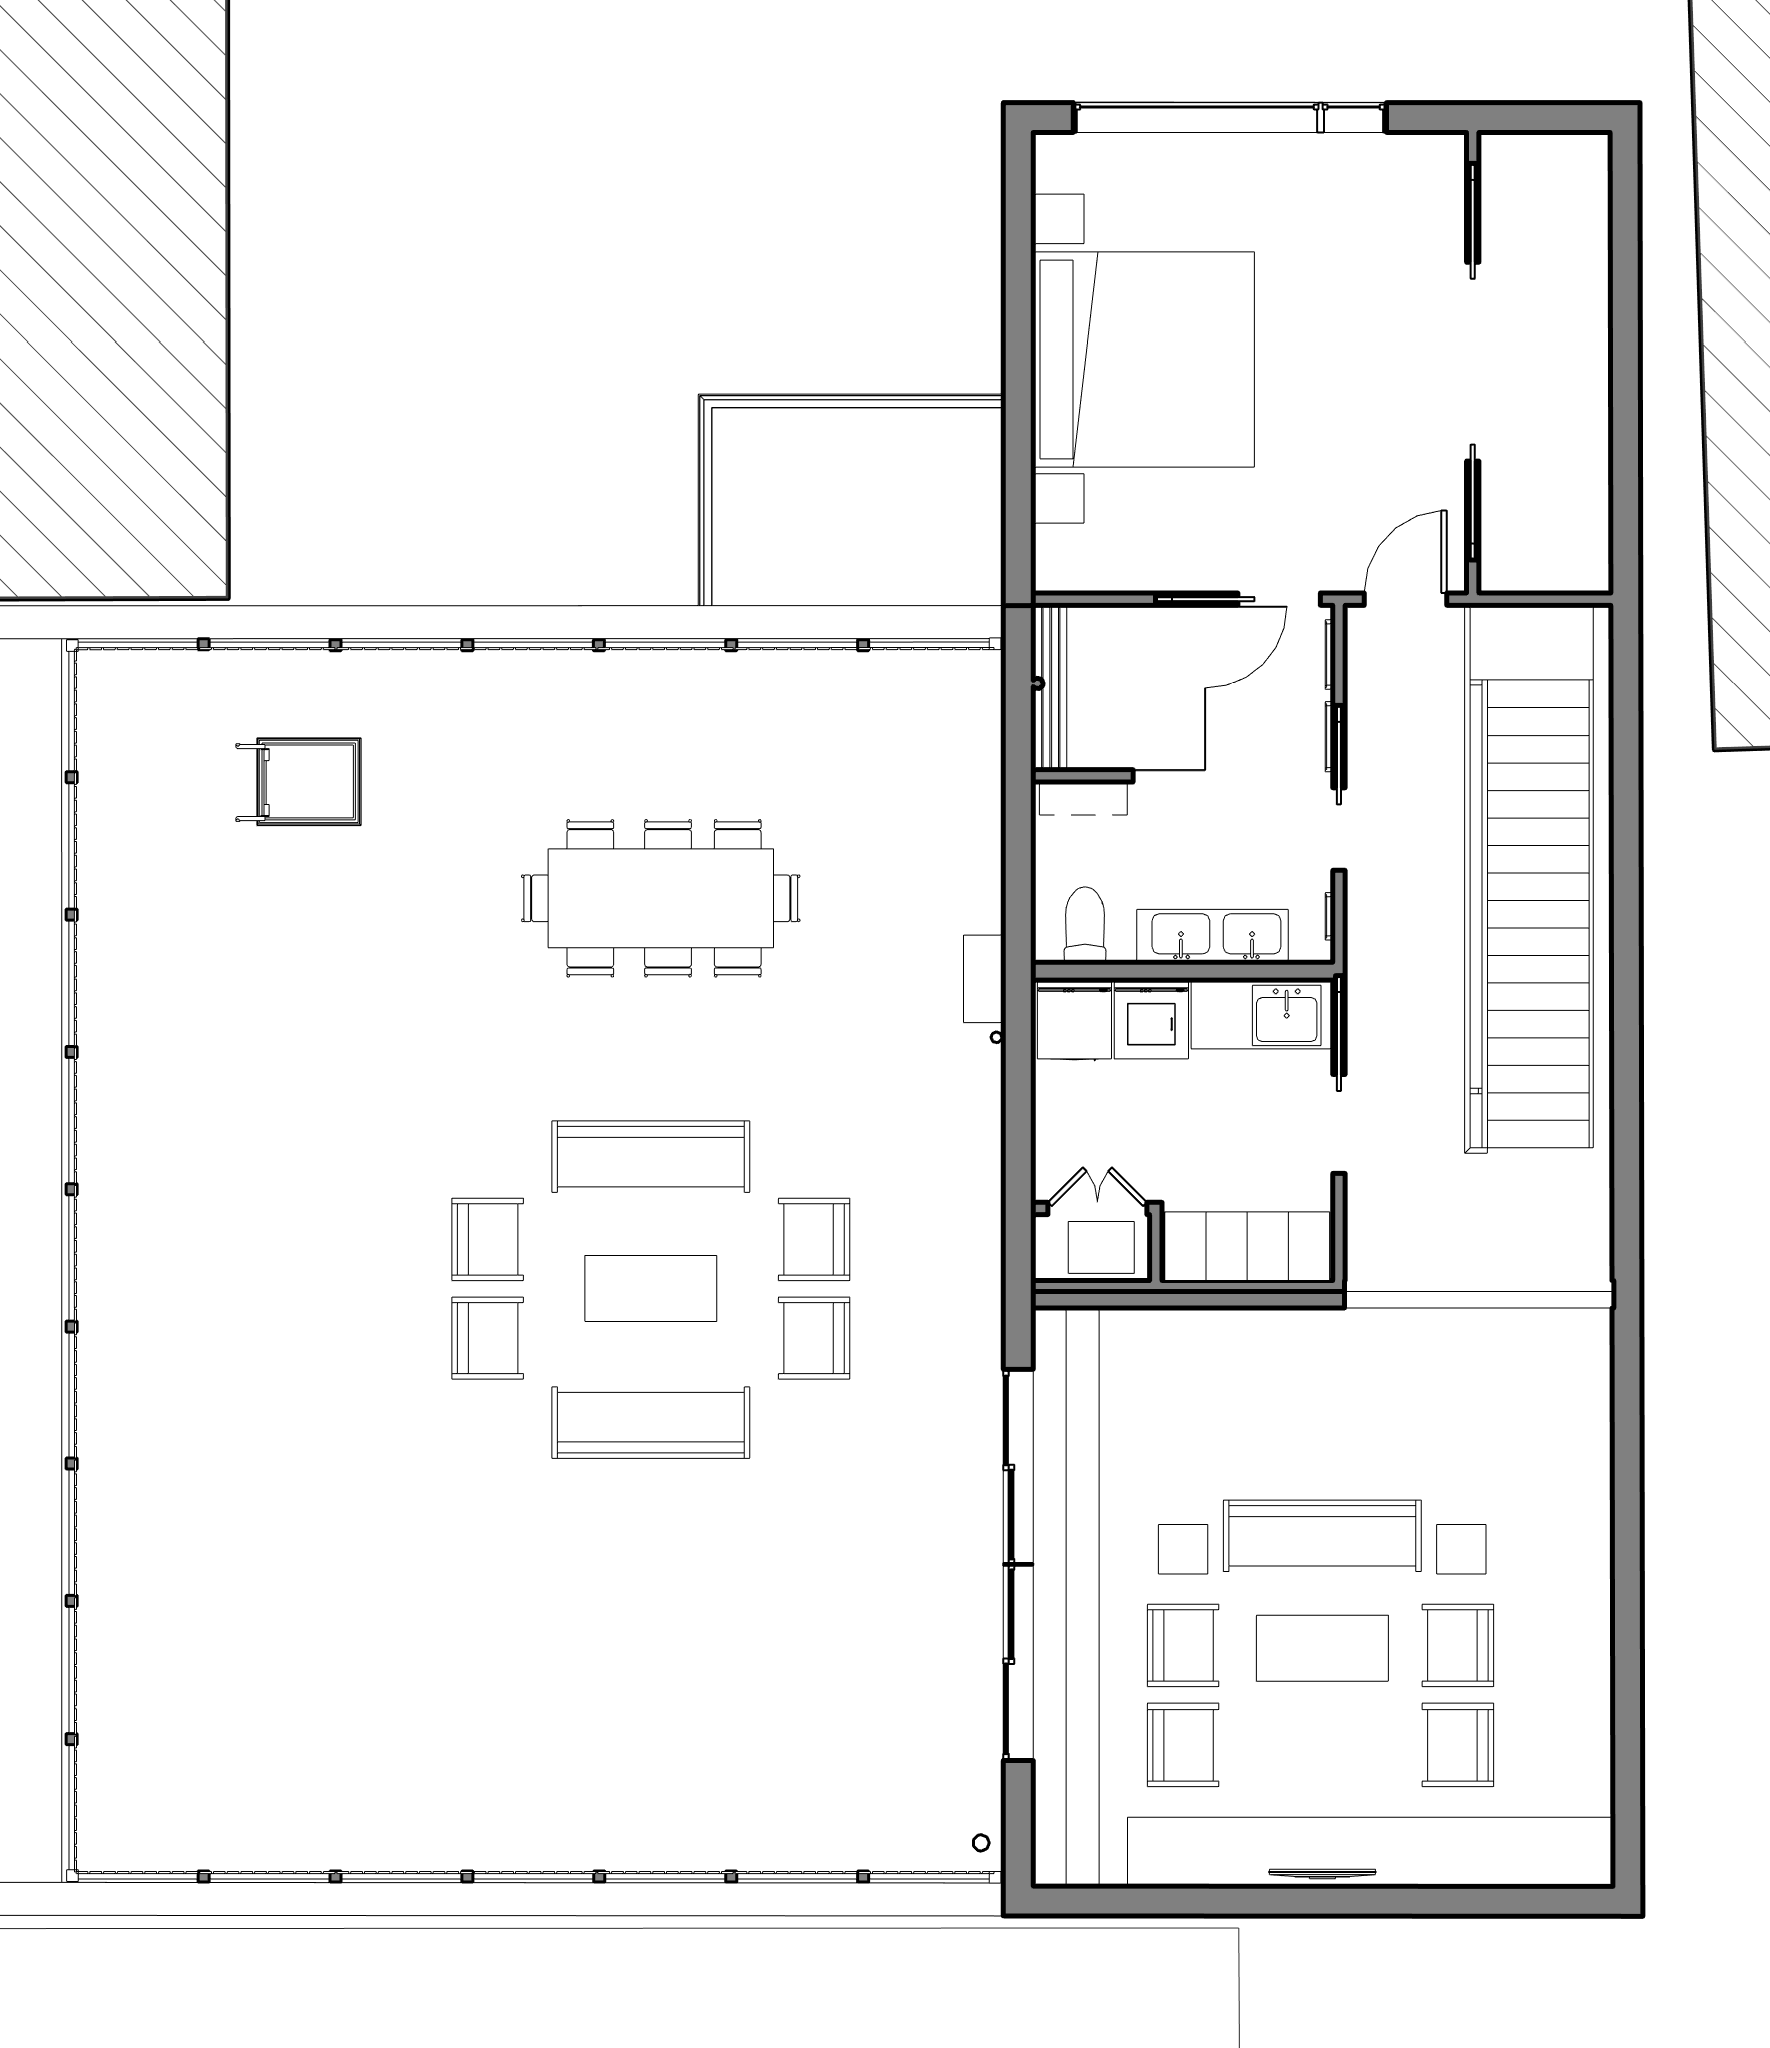
The new home will be three levels, each with 850sf of living space: The lower level, sitting a few steps below street level, the main storey, which sits at level, and the new upper, third floor.
The lower level houses the main entrance foyer with large closets as well as a single car garage, a total luxury in downtown Toronto. Both the foyer and garage lead to the main straight-run stair to the second level. Also on the lower level is a small utility and storage room, guest bathroom, and large family room which can double as a guest bedroom.
On the main floor, the stairs open up into a huge communal space with a seating area and dining room in the east, and a kitchen in the center. This open-concept dining area and kitchen take up about two-thirds of the main floor. The kitchen is a chef’s dream: with a huge island right in the middle and tons of counter space, it’s the perfect place for dinner parties or potlucks. The stacked stairs lead to the upper floor with large skylights above, spilling light down into the center of the plan. A bathroom and storage closet separate the kitchen from the kids’ bedroom on the far side of the main floor.
The northern end of the third floor hosts the master bedroom, with a luxurious en-suite bathroom and a humungous closet. A big utility room for laundry and storage sits next to the bathroom, and the west end of the floor consists of another communal room, where the family can talk, play games or listen to music together. The communal space upstairs has a more intimate feel than the main floor’s entertaining space, and the north facing rooftop deck leads off the family room, where the kids can play and the parents can cultivate their urban farm.
Once finished, the whole house will feel casual, intimate and friendly. The lack of a formal divide between private rooms and rooms reserved for company creates a welcoming, unpretentious atmosphere, and the high, 10ft ceilings on the lower level, as well as the open, all-purpose main floor add an airy brightness to this semi-industrial space.
Next time we’ll be discussing all things demo with this downtown dwelling. Keep checking in with us as this urban project begins to take shape!
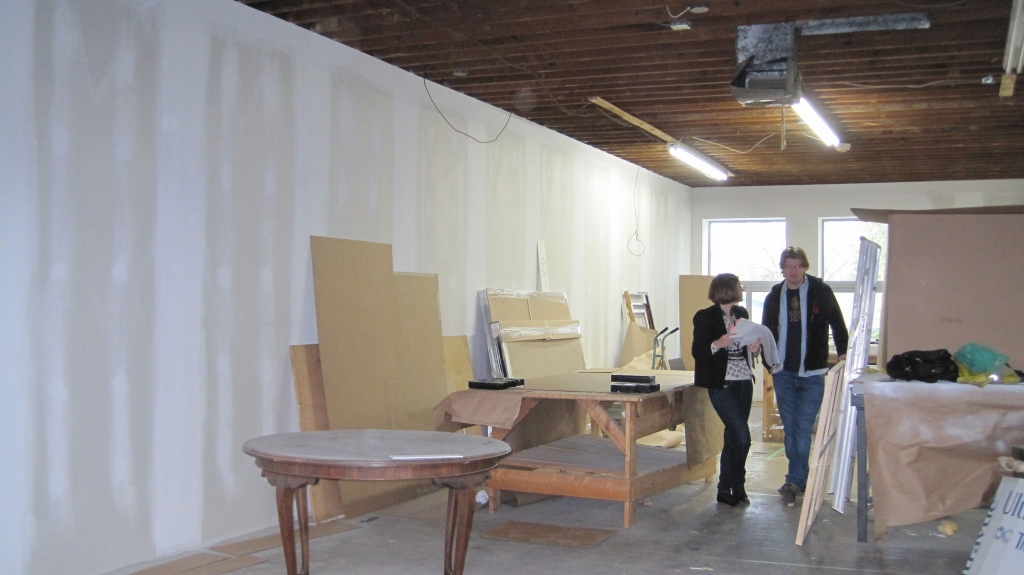
Construction has started at our Elgin Loft project. A super urban undertaking, we’re creating a cool, loft-like space for our client and his family in the same building that his framing-company occupies. I’m about to give you a crash course on everything that we handled throughout the construction process. It gets a little tricky, but where’s the fun if it isn’t? Our builder on this project is Paul Drummond of Modern Dwellings, a Toronto-based building team with expertise in renovating modern, sustainable homes. When it came to site preparation, we knew we needed a detail oriented “GC” (General Contractor) for a few key reasons: The close proximity of our building to the property line meant our scaffolding had to be extra precise and sturdy. The proximity of other buildings also made our basement underpinning process difficult – we needed to make sure we didn’t compromise the foundations of surrounding lots by digging too deep (we’ll talk more about that later on in this post). And lastly, our client wanted to keep the framing business open throughout construction. Before anything else, our building team created a dividing partition wall using studs and plastic sheeting, between the business unit and the soon-to-be residential unit of the house.Start of ConstructionGo To Project Page

Third Floor Addition & PVC Roof
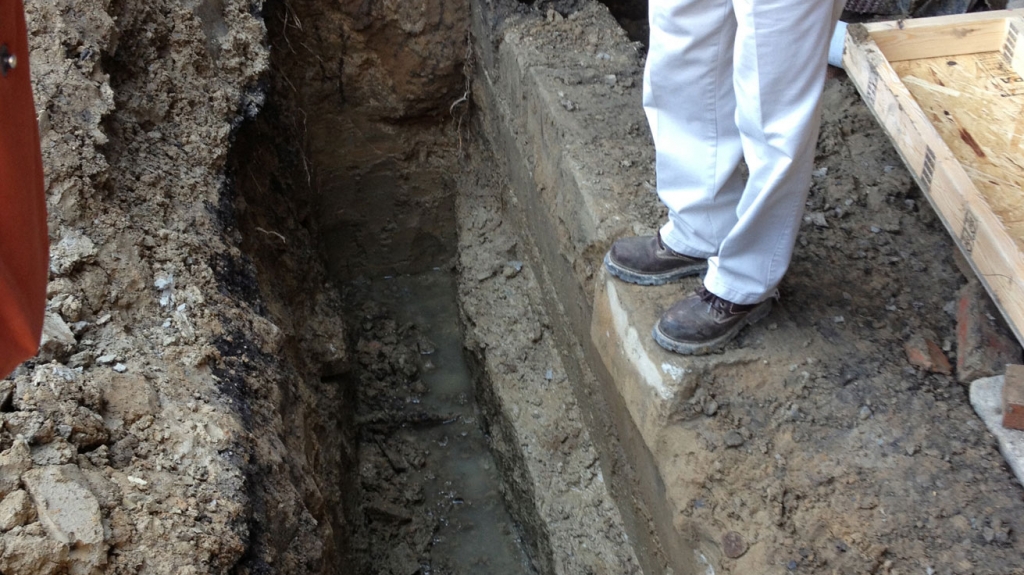
When adding a new storey to a building, it’s important to make sure your foundation can support the added weight. If it can’t, the foundation must be strengthened, either by adding thickness to the footing, or extending the footing downward. We decided to lower the back half of the basement during our underpinning process, for a higher, more comfortable ceiling height in our client’s music room and basement living area.
We didn’t need to lower the floors in the drive-in garage that makes up the front portion of the basement, so we only thickened the walls and footings of our foundation in that area. When underpinning, it’s important to make sure your neighbor’s foundations can also handle the excavation; if you dig too low, other neighbouring foundations may fall away. But we made sure that didn’t happen!
With the foundation ready, Modern Dwellings started on the third floor addition over the residential portion of the building’s footprint, which is approximately 1/3 of the total area. This leaves about 2500sf available for a huge roof deck.
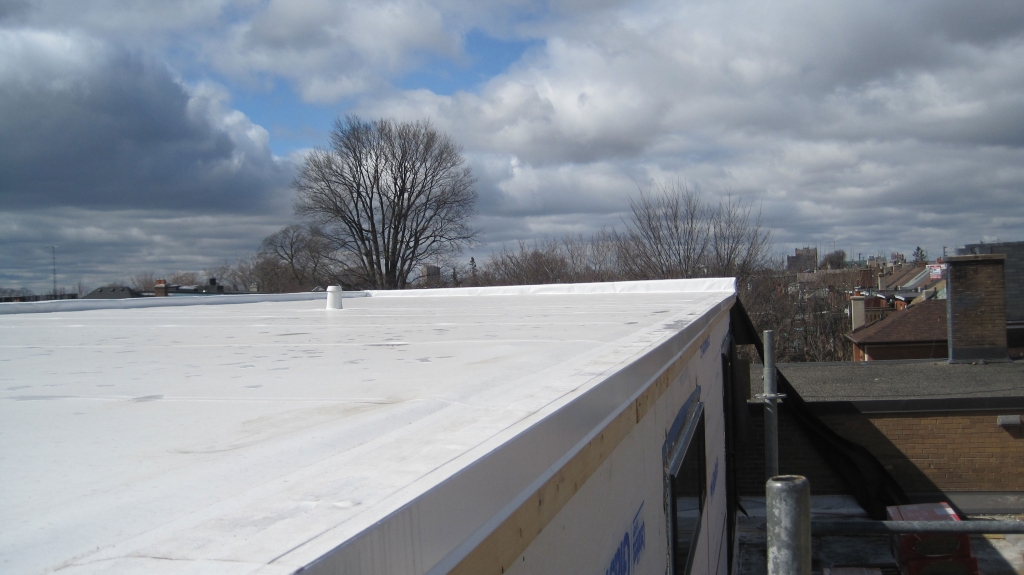
Our client, though excited with the design, was concerned because of roof work he had recently invested in: a PVC, poly-vinyl, high performance roof membrane he had installed only a few years ago. We understood his concerns: it would be frustrating if his new roof work went to waste! Instead of simply throwing out a section of the membrane and replacing it with the third floor addition, we decided to cut the membrane off and reattach it onto the third floor roof.
With some plastic welding and a bit more PVC material, we then welded the reused membrane to the existing one, recreating the continuous sheet with very little waste. On top of the second floor roof membrane, we installed wooden sleepers, engineered wood joists, which hold the new roof deck on top of the membrane. This satisfied us as well as our client!
Because of the building’s light-industrial mixed use, we needed to construct the third floor addition out of non-combustible materials, to adhere to F-3 building code. We decided on light-weight structural steel studs, for strength and stability. The first and second floors are made of concrete block, which already meets with building code requirements, so we didn’t have to worry too much about those floors.
Stay posted as we continue construction and start installing the systems in our urban Elgin loft!
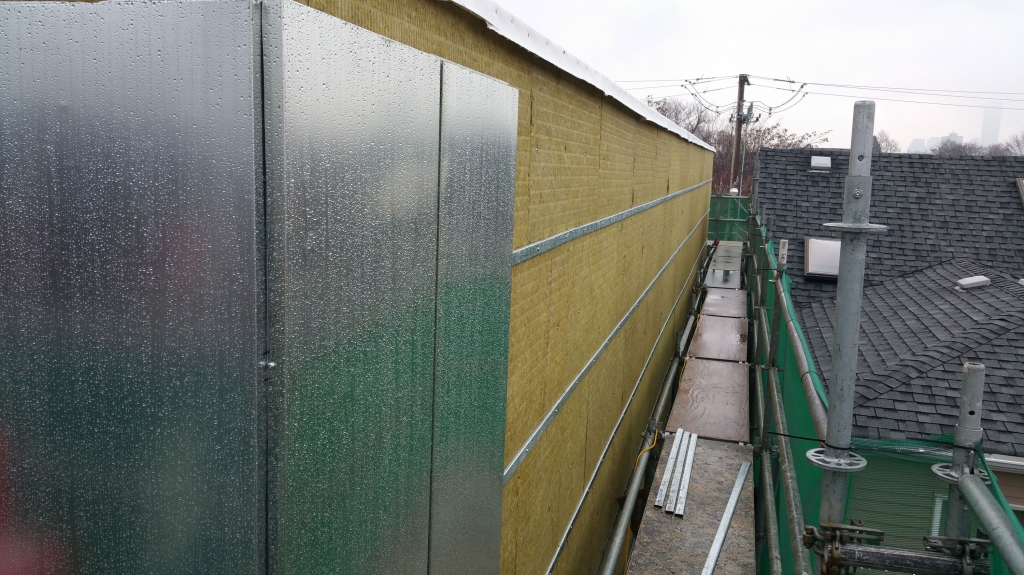
The existing structure and the new third floor addition of our urban multi-use project Elgin Loft are officially insulated, sheathed, and windowed! We’ve insulated in fairly conventional ways, but taking care with the added challenges of building a multi-use structure to code. The existing structure of the first two floors, made of concrete block, has been strapped with wood studs, set off the block by an inch, then sprayed with closed cell foam which acts as our air and vapour barrier. On the upper addition, we needed to use entirely non-combustible materials, due to the light-industrial assembly of the building. In the existing structure, the concrete block acts as fire protection. Wood, plastic, and oil-based materials aren’t great at fireproofing, to say the least! Therefore, we couldn’t use wood studs or spray foam. Instead, we opted for steel studs, and Roxul mineral wool batts for interior insulation, which are both non-combustible and made of recyclable materials; Mineral wool is made of rock slag, a by-product of the mining industry. We then added rigid boards on the exterior of the structure, also by Roxul, for additional insulation. On the exterior, we used a delta vent weather barrier to act as our weather barrier and air barrier – we stapled and taped it to the side of the sheathing, to protect from the outside elements. This delta vent is made of gypsum, which is more typically used in commercial building, because of the rigorous fire regulations of commercial codes. Then, we put up a typical poly sheet inside of our steel studs to act as our vapour barrier. For this type of F-3 building, the roof didn’t need to be composed of only non-combustible materials. That meant we were legally able to use spray foam between the roof joists which insulates and acts as both our air and vapour barriers. On top of the spray foam, we added some board insulation just before the PVC roof membrane that our client wanted to preserve. The good news: We did manage to preserve some of the membrane our client cherished. The bad news: with cutting it apart and welding it back together to ensure a water-tight and seamless installation, it ended up costing about the same as simply using a new membrane. Between the residential and industrial portions of the building, we had to install a smoke-tight, fire-rated separation. This wall is typically known as a “party wall”, because multiple parties share it. This separation was done as a wood-framed wall, and needed additional drywall and insulation for acoustics and sound-break separation. We then fire-caulked at all the joints, to make sure our party wall was both silent and fireproof.Wall AssemblyGo To Project Page
Exterior Cladding
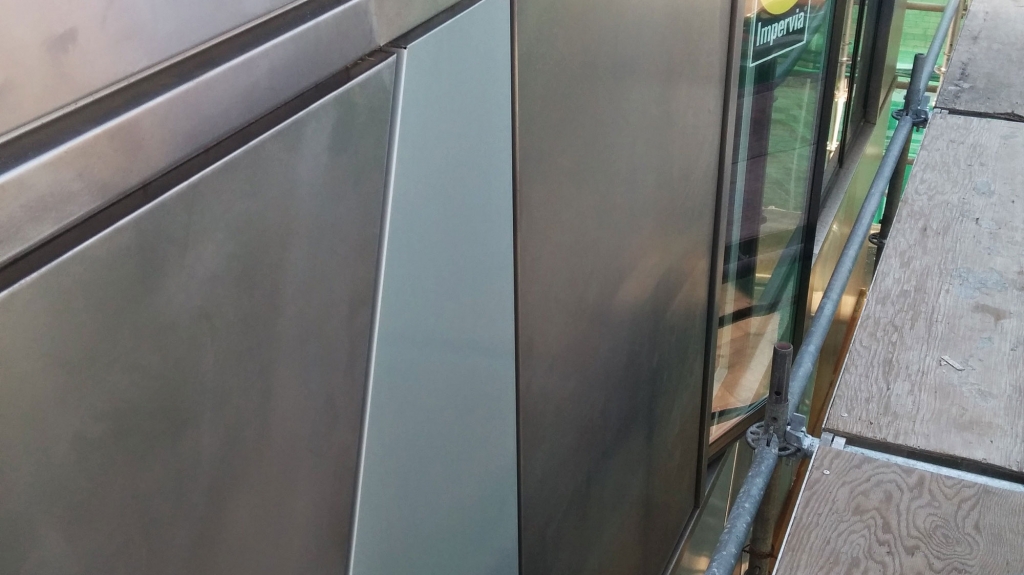
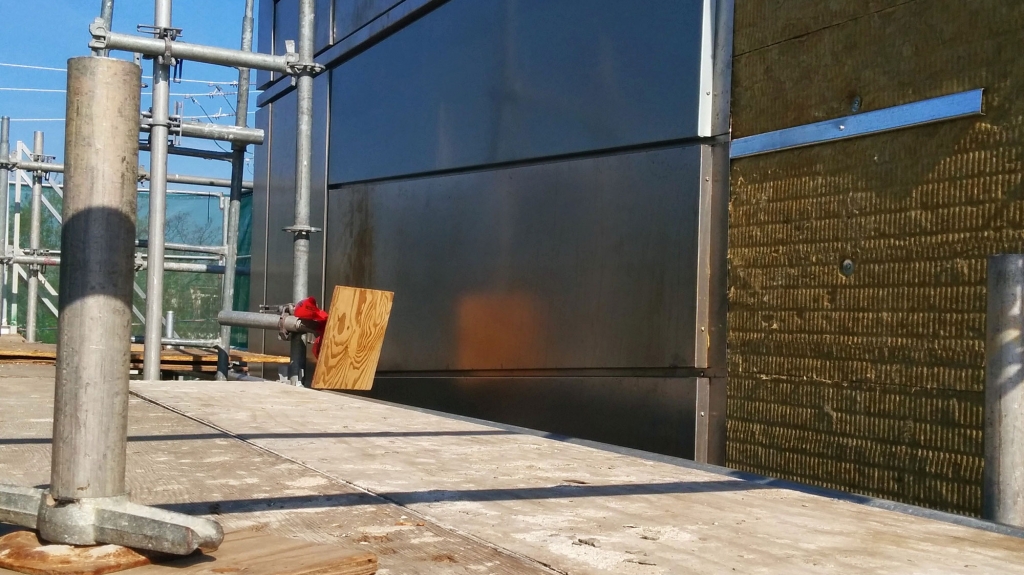
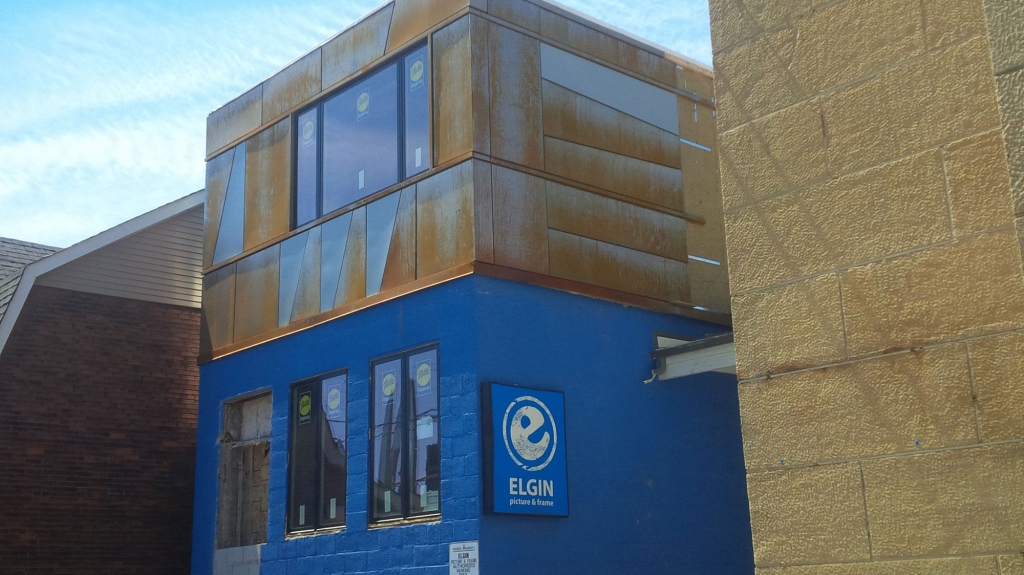
An impressive and striking feature on the eastern and northern exterior walls of our third floor addition was the weathering steel cladding, commonly known as COR-TEN, by Punchclock Metalworks. Punchclock is a local Toronto company that specializes in custom made metalwork, ranging from structures and art pieces to exterior siding and cladding.
The mild steel is designed to oxide and rust, which makes it naturally resistant to future rust. Plus, the industrial aesthetic is a wicked addition to this urban home. On the western and southern walls, we used aluminum panels for exterior cladding, which were much less expensive than steel. These walls sit right next to surrounding properties, so are not easily visible – we saved the artistic, rusting steel for the uber visible portion of the third floor. We left the concrete block on the first floor generally intact.
The fiberglass windows by Pella were also fairly common in installation – installed with screws, shimmed and finished with low expansion foam. Air sealing is important when installing windows, and we had to be extra careful with the third floor skylight, which needed air sealing, plus rain and wind protection. We opted for a huge, four-panel sliding door that leads out to the wooden roof deck, which aren’t as well-performing as other types of doors. But after talking with our client, we decided that the hit in performance was worth it for the functionality and aesthetic of such a lovely, large entrance to the deck.
Our priority when it came to this project was insulating above code, while turning a fully industrial building into a functioning family residence. Our existing foundation comes to an R10 to R12, with the new addition coming in at R35. The new roof performs at R32, and if airtight, will perform very well.
We’ll keep you posted when we install some mechanical systems in this urban project!
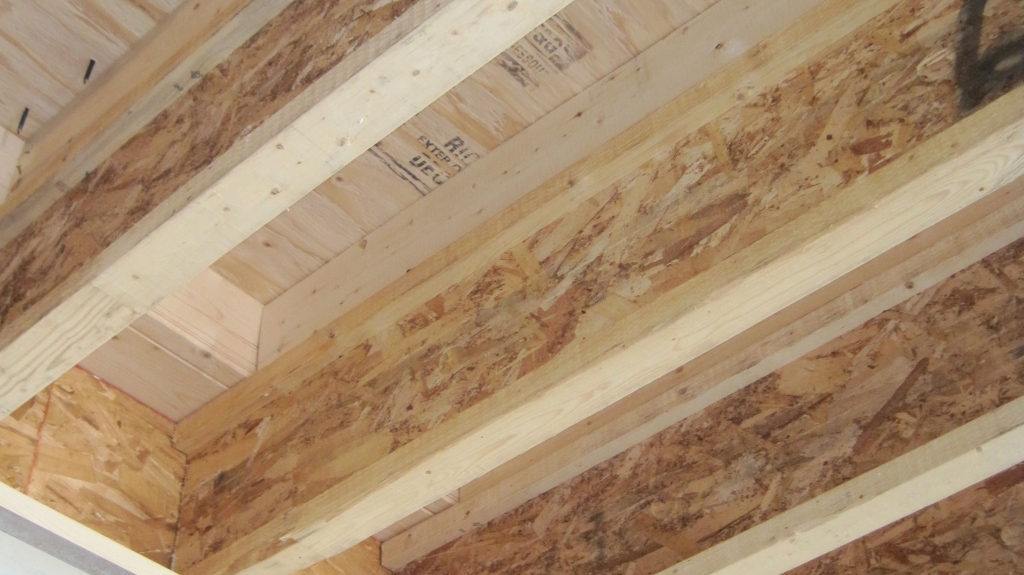
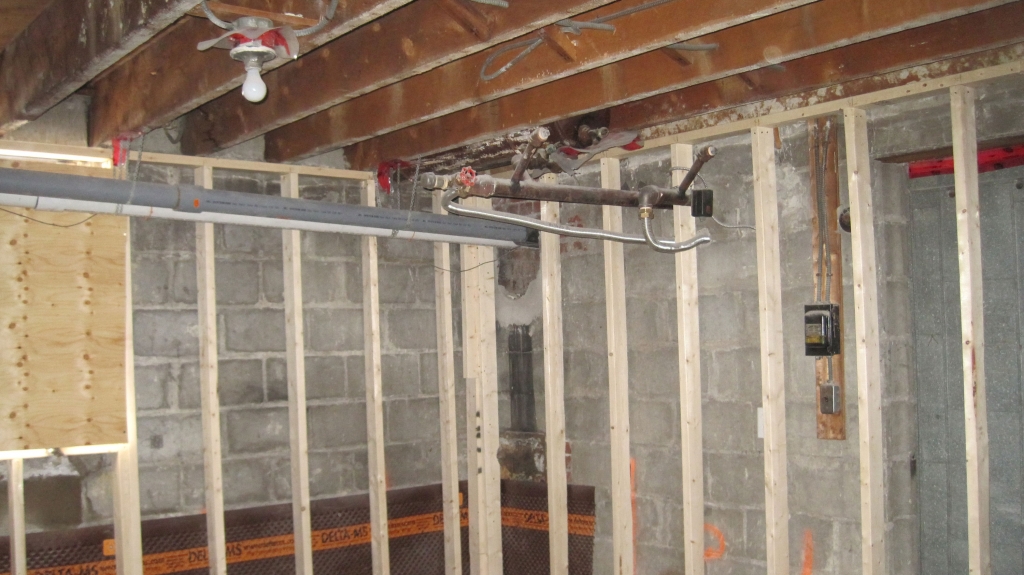
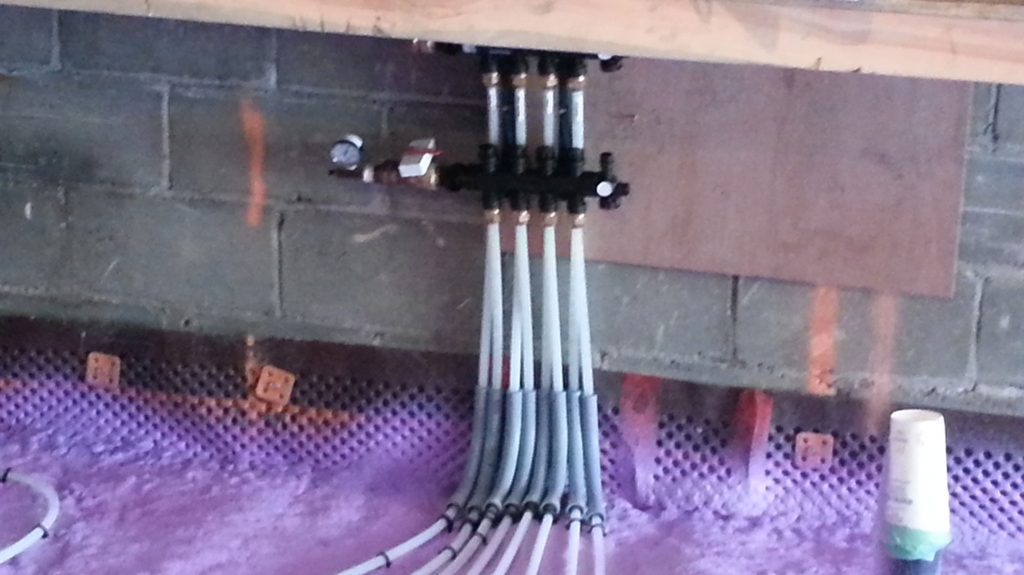
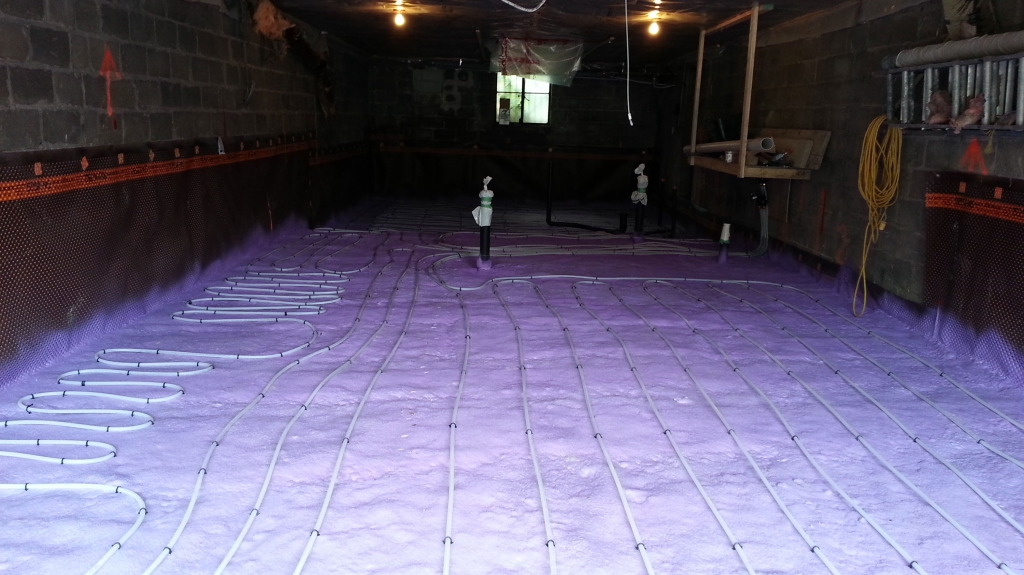
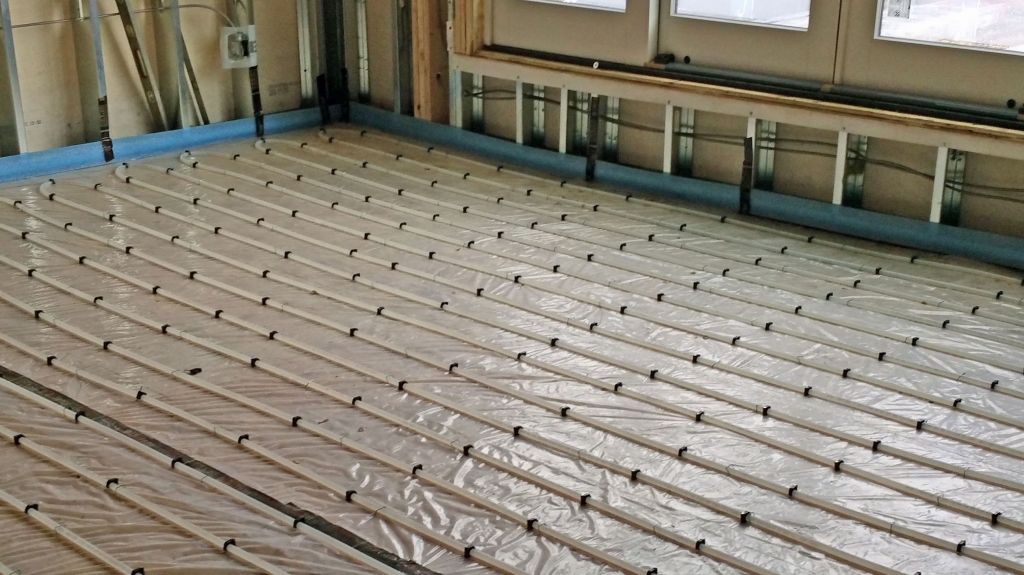
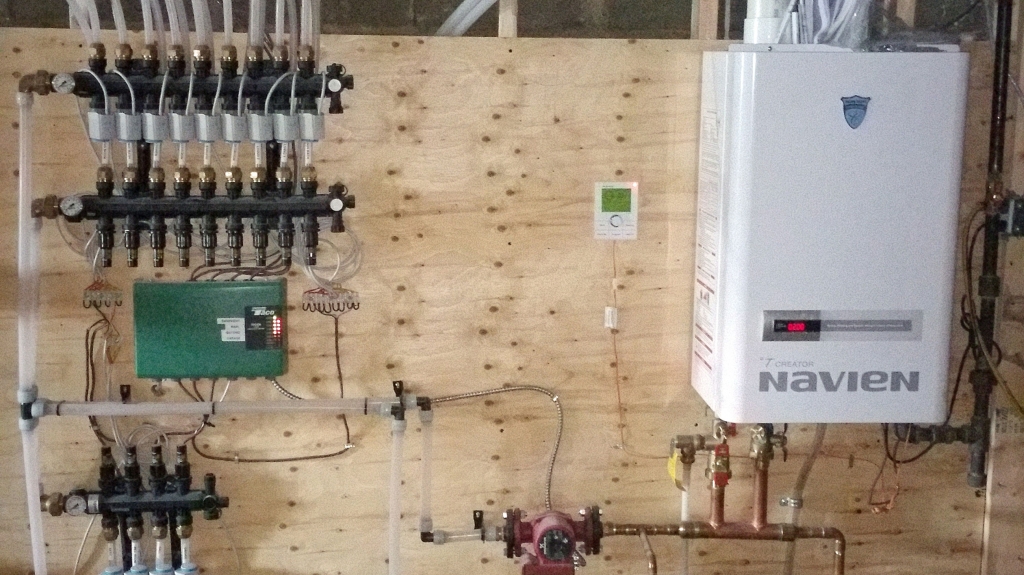
Our Elgin Loft project is getting a serious HVAC face-lift, with in-floor heating, a combination boiler and an optional ductless cooling unit. Thanks to our sturdy block structure and Roxul insulation, these systems won’t have to work hard to keep the loft-like space comfortable and well-ventilated. We’ve installed in-floor heating in between the building’s existing floor joists, a practice we’ve done in previous projects with great results. In-floor heating between existing joists is unconventional, because it is believed that the sub-floor and flooring material will prevent heat from coming through the floor. Instead, the practice is typically done by laying down piping right on the subfloor and pouring on a screed of cement and sad on top of the subfloor, embedding the heating pipes. Though this makes a great, brand new and level floor, this process is expensive and time consuming – not to mention even a few inches of screed is extremely heavy and takes away valuable ceiling height. We’ve proved the nonbelievers wrong by installing PEX plastic pipes between existing floor joists before filling in the joist cavity with insulation underneath the piping, leaving a 2” air gap around the pipes. The pipes heat the air space while the insulation forces heat upwards through the floor. There is some validity in what the existing-joist-naysayers argue – Yes, in-floor heating pipes in the space of an existing floor may not be the most efficient way to heat a house, and a screed topping does deliver consistent heat. But a high efficiency, leak-free, and well-insulated home doesn’t need a lot of heating input, so in-floor heating between joists is more than adequate to meet the demand. And now that a building’s in-floor heating doesn’t always require a new floor and a topping of heavy screed, it has become a much simpler, more affordable heating option than ever before. Because of Elgin Loft’s open concept plan, in-floor heating is a great way to seamlessly heat the space – no radiators or ducts need interrupt the space. We’ve installed engineered hardwood and tile in areas that may get wet (like the kitchen and bathroom). Our flooring must be compatible with in-floor heating, which impacted our choices for materials. We’ve opted for a ductless cooling unit, Fujitsu’s air to air condenser, mostly due to the size and layout of the home. But instead of connecting it to ducts like in our Bickford Park House or Tom and Christine’s house, we’ve left it ductless! With so few walls and separations, a home like Elgin Loft doesn’t necessarily need ductwork to ensure air circulation – With just one Fujitsu head on each floor, the building will easily be kept cool in hot summer months. We’ve separated our HRV unit and our cooling units, and our trusty combination boiler heats water for domestic use and heating. If this building’s structure and envelope was the skeleton & skin, we’ve just put healthy organs and veins into our project’s body. Next, we’ll be working on our interiors, painting walls and putting in cabinets, doors and furniture – our project’s clothes and sense of style! PEX Pipes and Mini-SplitGo To Project Page
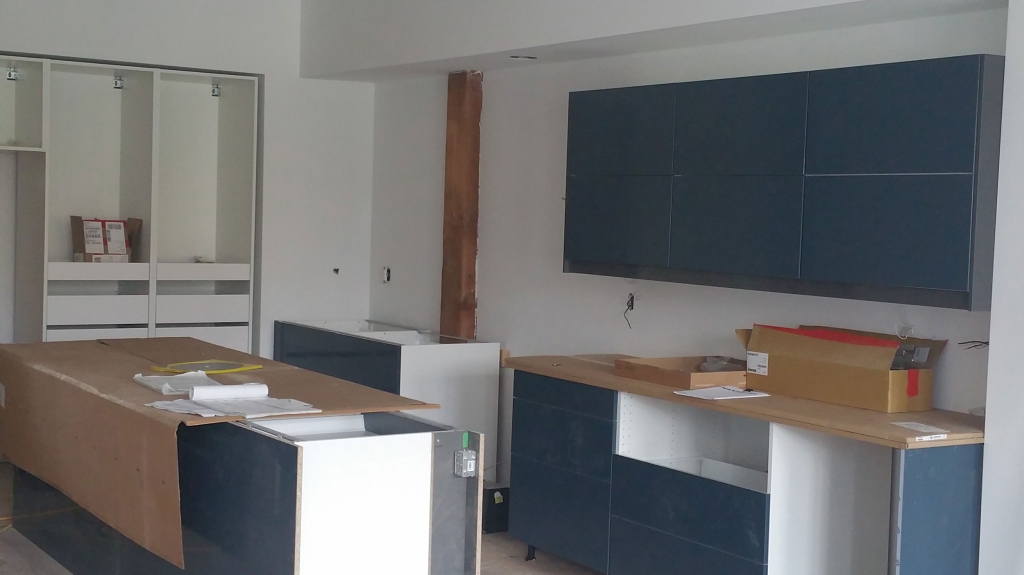
We’re working on getting the cabinets installed and the countertops polished in our Elgin Loft project. Our clients have opted for an industrial, loft-like (you don’t say!) appeal, which means our key colours in this project are grey, white, and more grey. The industrial chic works well with the building’s open concept layout, and we made sure to keep spatial interruptions like radiators and exposed pipes to a minimum, so the whole apartment is fluid and cohesive. The walls are painted with our favourite white paint from Benjamin Moore, and we’ve installed pot lights along the ceilings to keep the space bright and modern. The stair is finished with grey tiles, and the wooden floors will be an ash grey. This wood will complement the slate grey cabinets and countertops in the kitchen. The kitchen is also host to a gorgeous and giant island/breakfast bar, topped with quartz in the same grey. Upstairs, we will be using the same industrial aesthetic, but toning it down a bit to make it bedroom and bathroom appropriate. The wood floors will stay, but the cabinetry and countertops will be white, to match the walls. The huge glass doors that lead to the deck will be an impressive, uber contemporary feature on the second floor as well. Now it’s time to get the broom out and sweep up the last of the sawdust from the floors. Stay posted for move-in day!Grey-on-Grey in Elgin LoftGo To Project Page
Our clients have moved into Elgin Loft, and they’re settling in beautifully! The home is now complete, with art on the walls, furniture in place, and walls in beautiful blue and grey tones. This project, a multi-use building at Christie and Dupont that houses our client’s framing shop, was an exciting one for Solares. Multi-use buildings are a beast of their own, with separate zoning regulations, fire safety regulations, and building requirements. These regulations affect everything from building materials and window locations, to the distances between indoor and outdoor walls. Technical aspects aside, as our client also owns the framing shop within the building, we wanted the building’s style to be cohesive. To do this, we, with our clients help, chose a more industrial, loft-like style for the house’s living quarters, which takes up one branch of the building’s L-shape. Just like our client’s framing shop, which is bursting with style and art, the house is incredibly stylish. The front door opens onto the ground floor, with a large entranceway to hang coats and drop shoes, its own full bathroom, and a large basement rec room, which is currently being finished. The stairs up to the second floor are sleek and modern, with light wood steps and a contemporary glass stair guard. On the second floor, the room opens up to the uber modern kitchen, with dark grey walls and tiling. On one end of the kitchen, is bright blue boys’ bedroom, and on the other is the more formal living and dining area, with a striking chandelier and brightly coloured home accessories. The third floor houses the more casual TV room, big enough to put up a full-sized tent for the kids to camp indoors! Off this living room will be the giant roof deck, still a work in progress, saved for when the weather gets a bit warmer. A laundry room sits across from the stairs, next to a large bathroom with mint green shower tiles that shimmer like a mermaid would. Overlooking the street, the master bedroom is simple yet appealing, with dark blue-grey walls, a private door to the bathroom, tons of closet space, and modern wall sconces that hug a large multimedia work of art. The home’s outer face is just as impressive as the interior, with COR-TEN steel siding by Punchclock Metalworks that rusts a vibrant orange and a saturated dark blue painted exterior. Our builder, Paul Drummond of Modern Dwellings, did an awesome job with this sustainable loft. Paul was the perfect choice for this project — his construction management firm, which specializes in sustainable building and renovation work, did an awesome and impressive job on this unique project. Thank you, Paul! As if finishing this project wasn’t exciting enough, Dave LeBlanc, Globe and Mail’s resident Architourist, wrote an article on it! His engaging piece (give it a read here) includes an interview of our clients and the building’s unique history and nontraditional floor plan. Thanks for your awesome account, Dave! A huge thank you to our clients, for their positive energy throughout this entire process! It as a joy getting to know the family. And thank you Melodie Coneybeare, and Jered Gudbranson, for all their hard work managing this project! Here’s to another awesome project under our belt.The Urban Elgin Loft!
Go To Project Page
- + Intro
- An Intro to Elgin Loft
This new project, which we’ve called the Elgin Loft, is a unique combination of industrial, retail and residential space in downtown Toronto.
This building has been the home of our client’s picture framing company for years, but he is now looking to convert part of it into a home for his family of four. The beautiful and unique L-shaped lot opens onto two main Toronto streets, encircling a historic bank building which sits right on the corner. The building’s shape allows us to use one wing of the building for residential use without intruding on our client’s retail areas, which will take up the remaining building space. This gives the family their own entrance off one of the main streets while keeping the company’s existing entrance intact at the other end of the building.
The company’s main entrance splits at street level into a main floor upstairs, and a lower floor in the basement. His picture-framing workshop and retail space occupy the upper level, with a large gallery space for local artists on the lower level. The other wing of the “L”, which we’ll be converting into his family home, was previously underutilized, and was mainly used for storage and supplies.
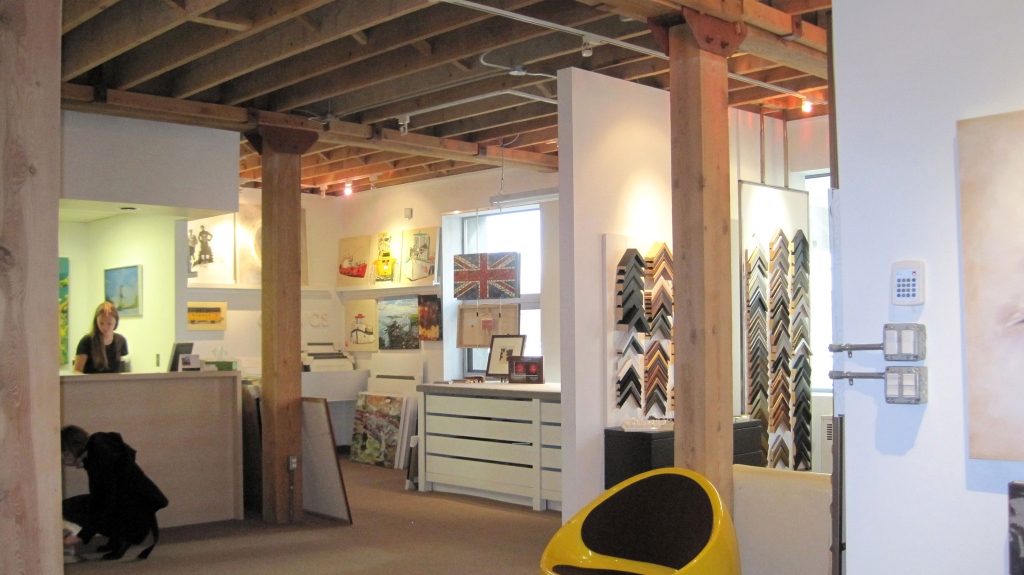
The building lives up to its “loft” title with high ceilings, art deco precast details, and heavy timber beams. The exterior walls are concrete block, giving the building an urban and industrial feel.
What makes this project unique, and a bit tricky, is its multi-purpose use and occupancy. Building code qualifies the building as suitable for F-3, “light-industrial” use, and regulations differ between residential and industrial uses. These regulations affect everything from window locations and building materials to distances between indoor and outdoor walls. Fire safety and separation is also critical when constructing a multi-use building.
Construction on this project is underway and we’re eager to share our progress with you. In a few weeks, I’ll be discussing the design plans in more detail, and how building code affects those designs (With fire regulations for multi-unit buildings, exposing those heavy timber beams requires special attention!). We love the idea and intention behind this multi-use project and can’t wait to see it complete!
Go To Project Page


- + Design
- Elgin Loft’s Urban Design
Multi-use buildings have their own sets of design and construction challenges. It takes careful planning to abide by the building, fire, electrical and zoning codes, while keeping in tune with a client’s needs and aesthetic.
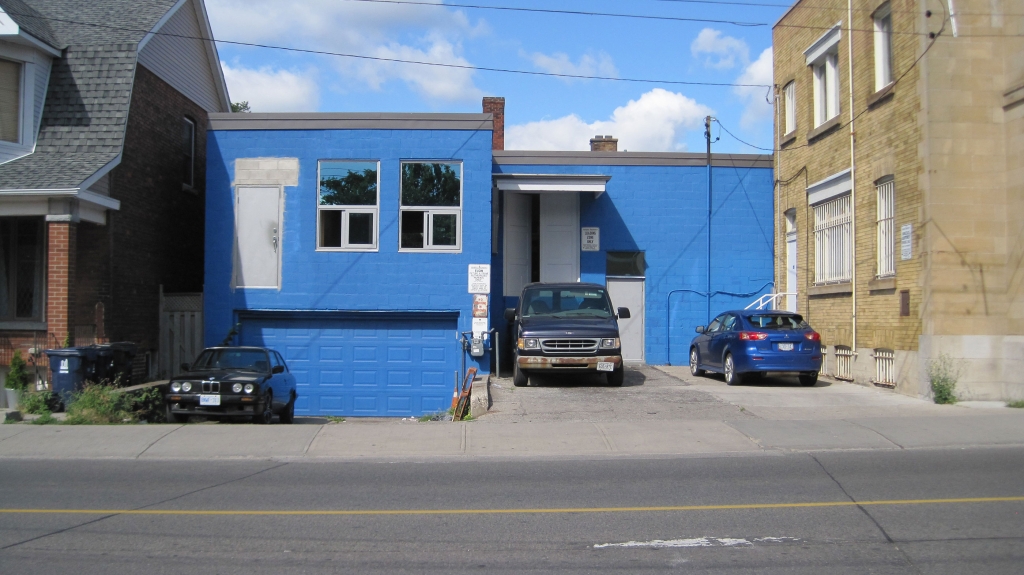
Enter the Elgin loft: our light-industrial, multi-use project. The L-shaped building currently houses our client’s picture framing shop with main entries on two sides. Once construction is complete, the property will double as a home for his family. Our proposed design is to split the building vertically at the “foot” of the L-shape. This would locate the main entry of the residence on the east side of the building, preserving the north entry for the existing retail and gallery space.
Our second “big idea” is to then add a partial 3rd storey addition above the residence and turn the roof over the industrial shop into a massive outdoor space. At around 800 square feet, this magnificent deck will act as the backyard replacement, continuing the relaxed, urban theme of this family dwelling. The existing two levels below the addition will be fully renovated to meet our clients’ needs and make the new home as energy efficient as possible.
The challenge of designing this “urban loft” is adding family functionality, sound and visual breaks while keeping the space as open-concept and communal as possible.
Go To Project Page
The Floor PlansThe new home will be three levels, each with 850sf of living space: The lower level, sitting a few steps below street level, the main storey, which sits at level, and the new upper, third floor.
The lower level houses the main entrance foyer with large closets as well as a single car garage, a total luxury in downtown Toronto. Both the foyer and garage lead to the main straight-run stair to the second level. Also on the lower level is a small utility and storage room, guest bathroom, and large family room which can double as a guest bedroom.
On the main floor, the stairs open up into a huge communal space with a seating area and dining room in the east, and a kitchen in the center. This open-concept dining area and kitchen take up about two-thirds of the main floor. The kitchen is a chef’s dream: with a huge island right in the middle and tons of counter space, it’s the perfect place for dinner parties or potlucks. The stacked stairs lead to the upper floor with large skylights above, spilling light down into the center of the plan. A bathroom and storage closet separate the kitchen from the kids’ bedroom on the far side of the main floor.
The northern end of the third floor hosts the master bedroom, with a luxurious en-suite bathroom and a humungous closet. A big utility room for laundry and storage sits next to the bathroom, and the west end of the floor consists of another communal room, where the family can talk, play games or listen to music together. The communal space upstairs has a more intimate feel than the main floor’s entertaining space, and the north facing rooftop deck leads off the family room, where the kids can play and the parents can cultivate their urban farm.
Once finished, the whole house will feel casual, intimate and friendly. The lack of a formal divide between private rooms and rooms reserved for company creates a welcoming, unpretentious atmosphere, and the high, 10ft ceilings on the lower level, as well as the open, all-purpose main floor add an airy brightness to this semi-industrial space.
Next time we’ll be discussing all things demo with this downtown dwelling. Keep checking in with us as this urban project begins to take shape!
- + Structure
- Start of Construction
Construction has started at our Elgin Loft project. A super urban undertaking, we’re creating a cool, loft-like space for our client and his family in the same building that his framing-company occupies.
I’m about to give you a crash course on everything that we handled throughout the construction process. It gets a little tricky, but where’s the fun if it isn’t?
Our builder on this project is Paul Drummond of Modern Dwellings, a Toronto-based building team with expertise in renovating modern, sustainable homes. When it came to site preparation, we knew we needed a detail oriented “GC” (General Contractor) for a few key reasons:
The close proximity of our building to the property line meant our scaffolding had to be extra precise and sturdy. The proximity of other buildings also made our basement underpinning process difficult – we needed to make sure we didn’t compromise the foundations of surrounding lots by digging too deep (we’ll talk more about that later on in this post).
And lastly, our client wanted to keep the framing business open throughout construction. Before anything else, our building team created a dividing partition wall using studs and plastic sheeting, between the business unit and the soon-to-be residential unit of the house.
Go To Project Page


 Third Floor Addition & PVC Roof
When adding a new storey to a building, it’s important to make sure your foundation can support the added weight. If it can’t, the foundation must be strengthened, either by adding thickness to the footing, or extending the footing downward. We decided to lower the back half of the basement during our underpinning process, for a higher, more comfortable ceiling height in our client’s music room and basement living area.
We didn’t need to lower the floors in the drive-in garage that makes up the front portion of the basement, so we only thickened the walls and footings of our foundation in that area. When underpinning, it’s important to make sure your neighbor’s foundations can also handle the excavation; if you dig too low, other neighbouring foundations may fall away. But we made sure that didn’t happen!
With the foundation ready, Modern Dwellings started on the third floor addition over the residential portion of the building’s footprint, which is approximately 1/3 of the total area. This leaves about 2500sf available for a huge roof deck.
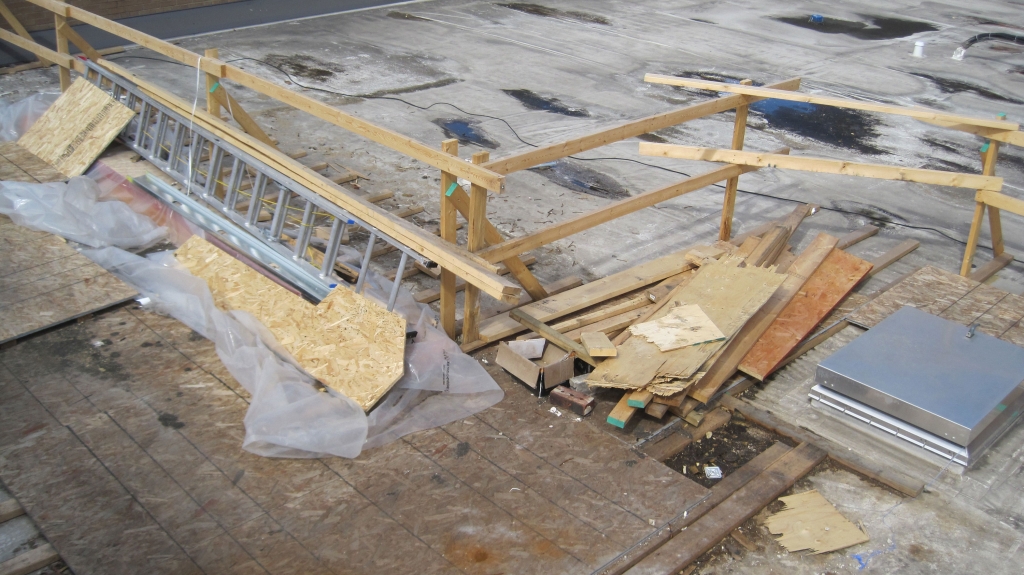
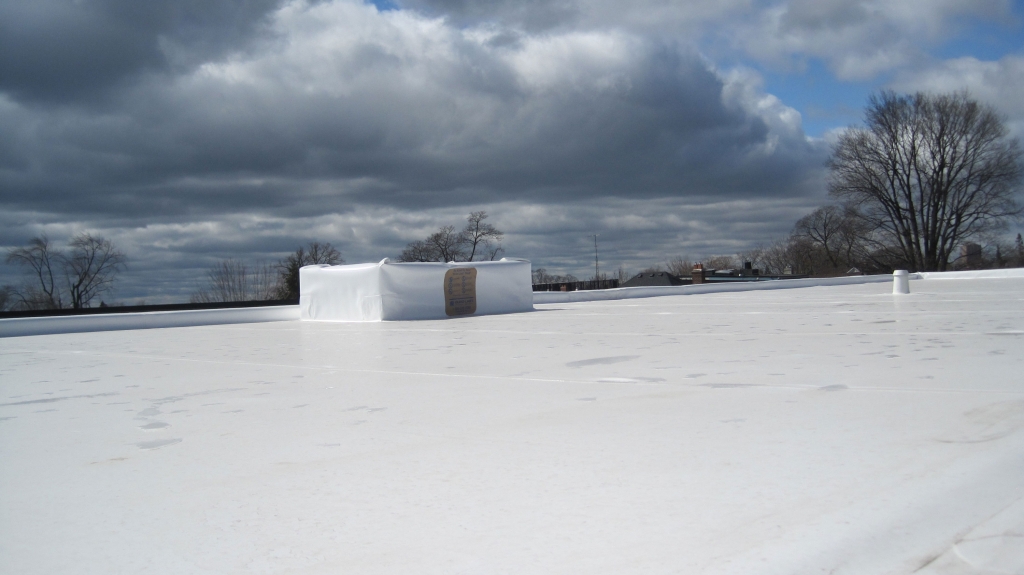
Our client, though excited with the design, was concerned because of roof work he had recently invested in: a PVC, poly-vinyl, high performance roof membrane he had installed only a few years ago. We understood his concerns: it would be frustrating if his new roof work went to waste! Instead of simply throwing out a section of the membrane and replacing it with the third floor addition, we decided to cut the membrane off and reattach it onto the third floor roof.
With some plastic welding and a bit more PVC material, we then welded the reused membrane to the existing one, recreating the continuous sheet with very little waste. On top of the second floor roof membrane, we installed wooden sleepers, engineered wood joists, which hold the new roof deck on top of the membrane. This satisfied us as well as our client!
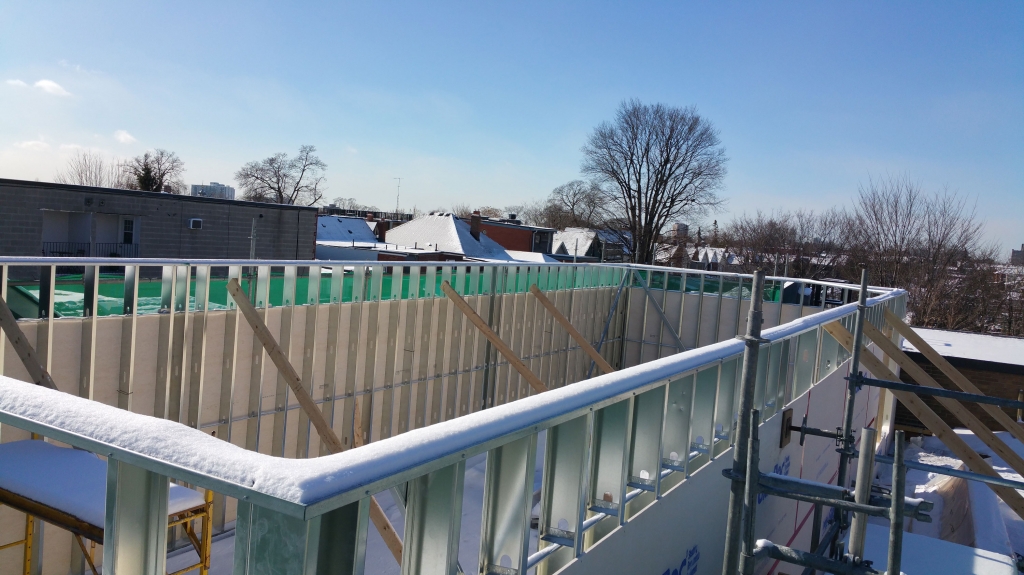
Because of the building’s light-industrial mixed use, we needed to construct the third floor addition out of non-combustible materials, to adhere to F-3 building code. We decided on light-weight structural steel studs, for strength and stability. The first and second floors are made of concrete block, which already meets with building code requirements, so we didn’t have to worry too much about those floors.
Stay posted as we continue construction and start installing the systems in our urban Elgin loft!
- + Envelope
- Wall Assembly
The existing structure and the new third floor addition of our urban multi-use project Elgin Loft are officially insulated, sheathed, and windowed! We’ve insulated in fairly conventional ways, but taking care with the added challenges of building a multi-use structure to code.
The existing structure of the first two floors, made of concrete block, has been strapped with wood studs, set off the block by an inch, then sprayed with closed cell foam which acts as our air and vapour barrier. On the upper addition, we needed to use entirely non-combustible materials, due to the light-industrial assembly of the building.
In the existing structure, the concrete block acts as fire protection. Wood, plastic, and oil-based materials aren’t great at fireproofing, to say the least! Therefore, we couldn’t use wood studs or spray foam. Instead, we opted for steel studs, and Roxul mineral wool batts for interior insulation, which are both non-combustible and made of recyclable materials; Mineral wool is made of rock slag, a by-product of the mining industry. We then added rigid boards on the exterior of the structure, also by Roxul, for additional insulation.
On the exterior, we used a delta vent weather barrier to act as our weather barrier and air barrier – we stapled and taped it to the side of the sheathing, to protect from the outside elements. This delta vent is made of gypsum, which is more typically used in commercial building, because of the rigorous fire regulations of commercial codes. Then, we put up a typical poly sheet inside of our steel studs to act as our vapour barrier.
For this type of F-3 building, the roof didn’t need to be composed of only non-combustible materials. That meant we were legally able to use spray foam between the roof joists which insulates and acts as both our air and vapour barriers. On top of the spray foam, we added some board insulation just before the PVC roof membrane that our client wanted to preserve. The good news: We did manage to preserve some of the membrane our client cherished. The bad news: with cutting it apart and welding it back together to ensure a water-tight and seamless installation, it ended up costing about the same as simply using a new membrane.
Between the residential and industrial portions of the building, we had to install a smoke-tight, fire-rated separation. This wall is typically known as a “party wall”, because multiple parties share it. This separation was done as a wood-framed wall, and needed additional drywall and insulation for acoustics and sound-break separation. We then fire-caulked at all the joints, to make sure our party wall was both silent and fireproof.
Go To Project Page


 Exterior Cladding
An impressive and striking feature on the eastern and northern exterior walls of our third floor addition was the weathering steel cladding, commonly known as COR-TEN, by Punchclock Metalworks. Punchclock is a local Toronto company that specializes in custom made metalwork, ranging from structures and art pieces to exterior siding and cladding.
The mild steel is designed to oxide and rust, which makes it naturally resistant to future rust. Plus, the industrial aesthetic is a wicked addition to this urban home. On the western and southern walls, we used aluminum panels for exterior cladding, which were much less expensive than steel. These walls sit right next to surrounding properties, so are not easily visible – we saved the artistic, rusting steel for the uber visible portion of the third floor. We left the concrete block on the first floor generally intact.
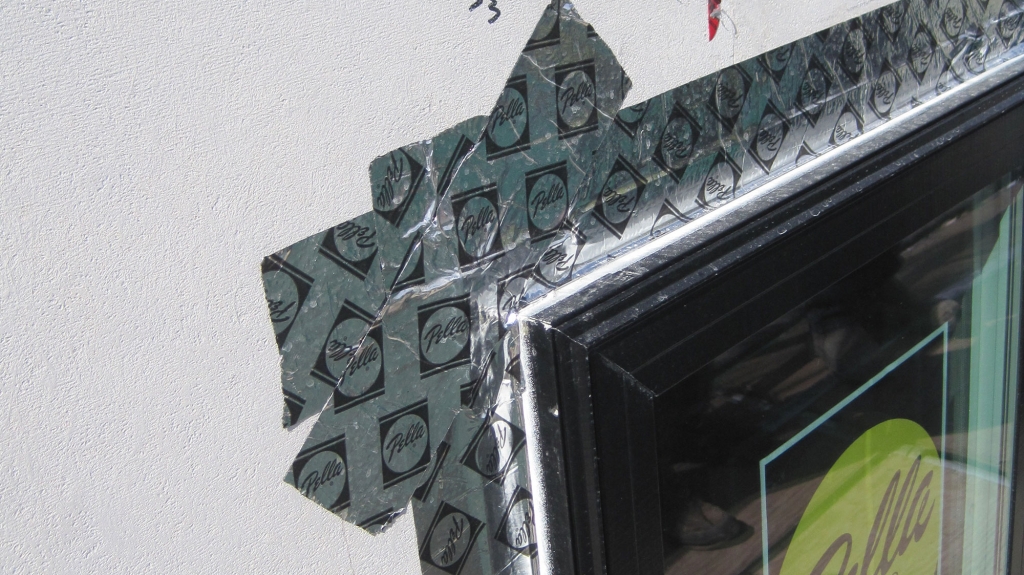
The fiberglass windows by Pella were also fairly common in installation – installed with screws, shimmed and finished with low expansion foam. Air sealing is important when installing windows, and we had to be extra careful with the third floor skylight, which needed air sealing, plus rain and wind protection. We opted for a huge, four-panel sliding door that leads out to the wooden roof deck, which aren’t as well-performing as other types of doors. But after talking with our client, we decided that the hit in performance was worth it for the functionality and aesthetic of such a lovely, large entrance to the deck.
Our priority when it came to this project was insulating above code, while turning a fully industrial building into a functioning family residence. Our existing foundation comes to an R10 to R12, with the new addition coming in at R35. The new roof performs at R32, and if airtight, will perform very well.
We’ll keep you posted when we install some mechanical systems in this urban project!
- + Systems
- PEX Pipes and Mini-Split
Our Elgin Loft project is getting a serious HVAC face-lift, with in-floor heating, a combination boiler and an optional ductless cooling unit.
Thanks to our sturdy block structure and Roxul insulation, these systems won’t have to work hard to keep the loft-like space comfortable and well-ventilated.
We’ve installed in-floor heating in between the building’s existing floor joists, a practice we’ve done in previous projects with great results. In-floor heating between existing joists is unconventional, because it is believed that the sub-floor and flooring material will prevent heat from coming through the floor. Instead, the practice is typically done by laying down piping right on the subfloor and pouring on a screed of cement and sad on top of the subfloor, embedding the heating pipes. Though this makes a great, brand new and level floor, this process is expensive and time consuming – not to mention even a few inches of screed is extremely heavy and takes away valuable ceiling height.
We’ve proved the nonbelievers wrong by installing PEX plastic pipes between existing floor joists before filling in the joist cavity with insulation underneath the piping, leaving a 2” air gap around the pipes. The pipes heat the air space while the insulation forces heat upwards through the floor.
There is some validity in what the existing-joist-naysayers argue – Yes, in-floor heating pipes in the space of an existing floor may not be the most efficient way to heat a house, and a screed topping does deliver consistent heat. But a high efficiency, leak-free, and well-insulated home doesn’t need a lot of heating input, so in-floor heating between joists is more than adequate to meet the demand. And now that a building’s in-floor heating doesn’t always require a new floor and a topping of heavy screed, it has become a much simpler, more affordable heating option than ever before.
Because of Elgin Loft’s open concept plan, in-floor heating is a great way to seamlessly heat the space – no radiators or ducts need interrupt the space. We’ve installed engineered hardwood and tile in areas that may get wet (like the kitchen and bathroom). Our flooring must be compatible with in-floor heating, which impacted our choices for materials.
We’ve opted for a ductless cooling unit, Fujitsu’s air to air condenser, mostly due to the size and layout of the home. But instead of connecting it to ducts like in our Bickford Park House or Tom and Christine’s house, we’ve left it ductless! With so few walls and separations, a home like Elgin Loft doesn’t necessarily need ductwork to ensure air circulation – With just one Fujitsu head on each floor, the building will easily be kept cool in hot summer months. We’ve separated our HRV unit and our cooling units, and our trusty combination boiler heats water for domestic use and heating.
If this building’s structure and envelope was the skeleton & skin, we’ve just put healthy organs and veins into our project’s body. Next, we’ll be working on our interiors, painting walls and putting in cabinets, doors and furniture – our project’s clothes and sense of style!
Go To Project Page


- + Interiors
- Grey-on-Grey in Elgin Loft
We’re working on getting the cabinets installed and the countertops polished in our Elgin Loft project.
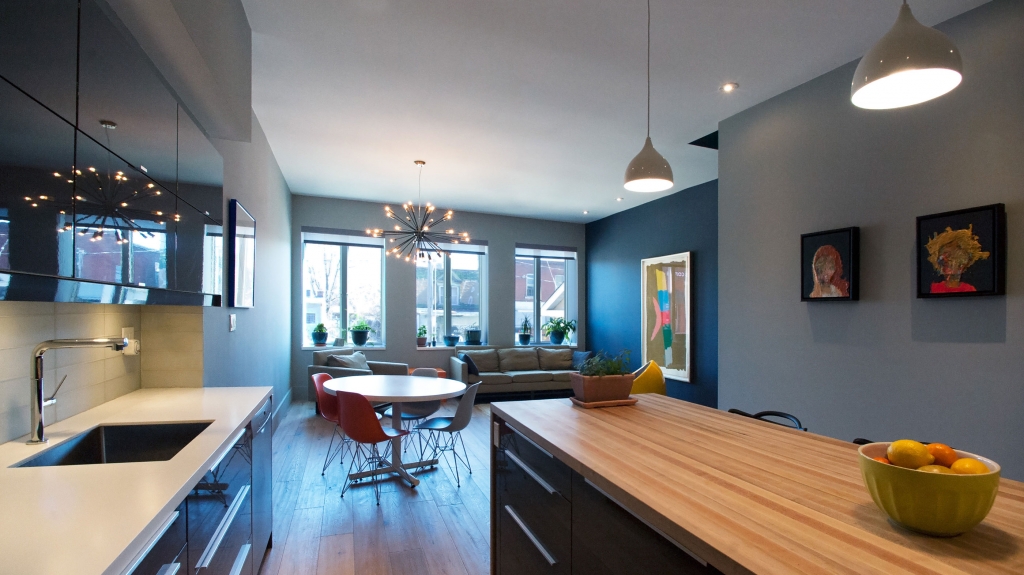
Our clients have opted for an industrial, loft-like (you don’t say!) appeal, which means our key colours in this project are grey, white, and more grey. The industrial chic works well with the building’s open concept layout, and we made sure to keep spatial interruptions like radiators and exposed pipes to a minimum, so the whole apartment is fluid and cohesive.
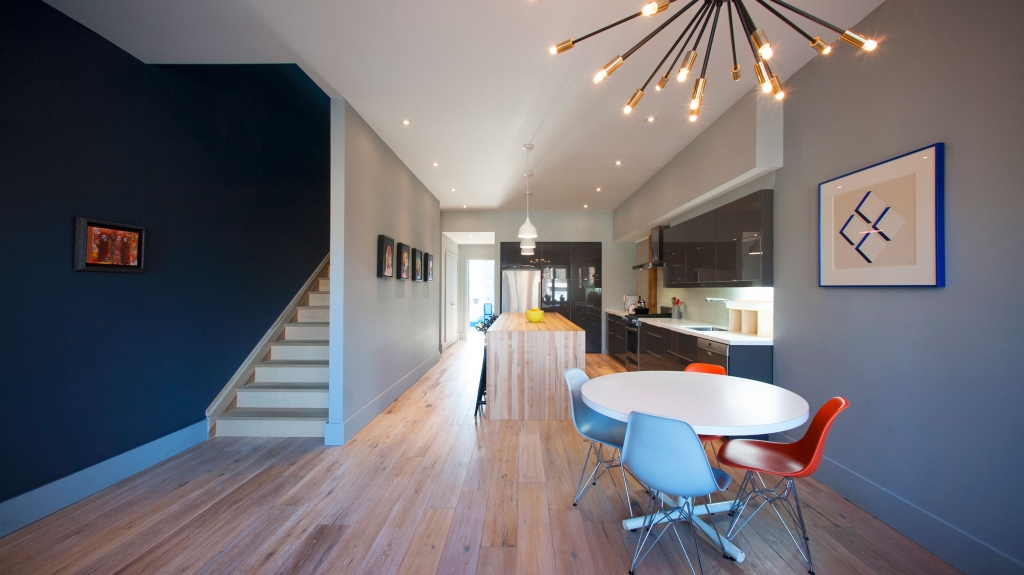
The walls are painted with our favourite white paint from Benjamin Moore, and we’ve installed pot lights along the ceilings to keep the space bright and modern. The stair is finished with grey tiles, and the wooden floors will be an ash grey. This wood will complement the slate grey cabinets and countertops in the kitchen. The kitchen is also host to a gorgeous and giant island/breakfast bar, topped with quartz in the same grey.
Upstairs, we will be using the same industrial aesthetic, but toning it down a bit to make it bedroom and bathroom appropriate. The wood floors will stay, but the cabinetry and countertops will be white, to match the walls. The huge glass doors that lead to the deck will be an impressive, uber contemporary feature on the second floor as well.
Now it’s time to get the broom out and sweep up the last of the sawdust from the floors. Stay posted for move-in day!
Go To Project Page


- + Reveal
- The Urban Elgin Loft!
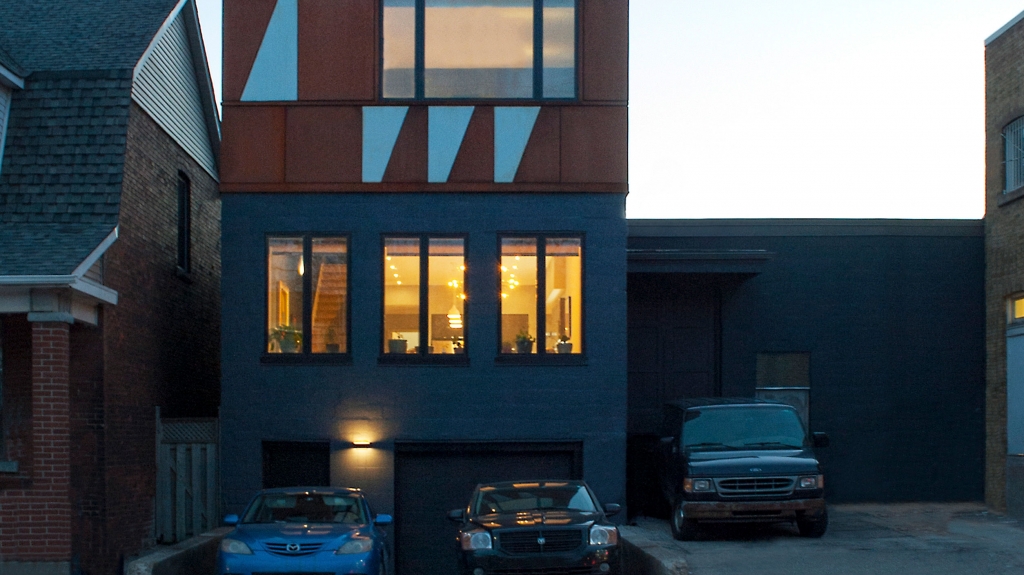
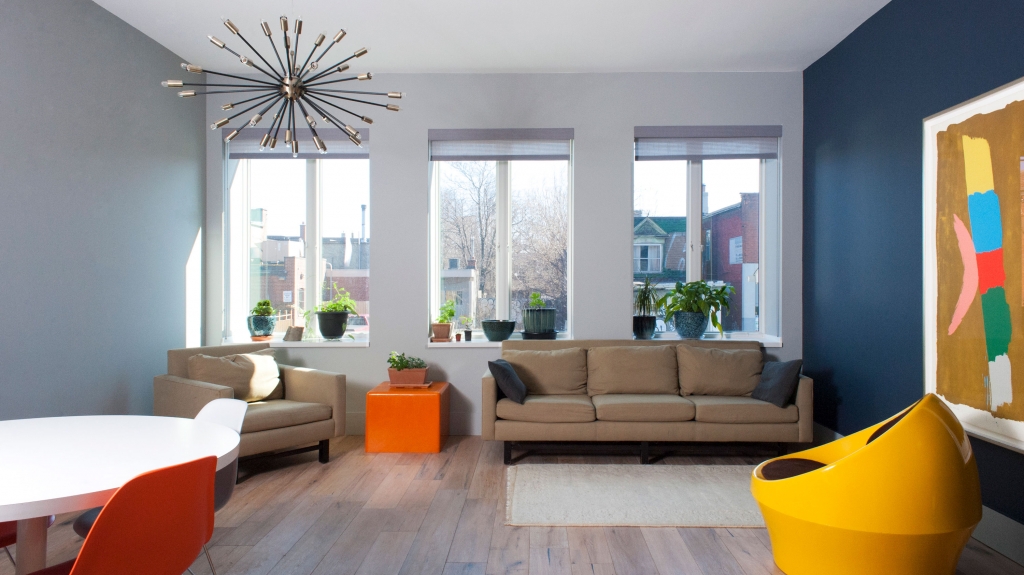
Our clients have moved into Elgin Loft, and they’re settling in beautifully! The home is now complete, with art on the walls, furniture in place, and walls in beautiful blue and grey tones.
This project, a multi-use building at Christie and Dupont that houses our client’s framing shop, was an exciting one for Solares. Multi-use buildings are a beast of their own, with separate zoning regulations, fire safety regulations, and building requirements. These regulations affect everything from building materials and window locations, to the distances between indoor and outdoor walls.
Technical aspects aside, as our client also owns the framing shop within the building, we wanted the building’s style to be cohesive. To do this, we, with our clients help, chose a more industrial, loft-like style for the house’s living quarters, which takes up one branch of the building’s L-shape.
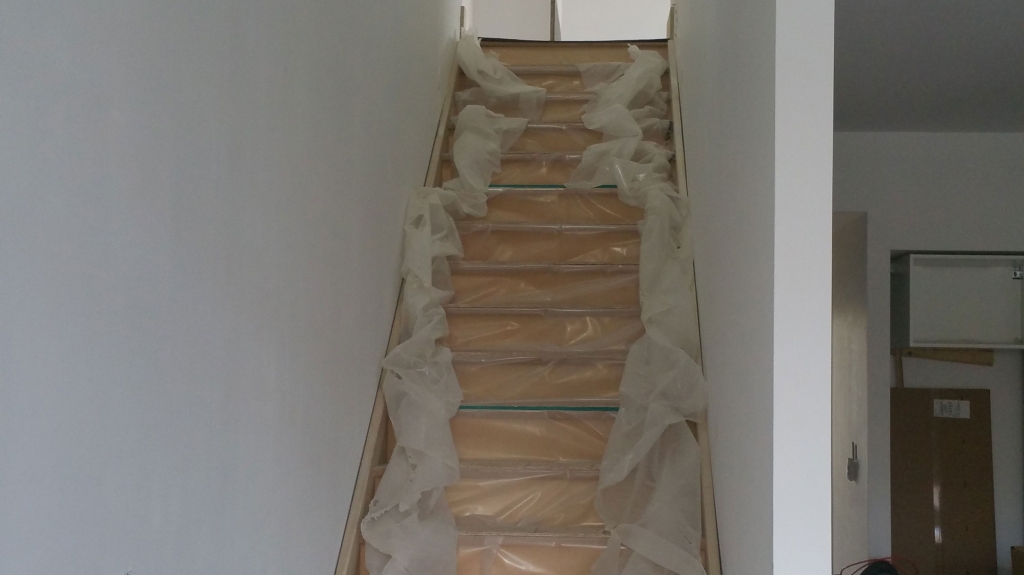
Just like our client’s framing shop, which is bursting with style and art, the house is incredibly stylish. The front door opens onto the ground floor, with a large entranceway to hang coats and drop shoes, its own full bathroom, and a large basement rec room, which is currently being finished. The stairs up to the second floor are sleek and modern, with light wood steps and a contemporary glass stair guard.
On the second floor, the room opens up to the uber modern kitchen, with dark grey walls and tiling. On one end of the kitchen, is bright blue boys’ bedroom, and on the other is the more formal living and dining area, with a striking chandelier and brightly coloured home accessories.
The third floor houses the more casual TV room, big enough to put up a full-sized tent for the kids to camp indoors! Off this living room will be the giant roof deck, still a work in progress, saved for when the weather gets a bit warmer.
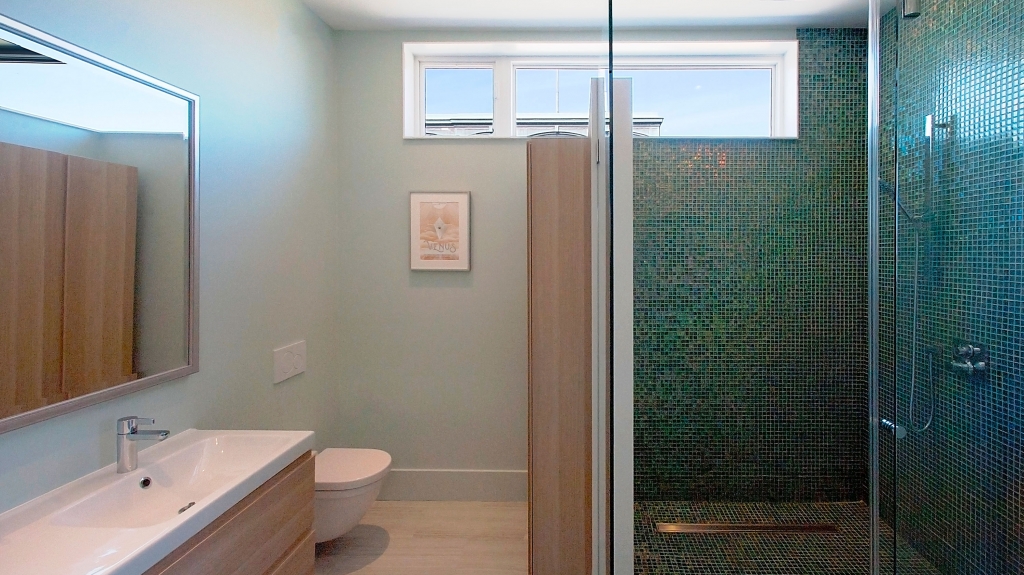
A laundry room sits across from the stairs, next to a large bathroom with mint green shower tiles that shimmer like a mermaid would. Overlooking the street, the master bedroom is simple yet appealing, with dark blue-grey walls, a private door to the bathroom, tons of closet space, and modern wall sconces that hug a large multimedia work of art.
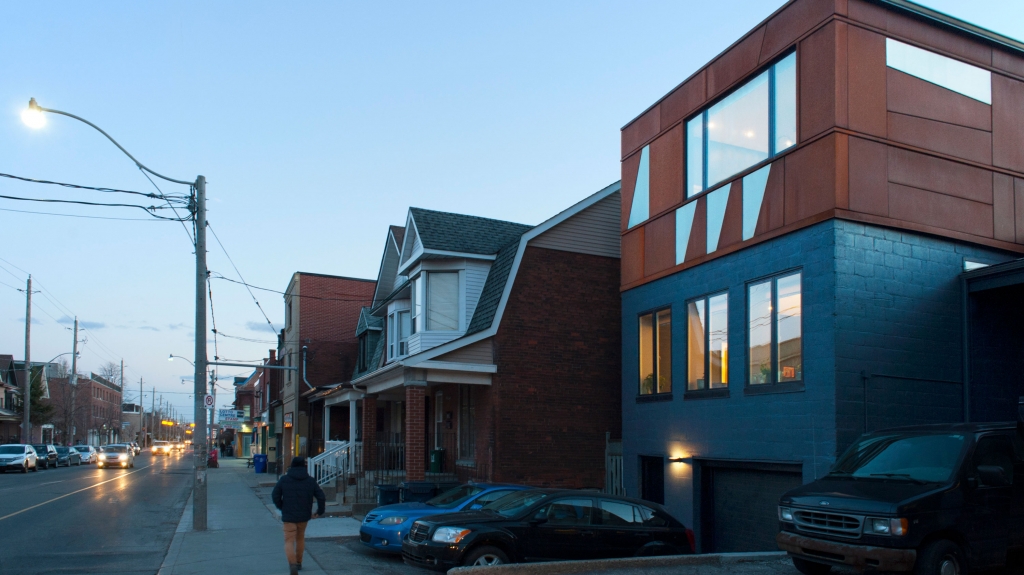
The home’s outer face is just as impressive as the interior, with COR-TEN steel siding by Punchclock Metalworks that rusts a vibrant orange and a saturated dark blue painted exterior.
Our builder, Paul Drummond of Modern Dwellings, did an awesome job with this sustainable loft. Paul was the perfect choice for this project — his construction management firm, which specializes in sustainable building and renovation work, did an awesome and impressive job on this unique project. Thank you, Paul!
As if finishing this project wasn’t exciting enough, Dave LeBlanc, Globe and Mail’s resident Architourist, wrote an article on it! His engaging piece (give it a read here) includes an interview of our clients and the building’s unique history and nontraditional floor plan. Thanks for your awesome account, Dave!
A huge thank you to our clients, for their positive energy throughout this entire process! It as a joy getting to know the family. And thank you Melodie Coneybeare, and Jered Gudbranson, for all their hard work managing this project! Here’s to another awesome project under our belt.
Go To Project Page


