SHARE THIS
What would you do if your house got hit by lightning and completely burnt down? It seems like a crazy question to ask, but this was the reality for two of our clients, a couple living north of Peterborough and west of Kawartha Highlands Provincial Park. The couple, with a grown-up daughter who lives in Toronto, recently retired and planned on staying in their forever home for the rest of their lives. Their home wasn’t necessarily perfect, but, with a bounding dog and tons of outdoor equipment and vehicles like canoes, boats, kayaks, and a snowmobile, the property sure delivered for their outdoorsy lifestyle. Their relatively flat, 1-acre plot is bordered by a lake to the east, with a view dotted by cedars. Densely packed cedar trees line the property to the north and the south, and to the west, is the main road. About 100 feet in from the road sits a limestone rock outcropping, about 6-8 feet high, which cuts the property in two – one half of the property sits at road height, and the other half lowers to meet the lake. The limestone, cedars, and lake make the property quintessentially Southern Ontario, not to mention beautiful. There were many people in the house when the lightning struck, and though – thankfully – everyone was able to escape, the experience was terrifying. Our clients could have easily focused on the trauma and fear of the incident. Instead, they were brave and hopeful – they began to see the experience as an opportunity to build a new (and even better) home, totally custom to their needs and wishes. Ideally, their new home would be smaller than their previous, and on one level, so they could age comfortably while living in it. But most of all, their priority was a Net-Zero house: they wanted a home that would produce as much – or more! – energy as it used per year. When they came to Solares with their optimistic outlook and awesome sustainable plan, we absolutely had to take part. The couple is not only positive and environmentally conscious – they are also popular! Their year is filled with both casual potlucks and fine-dining dinner parties, overnight guests, and a couple of birthday extravaganzas, indoor and outdoor in the summer. Plus, their daughter often comes to visit from Toronto, staying overnight. Their new house, though compact, must still have enough space for overnight guests to feel comfortable, and the kitchen and dining room are a top priority – a fancy dinner party is only as large as the dining room table! In their free time, the two are huge hobbyists – he is a hunter and retired metal shop worker and tradesman, and she loves to garden. Luckily, the property is spacious enough for a large garden with lots of southern sun, and a separate workshop/bunking lodge to store equipment and tools, and for hunting gatherings and hangouts. But that’s for the next post. This project will be exciting, interesting and enterprising – we can’t wait to see it through.Kawartha Highlands Net-Zero HouseGo To Project Page
Net Zero, Net Zero, and Net Zero: these are Kawartha Highlands’ three main priorities. If you need to be reminded, our Kawartha-Highlands Net Zero House is located near Peterborough and west of Kawartha Highlands Provincial Park. This lovey project sits on a small lot lined with cedar trees, and has coveted lakefront. Plus, this project is designed to be – you guessed it — completely Net Zero. A Net Zero house produces as much, if not more, energy than it uses annually. Net Zero Houses are hard to come by. And Net Zero Houses are hard to build. Building a house that uses absolutely no energy is unfeasible, uncomfortable, and essentially un-survivable in Ontario’s climate. A Net Zero house uses electricity to maintain comfort, but aims to break even by collecting energy to make up for the energy it uses. And unless one has the physical and financial freedom for hundreds of windmills or thousands of PV panels, using as little energy as possible makes this ambitious goal more attainable. That said, it becomes clear why every aspect of the Kawartha Highlands house has to be designed to both save and collect energy. Passive solar is one of the best strategies for minimal energy use and maximum energy collection. An ideal passive solar home has long south-facing exposures and pitched roofs for three main reasons: 1) large southern windows allow the interior of the house to collect the sun’s heat and light for most of the day, 2) the roof’s overhang keeps the house from overheating in the summer by shading the highest and hottest rays of the year, and 3) a roof’s long south-facing slope is prime real estate for PV Solar Panels. Using these principles, the perfect passive solar house would be designed with every room facing south, all with huge southern windows and a long pitched roof installed with solar panels. However, real life is not that easy – a lot’s landscape, size, and client’s aesthetic preferences can drastically alter a passive house’s blueprint. Take this project — with an eastern lakefront, it seems a waste to design a totally southern-oriented home with no windows overlooking the lake. But we weren’t discouraged! With careful thought and consideration, we managed to include everything we wanted in this design: eastern lake views, southern passive solar exposure, and a southern roof for solar panel installation. The home’s overall look is reminiscent of a modern Ontario agricultural building. The low-slung structure is topped with two intersecting steep-pitched roofs. The first pitched roof runs along the east-axis with full due-south exposure — perfect for mounting 40 PV solar panels. This roof covers the Great Room and the garage which sits to the west, slightly apart from the home. A breezeway paved by flagstone makes up the covered space between the garage and home, with an entrance to the home’s foyer. This foyer runs the length of the home, dividing the Great Room from the rest of the house. Opposite the entrance to the breezeway is an exterior door leading to the eastern lakefront, so our clients can walk straight from the house to the lake for a quick dip. Just off the foyer, the large Great Room stands in the south-east corner of the home, with tall southern windows. One huge eastern picture window gives a full view of the lake. The second roof runs along the north-south axis, covering the bedrooms and secondary spaces. Three east-facing bedrooms run the length of the house, each with their own views of the lake. The master bedroom, farthest from the Great Room, has its own personal exterior door. This door gives our clients the freedom to head down to the lake first thing in the morning or late at night, without disturbing any guests who may be staying in their additional bedrooms. Plus, the master bedroom has the best view of the “Whale” — the large rock outcropping that looks just like a breaching whale. Finally, the west side of the bedroom wing houses all the service spaces: master bathroom, guest bathroom, laundry and mechanical room. This home was both a challenge and a treat to design, and the building process will be even more so! We’re looking forward to tackling the heavy lifting of this Net Zero build.Net-Zero DesignGo To Project Page
The construction of a Net-Zero home is a lot more comprehensive than a typical house. Everything must be meticulously measured and executed with perfect accuracy, or else the house will use energy that might not be able to be made back in energy collection strategies like PV solar panels. In a perfect world, if a house uses tons of energy, one could simply pop a few more solar panels on the surrounding property, and voila — the house is still Net-Zero. But in the real world, solar panels, though amazing, are pricey and cumbersome. And the less energy used, the fewer solar panels needed, and the easier it is to maintain a relaxed and affordable Net-Zero life. Designing and building a home’s structure is where the meticulous, Net-Zero-conscious planning begins. Even before taking into account energy used by residents (like the number of appliances and electronics used), the building’s structure needs to be able to minimize constant background energy like heating and cooling loads. And for a passive, net-zero house, it is usually the home’s insulation and leak-free air barrier that are responsible for keeping the house efficient and comfortable. In a nutshell, this is why Kawartha Highlands was designed to be extremely well-insulated and air-tight. Kawartha Highlands’ structure begins as conventional. After digging a 4-foot deep trench, we poured the concrete footings and erected poured concrete foundation walls 6 inches thick. Then on the foundation walls, we put up 2×6 stud walls, with oriented strand board (OSB) sheathing. These stud walls are load-bearing, and support the home’s engineered truss roof, which is topped with plywood sheathing. After these conventional building elements is where things get interesting. Instead of the usual drywall, we clad the ceiling with OSB, in order to support the mountain of insulation we planned on blowing into the attic. Had we only used drywall, the ceiling would surely collapse under the weight! After the 2×6 stud wall structure, we build a second wall, of 2×4 wood studs, offset to the interior of the first wall by 7.5 inches. This inner wall sits on the slab-on-grade and runs right to the underside of the ceiling. This two-wall system, aptly called a “double-stud” wall assembly, will be filled to the brim with insulation – but more on that in a later blog post! Something very important to remember about beginning structural work is that constructing a perfect house doesn’t only need a perfect design — it needs a perfect execution. Sometimes during construction, the particularities of a design can get lost in the fray, be carried out improperly, or be stalled or defeated by external forces like weather, finances, or time (or lack thereof!). These problems are normally resolved quite easily, yet with such an ambitious goal like this one, the stakes are that much higher. A house is either Net-Zero or it isn’t, and even the smallest hiccup can seriously affect this goal. We would have to wait and see whether our careful design could be carried out without any complications. And should any problems occur, we would have to be willing to think radically outside the box. But problems don’t scare us – we find assurance in knowing that we’re more than willing to do whatever it takes to get this house to its formidable goal.Kawartha Highlands’ Double-Stud WallsGo To Project Page
As an architecture firm dedicated to sustainable residential design, we can’t strive for only ‘passable’. Every project we design must be absolutely perfect, and not only aesthetically – we fill tiny leaks and holes that might be invisible to the naked eye, we source the best, most effective, and in many cases, most environmentally conscious materials that might be forever hidden under drywall, cladding, or paint. But, as a small firm with lofty goals, every house must set a precedent. Even with especially difficult builds, our projects’ energy efficiency goals make it near impossible to take an easy way out or stick to much less complicated, conventional building practices. In an ideal world, our whole team would all be equipped with the same expertise. In an ideal world, building an effective double-stud wall would be in every builder’s repertoire. But unfortunately, sustainable building strategies have not completely crossed over into mainstream construction. Plus, a Net-Zero home is an unforgiving one – all aspects of design and construction must be meticulously executed. Even to a builder well-versed in sustainable houses, double-stud wall construction is ultra-challenging, especially if they’ve never done it before! As you might recall from Kawartha-Highlands’ last blog post, the structure’s outer frame was fairly conventional, which made construction simple and straightforward – everything from its concrete footings and 6-inch thick foundation walls to its 2×6 exterior wooden stud walls was cut-and-dry. On the exterior of our 2×6 stud walls went our OSB sheathing, which was then lined with Tyvek’s HomeWrap, a vapour-open weather protection sheet which protects from air and water, yet allows vapour to escape, preventing mould and rot in the walls. On the exterior of our Tyvek HomeWrap, we installed vertical wood strapping, which the final wall cladding, steel siding, was affixed to, running perpendicular to the strapping. On the interior our 2×6 stud walls was 7.5 inches of space, filled with dense pack cellulose insulation. Our insulation amounted to 13” in total – 5.5” in between our 2×6 studs, and the 7.5” of uninterrupted space between stud walls. This gave us R60 walls. And then we hit some serious turbulence. On the interior of the insulation, a peel and stick air barrier, our BlueSkin VP100, was supposed to be affixed, between our insulation and OSB sheathing that came before our interior 2×4 stud walls. In order to be truly airtight, the air barrier needs to be seamless, around the entire house – that includes affixing and sealing the air barrier around the foundations, ceiling, and around each window and door frame, to create one singular, continuous membrane. These areas are so important to focus on because they’re the most difficult spots to ensure an airtight seal, because of the irregular shapes of corners and crevices. In a stick frame house, the air barrier is usually placed overtop of the sheathing. However, in a house with this much insulation, in order to be properly effective, the air barrier should be placed much further inside the whole structure. That way, if there’s any air leakage, it will be less likely to create condensation, which can become trapped within the insulation and cause mould and rot. Condensation, a serious problem when found within house walls, arises when warm interior air quickly escapes into much colder outside air. If the air barrier was placed closer to or on the house’s exterior, air escaping outwards through leaks would hit the cold air barrier and instantly turn to condensation and start to rot out the walls. As we’ve said before, air-tightness and insulation is absolutely critical for a well-performing house. The more air that escapes a house, the more energy it must use in order to keep the interior livable, by heating, cooling, humidifying, dehumidifying… the list goes on. Plus, if an air barrier isn’t continuous, it is basically useless. Like a parka in the winter – if you use it unzipped and open, it really isn’t able to do its job, no matter how downy or puffy it is. Both of these facts makes our air barrier an extremely vital element of construction. However, without any prior knowledge or expertise in energy efficient design, one can’t truly understand just how important a structure’s air barrier really is to the overall design and performance of the house. Not only does BlueSkin have to be applied fastidiously to walls, corners and door and window frames, but BlueSkin also strongly recommends that their air barrier is fastened with a primer in cold weather, or else it won’t adhere properly. This phase of construction was taking place in the winter, and since our house was to be net-zero, this wasn’t just a recommendation for our build – it was an absolute necessity. Our air barrier needed to be as strong and airtight as possible. However, when we came to our first blower door test, after our air barrier, slab, and doors and windows were installed, we were shocked at the numbers – and not in a good way. The results were much worse than we had expected – coming in at 4ACH. Our air barrier test was done by our trusted Greg Labbé, of BlueGreen Consulting Group. With his expertise in measuring air tightness, and our deep understanding of the home’s comprehensive design, we were able to assess the situation and fully clarify the problem. Together, we came to the conclusion that the air barrier wasn’t properly attached. We suspected that it had been installed without primer; there was no other possible reason the house was performing so poorly. Our design had been perfectly calculated, planned and laid out. With the air barrier unattached, it was blowing freely within the cavity, not properly secured to the walls or the other elements of the air barrier like the foundation, walls, ceiling, and window and door frames, and letting in huge amounts of outside air. Plus, due to our building’s sequencing and structure, the air barrier is difficult to access, making it extremely hard to fix. So, we did the only thing we could do: not panic. We began to brainstorm. Hypothetically speaking, once our cellulose insulation was packed in, the pressure could push our air barrier back into place, but we didn’t want to count on it. With our knowledge and experience, we know that it’s never too late to make a good air barrier! So we decided to cut our losses and abandon the Blueskin air barrier, opting for a new, clever, yet unconventional plan: to create a new air barrier on the interior side of the interior wall. We turned our 6 millimetre polyethylene sheet (which was already acting as our vapour barrier) into our air barrier. Then, we made our builder seal every single stud with acoustical sealant, from top to bottom. We made sure all our doors and window sills were sealed, and where our studs met our floors and ceilings. We did the same thing in the attic, where the OSB (which was supporting the blown-in cellulose insulation) was taped to the underside of the ceiling. We made our builder execute it exactly to our standards, regardless of how tedious or difficult the process of fixing it was. With our understanding of this project’s building practices and our builder’ co-operation, we began to slowly get this project back on track.Kawartha Highlands’ HurdlesGo To Project Page
When our blog last left this project, things were a little bit bleak. Roadblocks like our building team’s lack of experience in energy efficient building design were making it difficult to get the reality of the build to match its sleek intelligent design. We think honesty is an important virtue for a company like ours, one that takes pride in all the work it does. So, to be honest – this project was a punishing one. However, as they say, the show must go on. And it did. We began to make all the necessary moves to get this project back on track. It’s been gruelling, but we’re moving forward. As for the home’s systems, they are pretty standard… for a Solares project, that is! The house will be powered entirely by electricity, which will allow its planned 60 – yes, 60! – PV solar panels (40 on the roof of the house, and 20 on the detached garage and workshop) to make back any energy used, which is the whole point of Net Zero living. The home is heated and cooled by an air source heat pump by Mitsubishi, which we have ducted to spread hot and cool air throughout the entire house. Domestic water is heated with a standard electric tank, and the house doesn’t have a fireplace, wood, gas, or otherwise. The house’s air-tight envelope and abundance of insulation will mean heating and cooling loads will be minimal. The Heat Recovery Ventilator (HRV) is tied to its own, separate ductwork, to ventilate the house while retaining freshness and moisture from the outgoing interior air. Something a bit unique to this project are its short and shallow pot lights. Normally, pot lights that are installed in the ceiling break though the polyethelyne sheets that typically act as air and vapour barrier, causing leaks and holes and potentially compromising the ceiling’s air tightness. So in order to avoid air leakage, pot lights need to sit in “boots”, which are taped onto the polyethylene sheets in an attempt to create an airtight seal and maintain the integrity of the ceiling’s air barrier. However, it’s a messy process and is usually unsuccessful in creating a truly airtight seal. In this house, the air/vapour barrier isn’t a polyethylene sheet. It’s a ½” of OSB taped together, as Oriented Strand Board was the only material able to carry the weight of our vast loads of cellulose insulation. Using OSB instead of plastic sheets meant that this pot light “boot” approach would have been much more difficult, as we would’ve needed to cut through the ultra important layer of OSB. Besides, scratching this technique was just as well, because of its inability to create a truly airtight ceiling. We didn’t need any more air barrier stress! Instead, we strapped the OSB with 2×2 and installed super shallow LED pots directly onto the OSB, leaving it completely intact, which saved us the grief trying to patch up any holes that the pot lights would make. There you have it, Kawartha Highlands Net Zero’s systems in a nutshell! Next time we’ll be talking about the home’s lovely interiors, and hopefully by that time the air barrier’s hiccups will be far behind us.The Electric SystemsGo To Project Page
Finally, it’s time to talk about the interiors of our Net-Zero home! This home’s hiccups are far past us. Now it’s time to move on and talk about the lovely interior touches that give this house charm. The home’s colour scheme is white on white on white. As you may know, we are huge fans of white walls. White walls are clean, timeless, and elegant. They create no visual noise, which makes for a restful and relaxing environment. But loving white walls doesn’t mean we hate colour — In fact, it’s just the opposite! Neutral walls make brightly coloured furniture, art, or appliances really pop. Plus, white walls are incredibly versatile. With neutral coloured walls, a new bedspread, art print, or even a kettle can drastically change the entire look of the space. So, you may have guessed it, but we painted Kawartha’s walls white! The home’s aesthetic is cool and contemporary, with white walls, wood floors, chrome details, and plenty of glass windows. In the living areas, the floors are a warm wood, and the entranceway is tiled with dark, slate grey tiles. The kitchen is IKEA, a Solares favourite for their versatility, affordability, and their limited use of household toxins like VOC and formaldehyde. And this kitchen is… you guessed it, white! Glossy white cabinetry goes nearly up to the ceiling, blending into the walls and giving our clients tons of storage space. The countertops are smooth white laminate and the appliances are cool chrome. Many of the windows in the Great Room are floor-to-ceiling, which creates a very cool (and futuristic!) portal effect. From the living room, it feels like you can step right out into the countryside. Because of the home’s double-stud walls, windows are set deep into the walls, with spacious window sills. The sills are topped with a warm wood that complements the floors, and turns the sill into a built-in shelf, where our clients can display plants, knick knacks and other valuables. To add even more depth and interest to the home’s clean look, the window frames are all black, set in striking contrast against the home’s white walls. Finally, the bathrooms are finished with gleaming white ceramic and tiles. The master suite’s bathroom is complete with a large, beautiful corner bathtub, with a lovely view of the property from the bathroom window. Next time we take a look at this house, the interiors will be finished and the house will be fully functioning as our clients’ forever home! Stay tuned for the final photos!Bright White InteriorsGo To Project Page
In the recently frigid, early spring weather, Kawartha Highlands Net-Zero home stood like a glacier, surrounded in snow and ice that seemed it would never melt away. But even in the unforgiving Canadian barrens that the home was built to handle, the home’s interiors sparkled warmly. Finally, in these past few weeks, the snow began to melt away. But not before our talented photographer Derek Monson captured its serene beauty in our “Final Reveal” photoshoot. For those of you in need of a refresher, our Kawartha Highlands Net-Zero House is a double-walled home in the Kawartha Highlands, with the ambitious goal of creating as much energy as it used. To help meet this feat, Solares built a home that used minimal energy - the less energy a Net Zero home uses, the less it needs to collect. The end result: A beautiful, energy efficient home with double-stud walls, filled to the brim with insulation. Our clients have moved in and added their lovely unique personalities to this double-stud home. We love what they’ve done with the place! The Great Room is bright, open, and unpretentious, with honey-coloured walls and minimalist furnishings. On one end of the Great Room stands a show-casing series of floor-to-ceiling window panels, In fact, many of the home’s windows touch the floor, acting as portals to the outdoors. These large and deep windows give off the impression one is in safely tucked inside a gallery (or a submarine!), looking out onto the beautiful property. The kitchen’s spunky turquoise backsplash adds a pop of colour to the Great Room, and the spacious wraparound kitchen island gives the kitchen plenty of counter space for cooking and dining. The home’s bedroom is simple and serene, with built-in bedside tables affixed to the walls. One of our favourite features of the home is the gorgeous master bathroom. A lovely square Japanese style soaking tub sits beside a glass partition and looks out onto the property from a large window. The family chose to utilize the window’s extra deep sill to showcase two cascading ferns, which further adds to the bathroom’s spa-like tranquility. The whole home is cozy, peaceful and serene - the perfect haven for Canada’s long winters and languid summers. We’d also like to thank our photographer, Derek Monson, who did a wonderful job capturing the warmth and beauty of this rural home.Final Reveal
Go To Project Page
- + Intro
- Kawartha Highlands Net-Zero House
What would you do if your house got hit by lightning and completely burnt down? It seems like a crazy question to ask, but this was the reality for two of our clients, a couple living north of Peterborough and west of Kawartha Highlands Provincial Park.
The couple, with a grown-up daughter who lives in Toronto, recently retired and planned on staying in their forever home for the rest of their lives. Their home wasn’t necessarily perfect, but, with a bounding dog and tons of outdoor equipment and vehicles like canoes, boats, kayaks, and a snowmobile, the property sure delivered for their outdoorsy lifestyle.
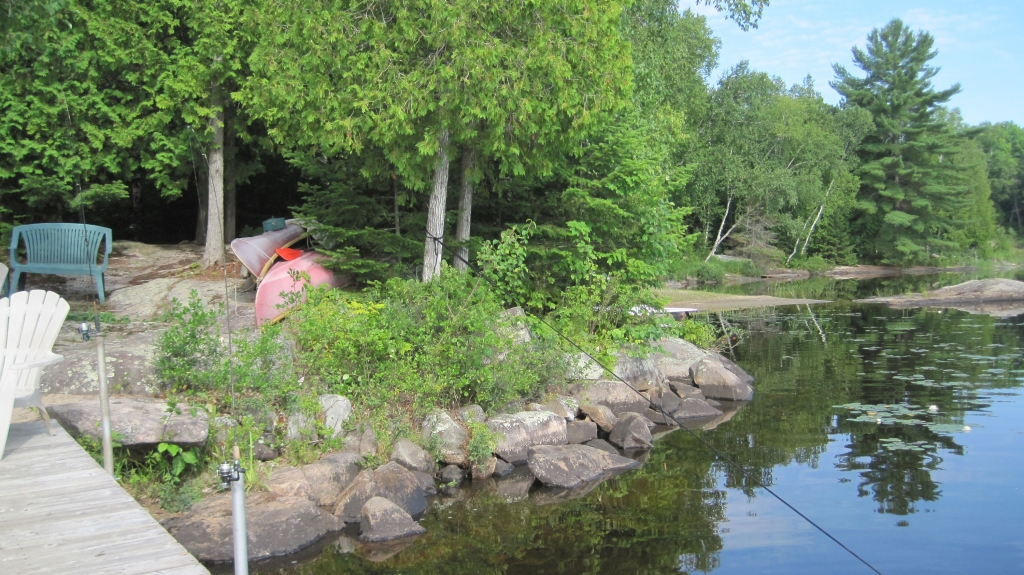
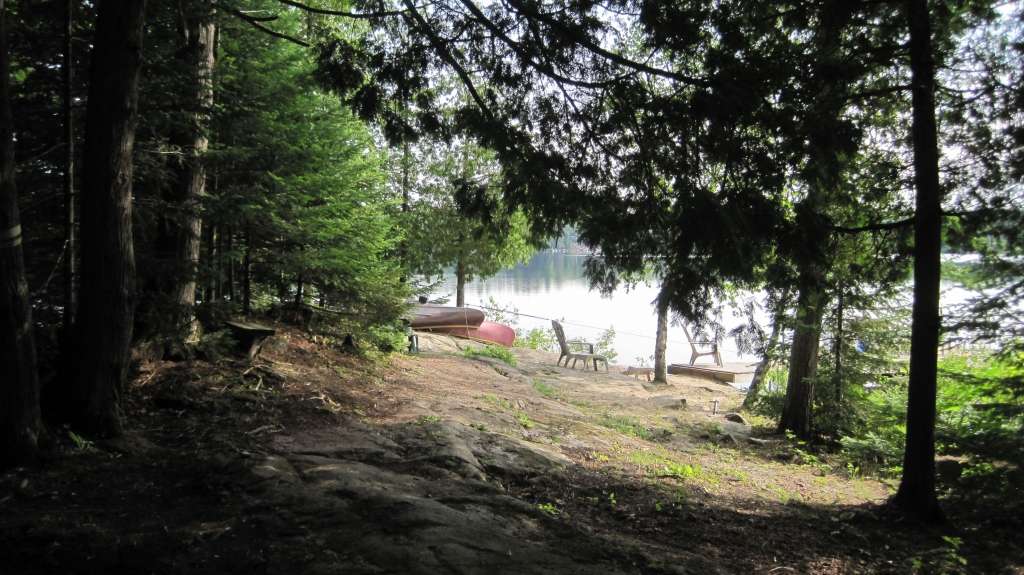
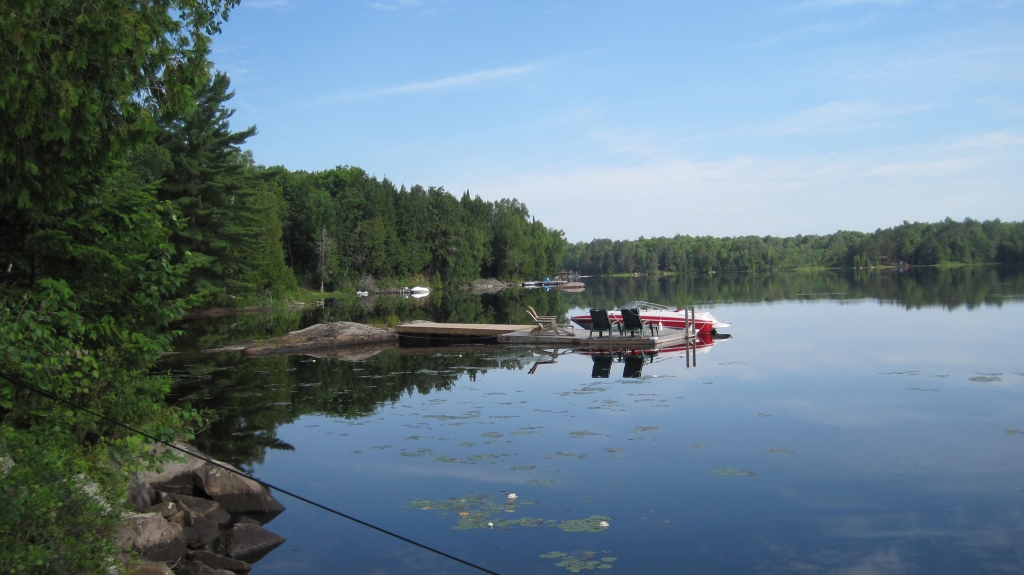
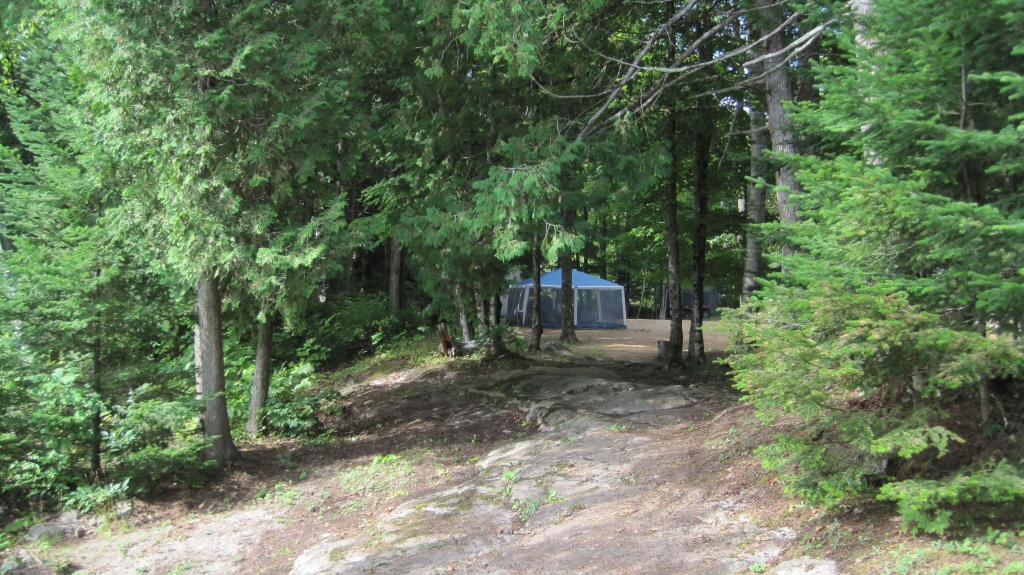
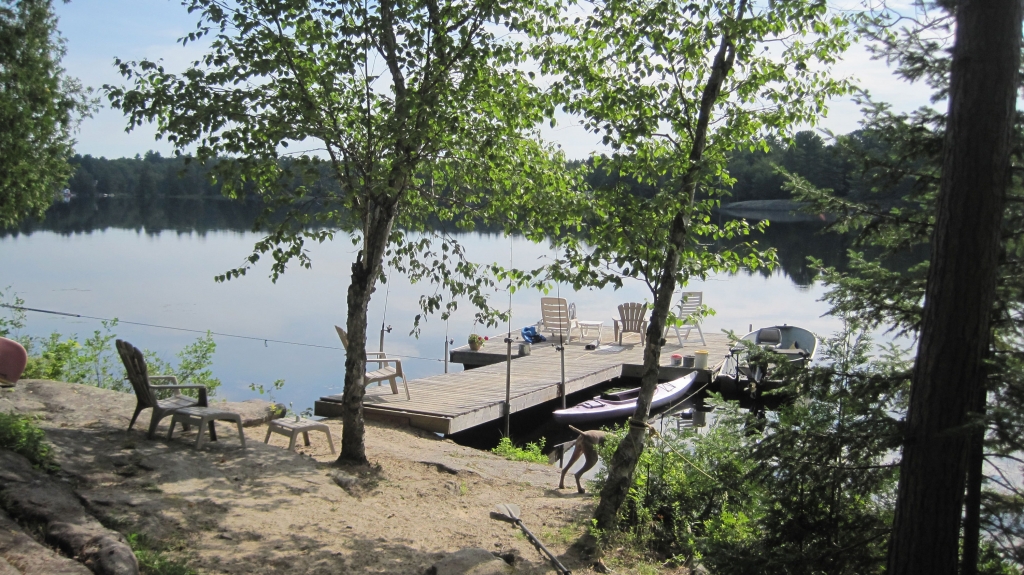
Their relatively flat, 1-acre plot is bordered by a lake to the east, with a view dotted by cedars. Densely packed cedar trees line the property to the north and the south, and to the west, is the main road. About 100 feet in from the road sits a limestone rock outcropping, about 6-8 feet high, which cuts the property in two – one half of the property sits at road height, and the other half lowers to meet the lake. The limestone, cedars, and lake make the property quintessentially Southern Ontario, not to mention beautiful.
There were many people in the house when the lightning struck, and though – thankfully – everyone was able to escape, the experience was terrifying. Our clients could have easily focused on the trauma and fear of the incident. Instead, they were brave and hopeful – they began to see the experience as an opportunity to build a new (and even better) home, totally custom to their needs and wishes.
Ideally, their new home would be smaller than their previous, and on one level, so they could age comfortably while living in it. But most of all, their priority was a Net-Zero house: they wanted a home that would produce as much – or more! – energy as it used per year. When they came to Solares with their optimistic outlook and awesome sustainable plan, we absolutely had to take part.
The couple is not only positive and environmentally conscious – they are also popular! Their year is filled with both casual potlucks and fine-dining dinner parties, overnight guests, and a couple of birthday extravaganzas, indoor and outdoor in the summer. Plus, their daughter often comes to visit from Toronto, staying overnight. Their new house, though compact, must still have enough space for overnight guests to feel comfortable, and the kitchen and dining room are a top priority – a fancy dinner party is only as large as the dining room table!
In their free time, the two are huge hobbyists – he is a hunter and retired metal shop worker and tradesman, and she loves to garden. Luckily, the property is spacious enough for a large garden with lots of southern sun, and a separate workshop/bunking lodge to store equipment and tools, and for hunting gatherings and hangouts. But that’s for the next post.
This project will be exciting, interesting and enterprising – we can’t wait to see it through.
Go To Project Page


- + Design
- Net-Zero Design
Net Zero, Net Zero, and Net Zero: these are Kawartha Highlands’ three main priorities.
If you need to be reminded, our Kawartha-Highlands Net Zero House is located near Peterborough and west of Kawartha Highlands Provincial Park. This lovey project sits on a small lot lined with cedar trees, and has coveted lakefront. Plus, this project is designed to be – you guessed it — completely Net Zero.
A Net Zero house produces as much, if not more, energy than it uses annually. Net Zero Houses are hard to come by. And Net Zero Houses are hard to build.
Building a house that uses absolutely no energy is unfeasible, uncomfortable, and essentially un-survivable in Ontario’s climate. A Net Zero house uses electricity to maintain comfort, but aims to break even by collecting energy to make up for the energy it uses. And unless one has the physical and financial freedom for hundreds of windmills or thousands of PV panels, using as little energy as possible makes this ambitious goal more attainable. That said, it becomes clear why every aspect of the Kawartha Highlands house has to be designed to both save and collect energy.
Passive solar is one of the best strategies for minimal energy use and maximum energy collection. An ideal passive solar home has long south-facing exposures and pitched roofs for three main reasons: 1) large southern windows allow the interior of the house to collect the sun’s heat and light for most of the day, 2) the roof’s overhang keeps the house from overheating in the summer by shading the highest and hottest rays of the year, and 3) a roof’s long south-facing slope is prime real estate for PV Solar Panels.
Using these principles, the perfect passive solar house would be designed with every room facing south, all with huge southern windows and a long pitched roof installed with solar panels. However, real life is not that easy – a lot’s landscape, size, and client’s aesthetic preferences can drastically alter a passive house’s blueprint.
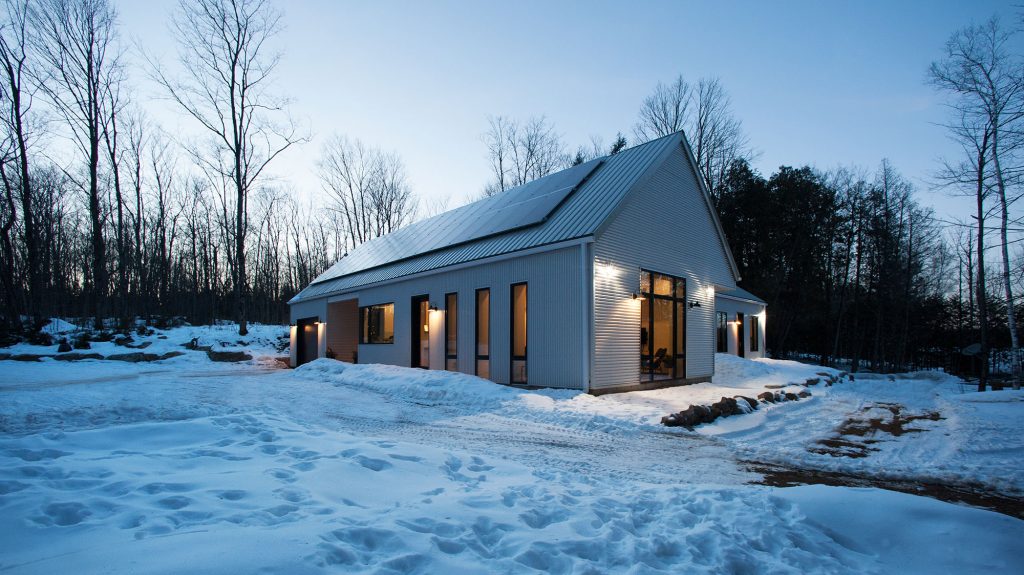
Take this project — with an eastern lakefront, it seems a waste to design a totally southern-oriented home with no windows overlooking the lake. But we weren’t discouraged! With careful thought and consideration, we managed to include everything we wanted in this design: eastern lake views, southern passive solar exposure, and a southern roof for solar panel installation.
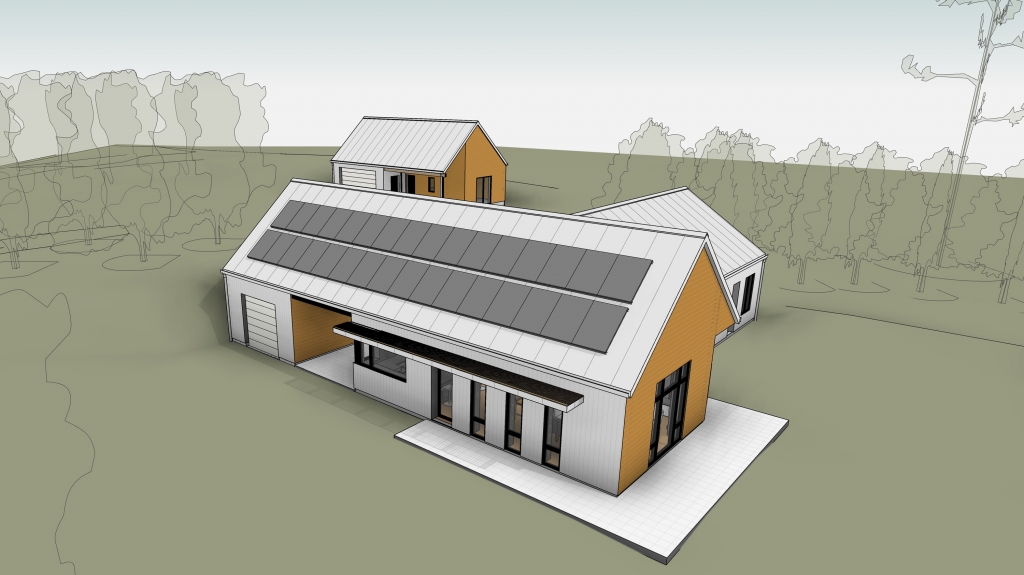
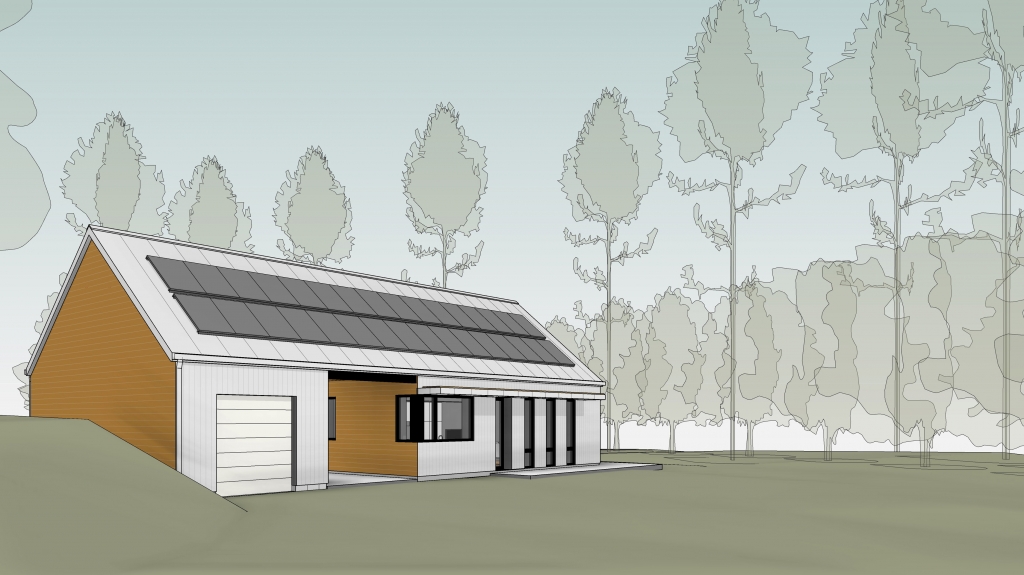
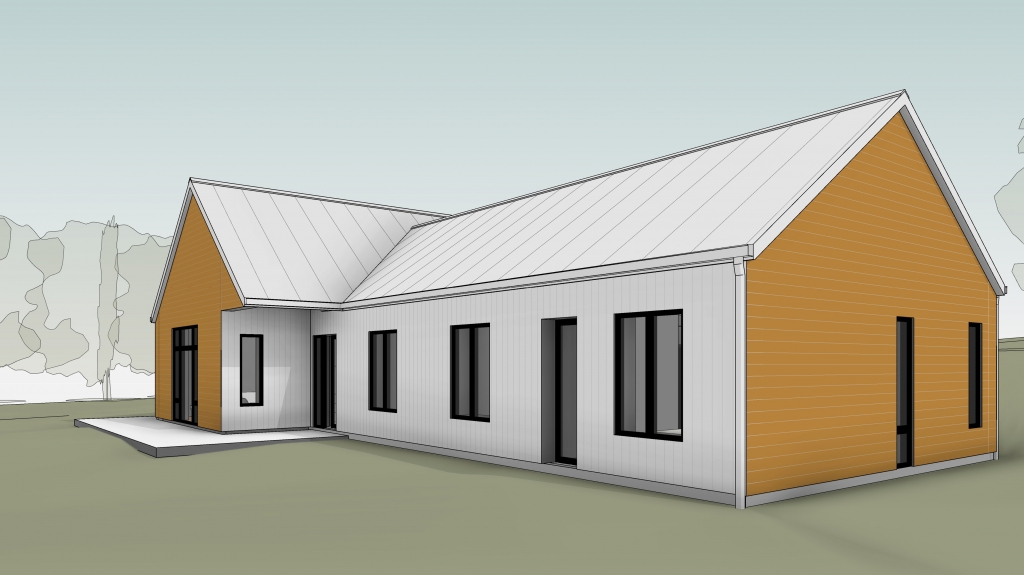
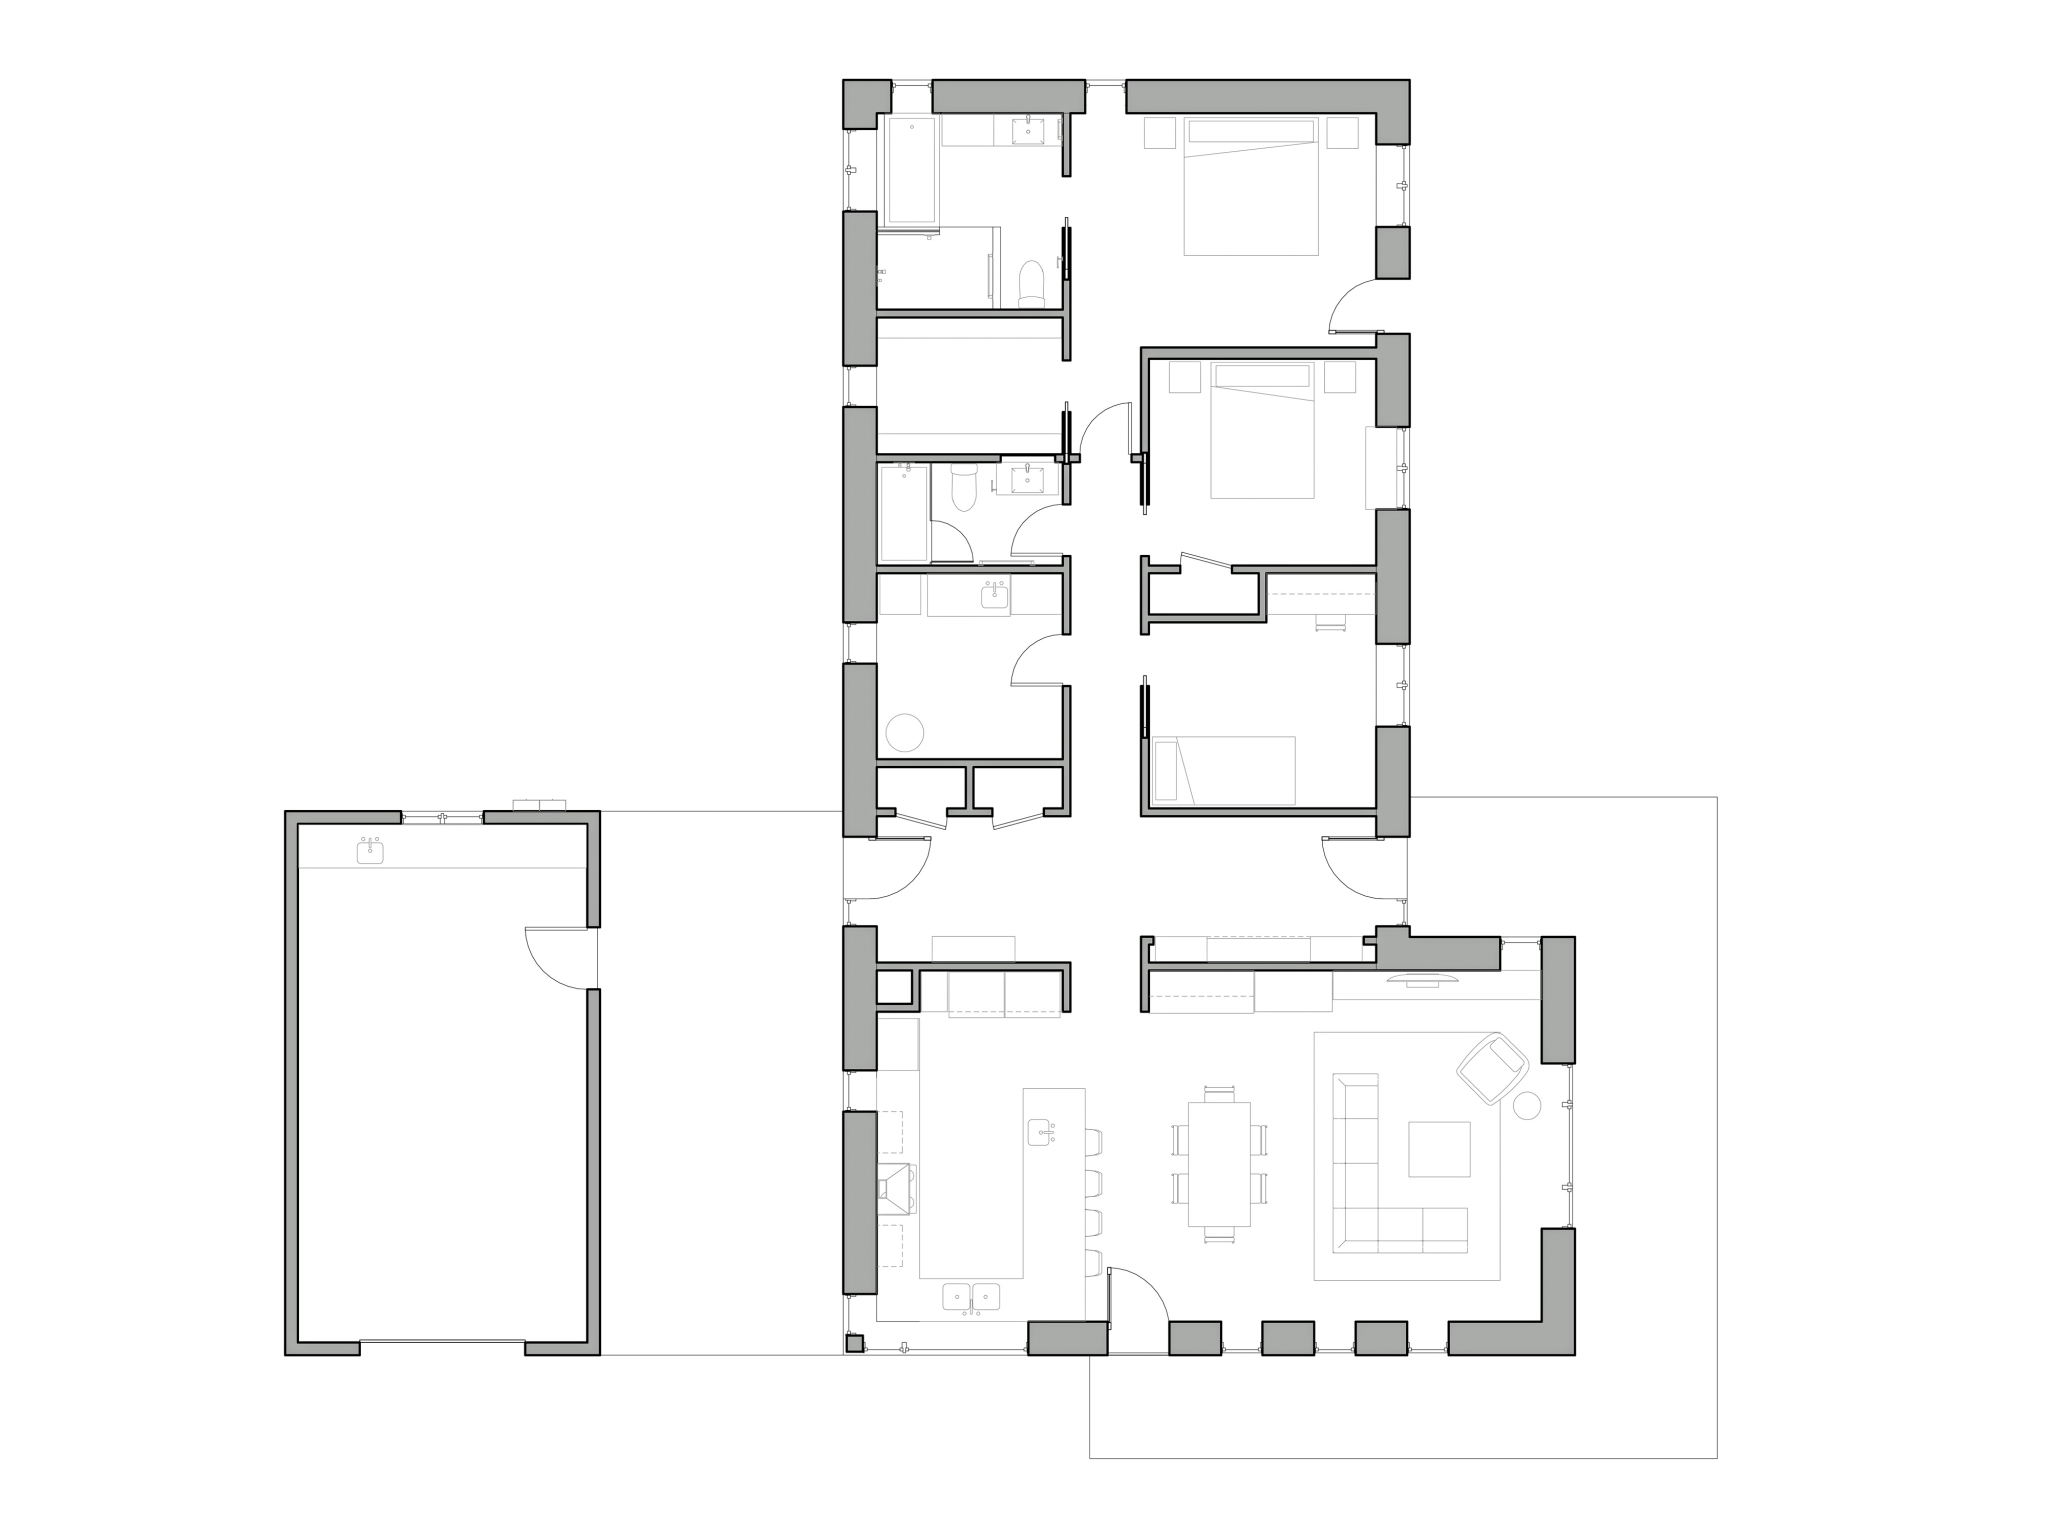
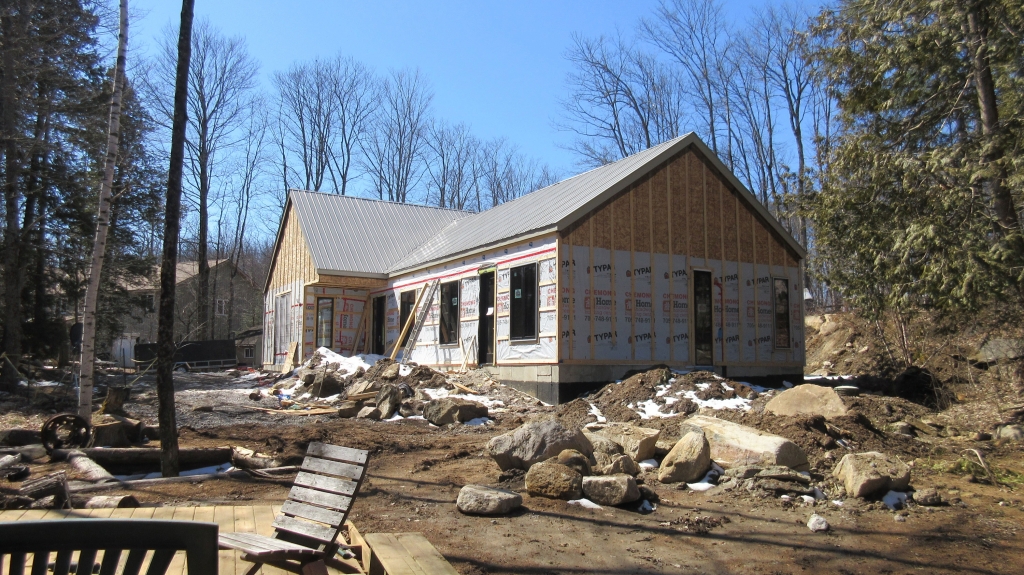
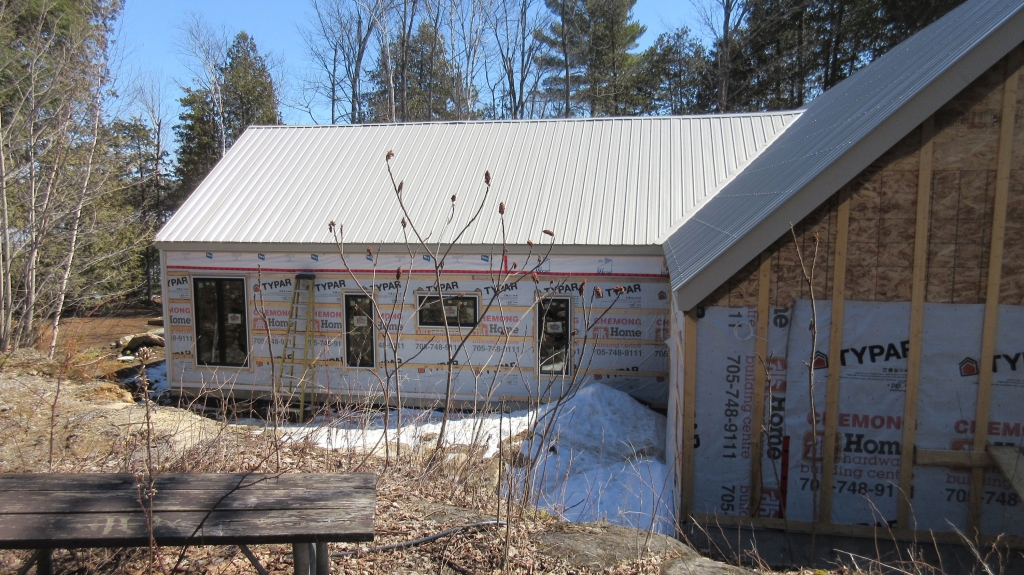
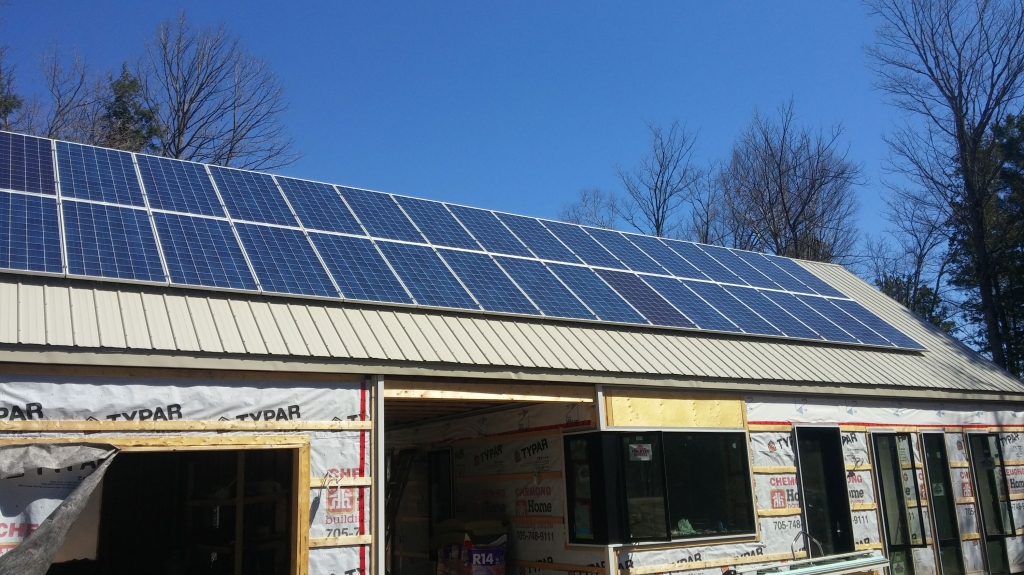
The home’s overall look is reminiscent of a modern Ontario agricultural building. The low-slung structure is topped with two intersecting steep-pitched roofs. The first pitched roof runs along the east-axis with full due-south exposure — perfect for mounting 40 PV solar panels. This roof covers the Great Room and the garage which sits to the west, slightly apart from the home. A breezeway paved by flagstone makes up the covered space between the garage and home, with an entrance to the home’s foyer. This foyer runs the length of the home, dividing the Great Room from the rest of the house. Opposite the entrance to the breezeway is an exterior door leading to the eastern lakefront, so our clients can walk straight from the house to the lake for a quick dip. Just off the foyer, the large Great Room stands in the south-east corner of the home, with tall southern windows. One huge eastern picture window gives a full view of the lake.
The second roof runs along the north-south axis, covering the bedrooms and secondary spaces. Three east-facing bedrooms run the length of the house, each with their own views of the lake. The master bedroom, farthest from the Great Room, has its own personal exterior door. This door gives our clients the freedom to head down to the lake first thing in the morning or late at night, without disturbing any guests who may be staying in their additional bedrooms. Plus, the master bedroom has the best view of the “Whale” — the large rock outcropping that looks just like a breaching whale. Finally, the west side of the bedroom wing houses all the service spaces: master bathroom, guest bathroom, laundry and mechanical room.
This home was both a challenge and a treat to design, and the building process will be even more so! We’re looking forward to tackling the heavy lifting of this Net Zero build.
Go To Project Page
- + Structure
- Kawartha Highlands’ Double-Stud Walls
The construction of a Net-Zero home is a lot more comprehensive than a typical house. Everything must be meticulously measured and executed with perfect accuracy, or else the house will use energy that might not be able to be made back in energy collection strategies like PV solar panels. In a perfect world, if a house uses tons of energy, one could simply pop a few more solar panels on the surrounding property, and voila — the house is still Net-Zero. But in the real world, solar panels, though amazing, are pricey and cumbersome. And the less energy used, the fewer solar panels needed, and the easier it is to maintain a relaxed and affordable Net-Zero life.
Designing and building a home’s structure is where the meticulous, Net-Zero-conscious planning begins. Even before taking into account energy used by residents (like the number of appliances and electronics used), the building’s structure needs to be able to minimize constant background energy like heating and cooling loads. And for a passive, net-zero house, it is usually the home’s insulation and leak-free air barrier that are responsible for keeping the house efficient and comfortable. In a nutshell, this is why Kawartha Highlands was designed to be extremely well-insulated and air-tight.
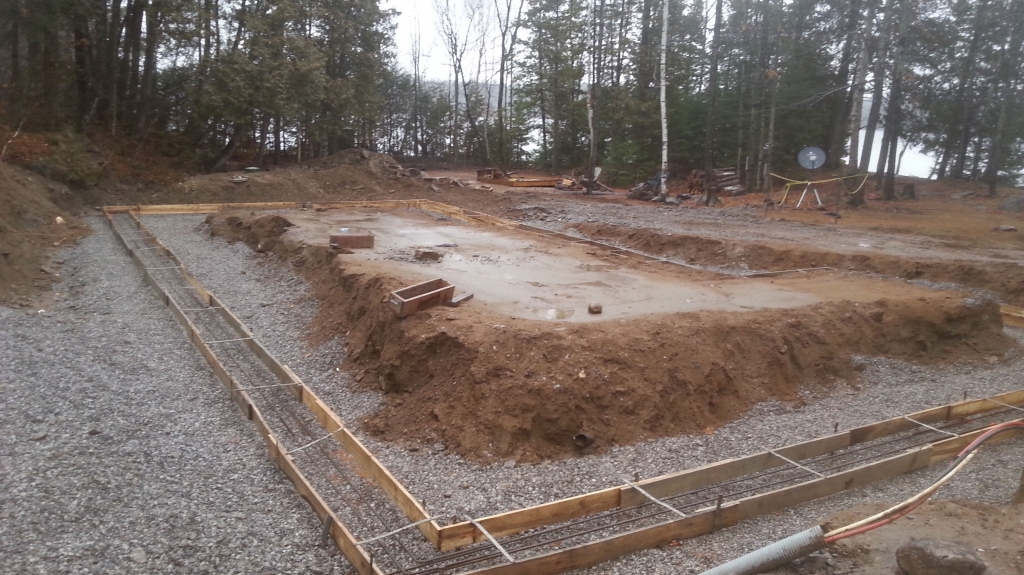
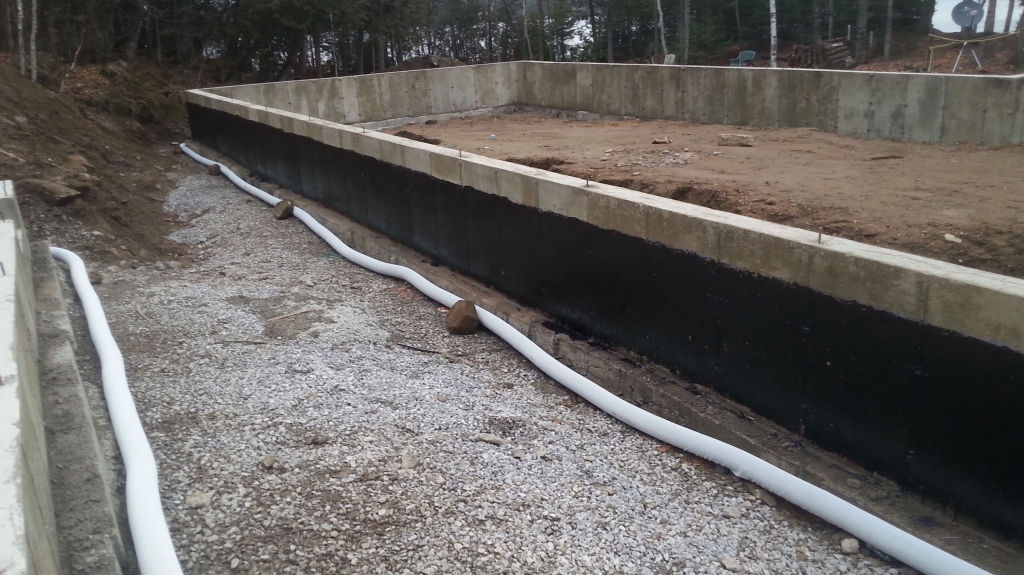
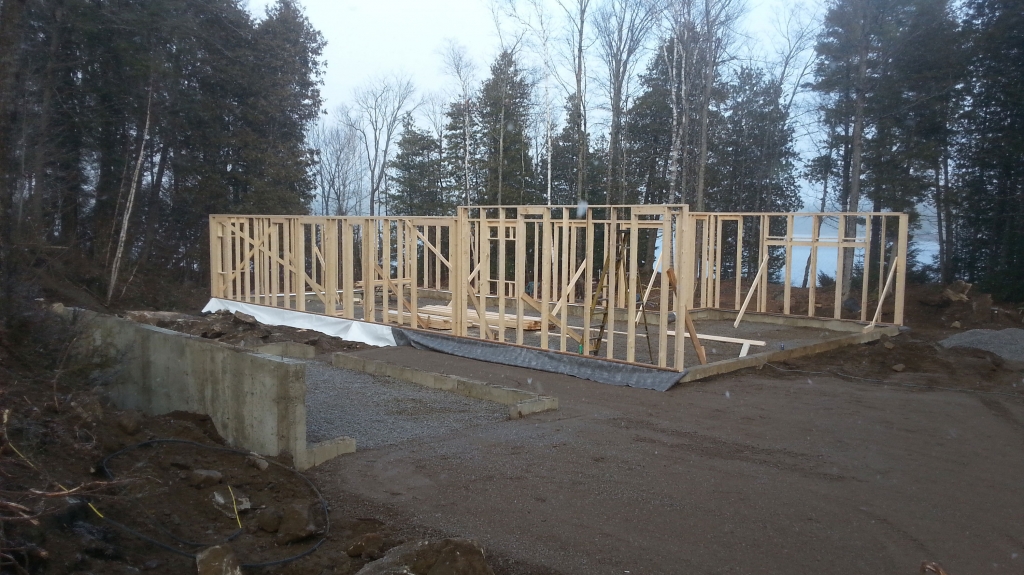
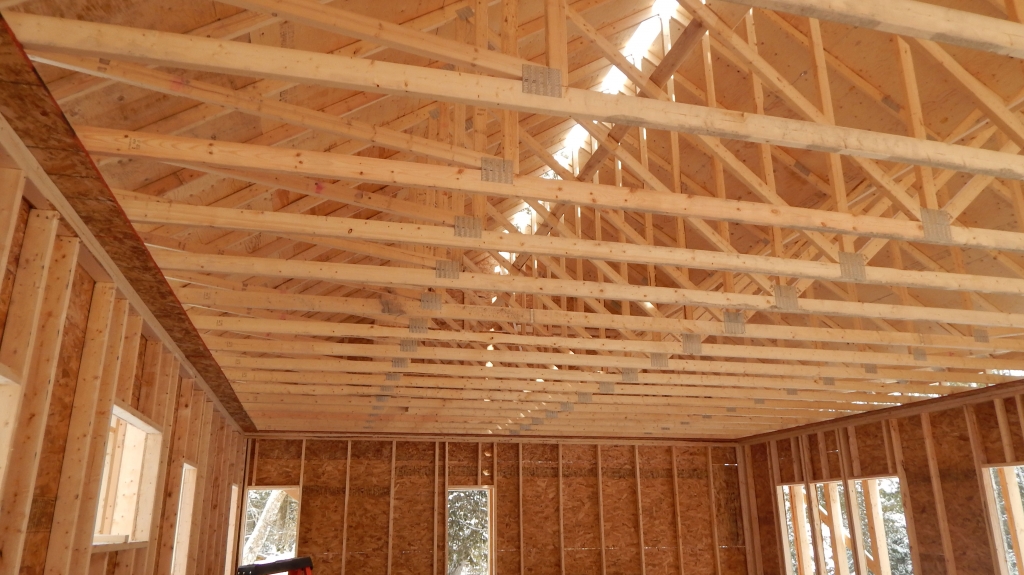
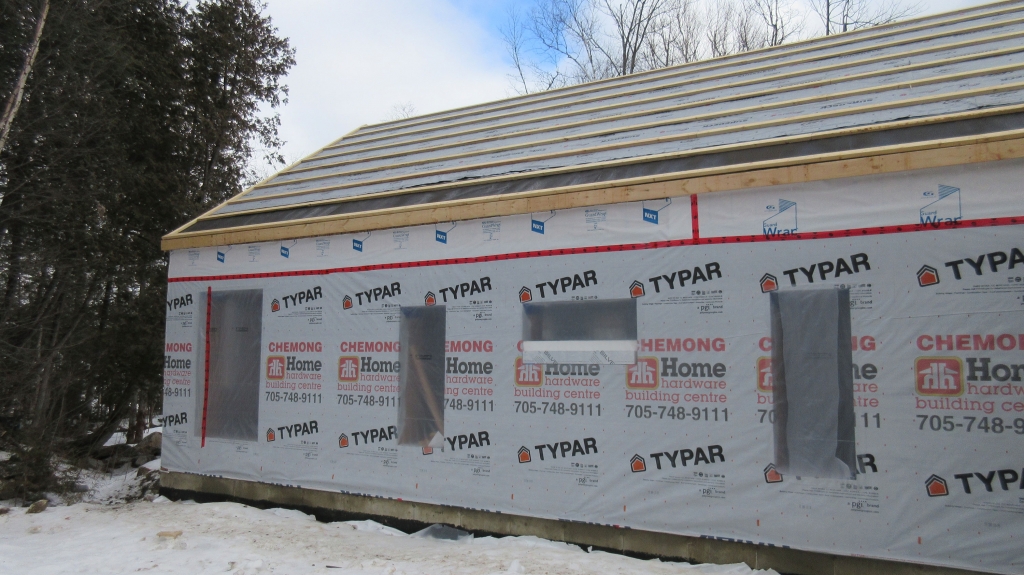
Kawartha Highlands’ structure begins as conventional. After digging a 4-foot deep trench, we poured the concrete footings and erected poured concrete foundation walls 6 inches thick. Then on the foundation walls, we put up 2×6 stud walls, with oriented strand board (OSB) sheathing. These stud walls are load-bearing, and support the home’s engineered truss roof, which is topped with plywood sheathing.
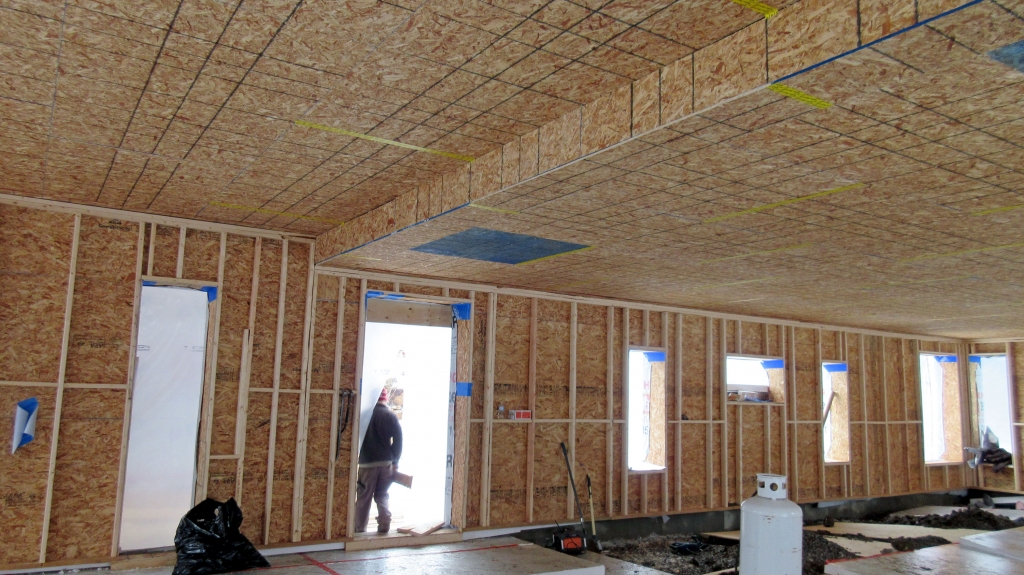
After these conventional building elements is where things get interesting. Instead of the usual drywall, we clad the ceiling with OSB, in order to support the mountain of insulation we planned on blowing into the attic. Had we only used drywall, the ceiling would surely collapse under the weight!
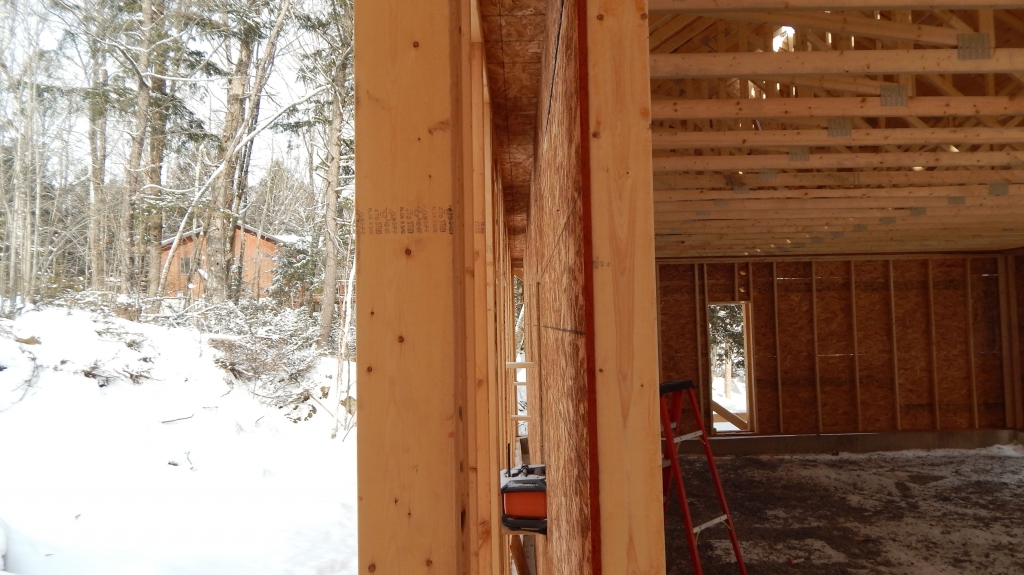
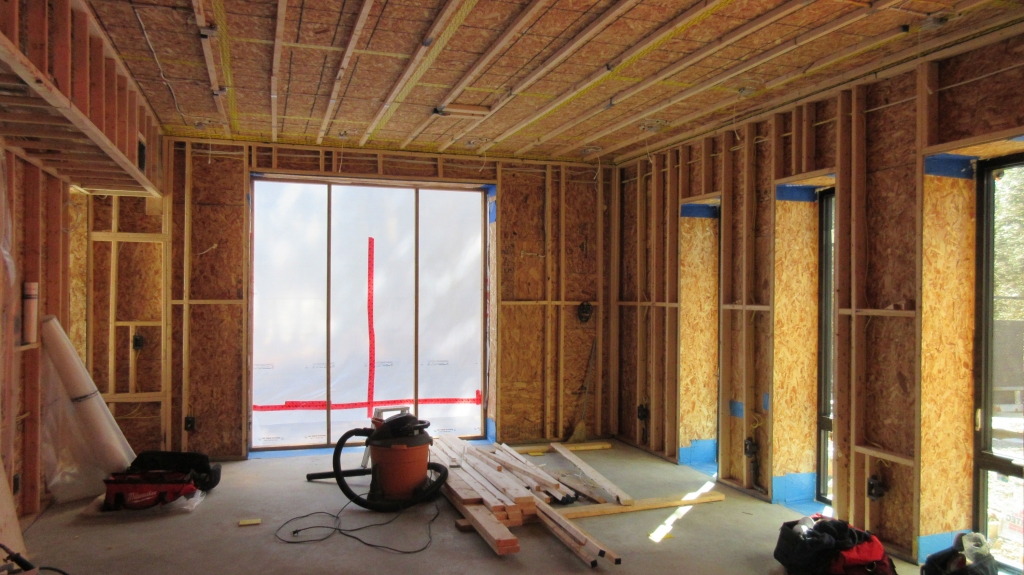
After the 2×6 stud wall structure, we build a second wall, of 2×4 wood studs, offset to the interior of the first wall by 7.5 inches. This inner wall sits on the slab-on-grade and runs right to the underside of the ceiling. This two-wall system, aptly called a “double-stud” wall assembly, will be filled to the brim with insulation – but more on that in a later blog post!
Something very important to remember about beginning structural work is that constructing a perfect house doesn’t only need a perfect design — it needs a perfect execution. Sometimes during construction, the particularities of a design can get lost in the fray, be carried out improperly, or be stalled or defeated by external forces like weather, finances, or time (or lack thereof!). These problems are normally resolved quite easily, yet with such an ambitious goal like this one, the stakes are that much higher. A house is either Net-Zero or it isn’t, and even the smallest hiccup can seriously affect this goal.
We would have to wait and see whether our careful design could be carried out without any complications. And should any problems occur, we would have to be willing to think radically outside the box. But problems don’t scare us – we find assurance in knowing that we’re more than willing to do whatever it takes to get this house to its formidable goal.
Go To Project Page


- + Envelope
- Kawartha Highlands’ Hurdles
As an architecture firm dedicated to sustainable residential design, we can’t strive for only ‘passable’. Every project we design must be absolutely perfect, and not only aesthetically – we fill tiny leaks and holes that might be invisible to the naked eye, we source the best, most effective, and in many cases, most environmentally conscious materials that might be forever hidden under drywall, cladding, or paint. But, as a small firm with lofty goals, every house must set a precedent. Even with especially difficult builds, our projects’ energy efficiency goals make it near impossible to take an easy way out or stick to much less complicated, conventional building practices.
In an ideal world, our whole team would all be equipped with the same expertise. In an ideal world, building an effective double-stud wall would be in every builder’s repertoire. But unfortunately, sustainable building strategies have not completely crossed over into mainstream construction. Plus, a Net-Zero home is an unforgiving one – all aspects of design and construction must be meticulously executed. Even to a builder well-versed in sustainable houses, double-stud wall construction is ultra-challenging, especially if they’ve never done it before!
As you might recall from Kawartha-Highlands’ last blog post, the structure’s outer frame was fairly conventional, which made construction simple and straightforward – everything from its concrete footings and 6-inch thick foundation walls to its 2×6 exterior wooden stud walls was cut-and-dry.
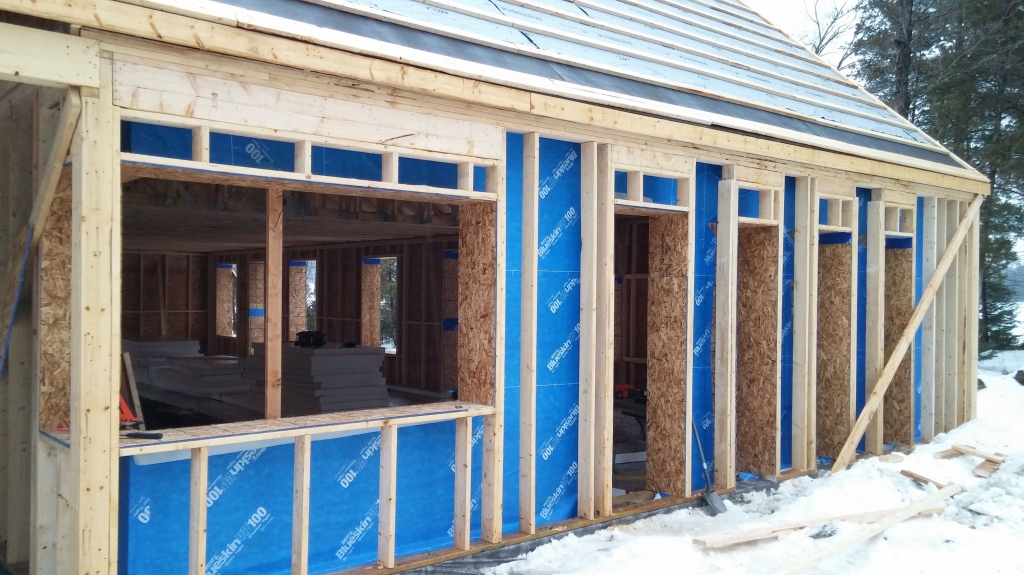
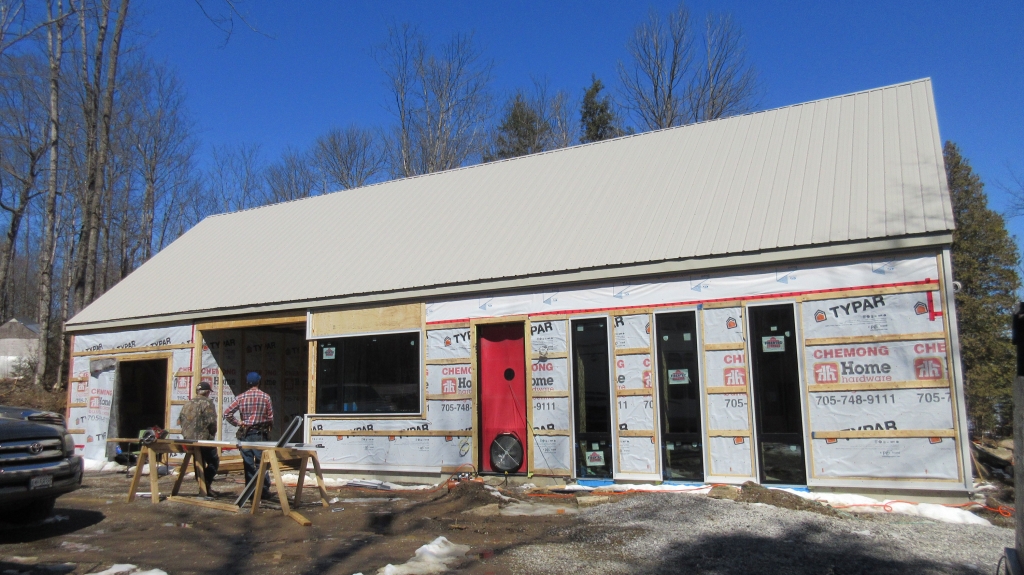
On the exterior of our 2×6 stud walls went our OSB sheathing, which was then lined with Tyvek’s HomeWrap, a vapour-open weather protection sheet which protects from air and water, yet allows vapour to escape, preventing mould and rot in the walls. On the exterior of our Tyvek HomeWrap, we installed vertical wood strapping, which the final wall cladding, steel siding, was affixed to, running perpendicular to the strapping.
On the interior our 2×6 stud walls was 7.5 inches of space, filled with dense pack cellulose insulation. Our insulation amounted to 13” in total – 5.5” in between our 2×6 studs, and the 7.5” of uninterrupted space between stud walls. This gave us R60 walls. And then we hit some serious turbulence.
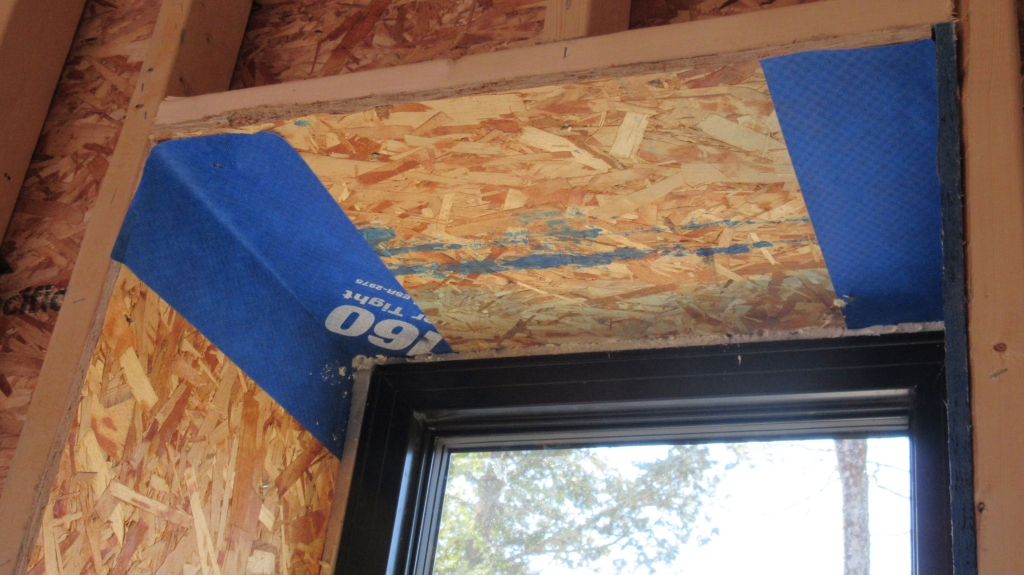
On the interior of the insulation, a peel and stick air barrier, our BlueSkin VP100, was supposed to be affixed, between our insulation and OSB sheathing that came before our interior 2×4 stud walls. In order to be truly airtight, the air barrier needs to be seamless, around the entire house – that includes affixing and sealing the air barrier around the foundations, ceiling, and around each window and door frame, to create one singular, continuous membrane. These areas are so important to focus on because they’re the most difficult spots to ensure an airtight seal, because of the irregular shapes of corners and crevices.
In a stick frame house, the air barrier is usually placed overtop of the sheathing. However, in a house with this much insulation, in order to be properly effective, the air barrier should be placed much further inside the whole structure. That way, if there’s any air leakage, it will be less likely to create condensation, which can become trapped within the insulation and cause mould and rot. Condensation, a serious problem when found within house walls, arises when warm interior air quickly escapes into much colder outside air. If the air barrier was placed closer to or on the house’s exterior, air escaping outwards through leaks would hit the cold air barrier and instantly turn to condensation and start to rot out the walls.
As we’ve said before, air-tightness and insulation is absolutely critical for a well-performing house. The more air that escapes a house, the more energy it must use in order to keep the interior livable, by heating, cooling, humidifying, dehumidifying… the list goes on. Plus, if an air barrier isn’t continuous, it is basically useless. Like a parka in the winter – if you use it unzipped and open, it really isn’t able to do its job, no matter how downy or puffy it is.
Both of these facts makes our air barrier an extremely vital element of construction. However, without any prior knowledge or expertise in energy efficient design, one can’t truly understand just how important a structure’s air barrier really is to the overall design and performance of the house.
Not only does BlueSkin have to be applied fastidiously to walls, corners and door and window frames, but BlueSkin also strongly recommends that their air barrier is fastened with a primer in cold weather, or else it won’t adhere properly. This phase of construction was taking place in the winter, and since our house was to be net-zero, this wasn’t just a recommendation for our build – it was an absolute necessity. Our air barrier needed to be as strong and airtight as possible.
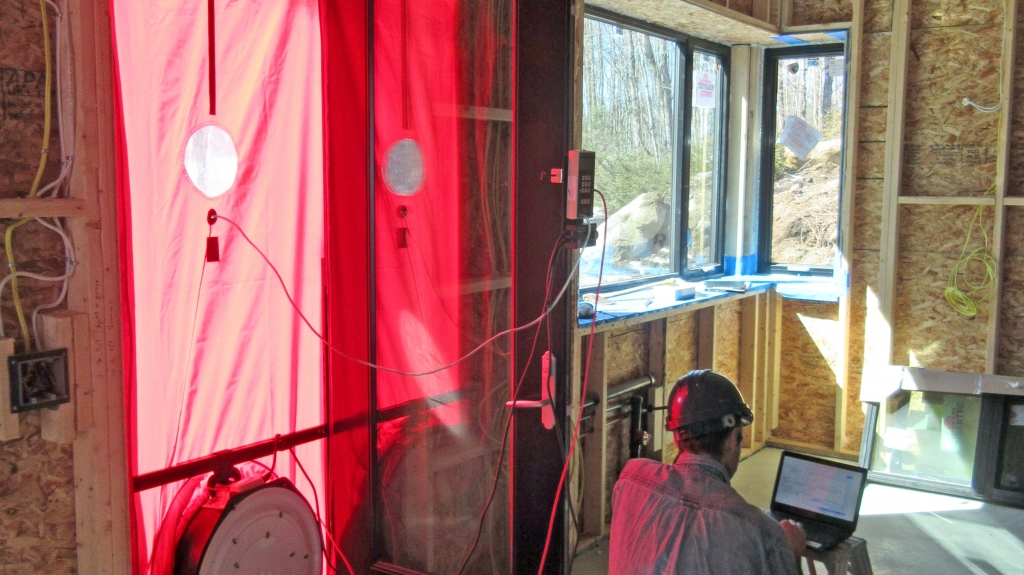
However, when we came to our first blower door test, after our air barrier, slab, and doors and windows were installed, we were shocked at the numbers – and not in a good way.
The results were much worse than we had expected – coming in at 4ACH. Our air barrier test was done by our trusted Greg Labbé, of BlueGreen Consulting Group. With his expertise in measuring air tightness, and our deep understanding of the home’s comprehensive design, we were able to assess the situation and fully clarify the problem. Together, we came to the conclusion that the air barrier wasn’t properly attached. We suspected that it had been installed without primer; there was no other possible reason the house was performing so poorly.
Our design had been perfectly calculated, planned and laid out. With the air barrier unattached, it was blowing freely within the cavity, not properly secured to the walls or the other elements of the air barrier like the foundation, walls, ceiling, and window and door frames, and letting in huge amounts of outside air. Plus, due to our building’s sequencing and structure, the air barrier is difficult to access, making it extremely hard to fix.
So, we did the only thing we could do: not panic. We began to brainstorm.
Hypothetically speaking, once our cellulose insulation was packed in, the pressure could push our air barrier back into place, but we didn’t want to count on it. With our knowledge and experience, we know that it’s never too late to make a good air barrier! So we decided to cut our losses and abandon the Blueskin air barrier, opting for a new, clever, yet unconventional plan: to create a new air barrier on the interior side of the interior wall.
We turned our 6 millimetre polyethylene sheet (which was already acting as our vapour barrier) into our air barrier. Then, we made our builder seal every single stud with acoustical sealant, from top to bottom. We made sure all our doors and window sills were sealed, and where our studs met our floors and ceilings. We did the same thing in the attic, where the OSB (which was supporting the blown-in cellulose insulation) was taped to the underside of the ceiling. We made our builder execute it exactly to our standards, regardless of how tedious or difficult the process of fixing it was. With our understanding of this project’s building practices and our builder’ co-operation, we began to slowly get this project back on track.
Go To Project Page


- + Systems
- The Electric Systems
When our blog last left this project, things were a little bit bleak. Roadblocks like our building team’s lack of experience in energy efficient building design were making it difficult to get the reality of the build to match its sleek intelligent design. We think honesty is an important virtue for a company like ours, one that takes pride in all the work it does. So, to be honest – this project was a punishing one.
However, as they say, the show must go on. And it did. We began to make all the necessary moves to get this project back on track. It’s been gruelling, but we’re moving forward.
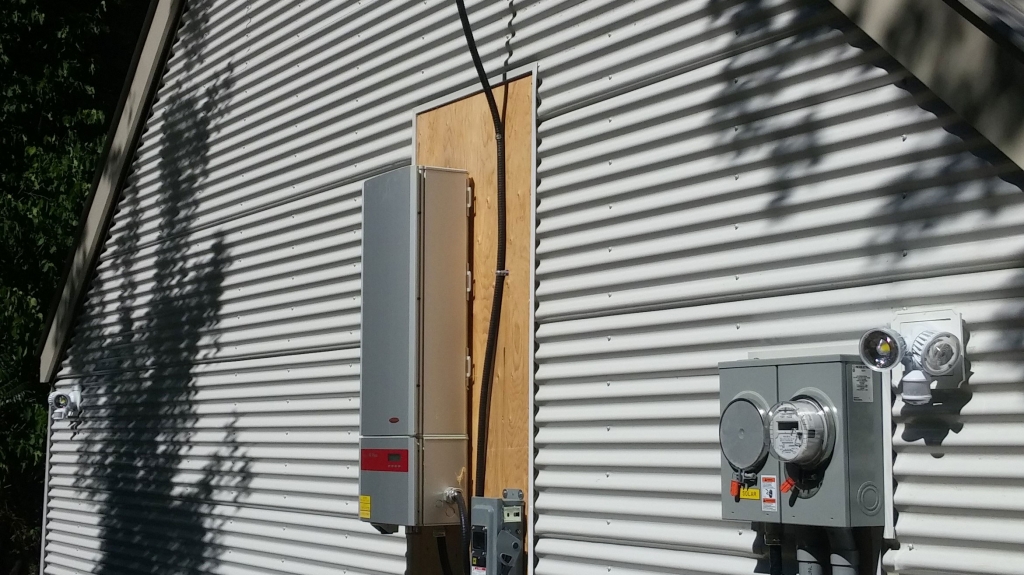
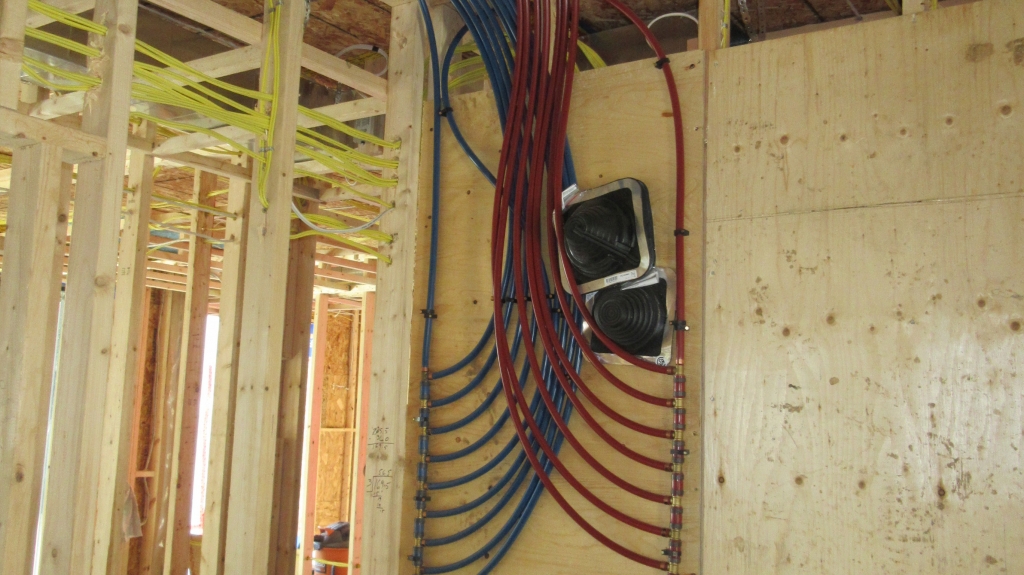
As for the home’s systems, they are pretty standard… for a Solares project, that is! The house will be powered entirely by electricity, which will allow its planned 60 – yes, 60! – PV solar panels (40 on the roof of the house, and 20 on the detached garage and workshop) to make back any energy used, which is the whole point of Net Zero living.
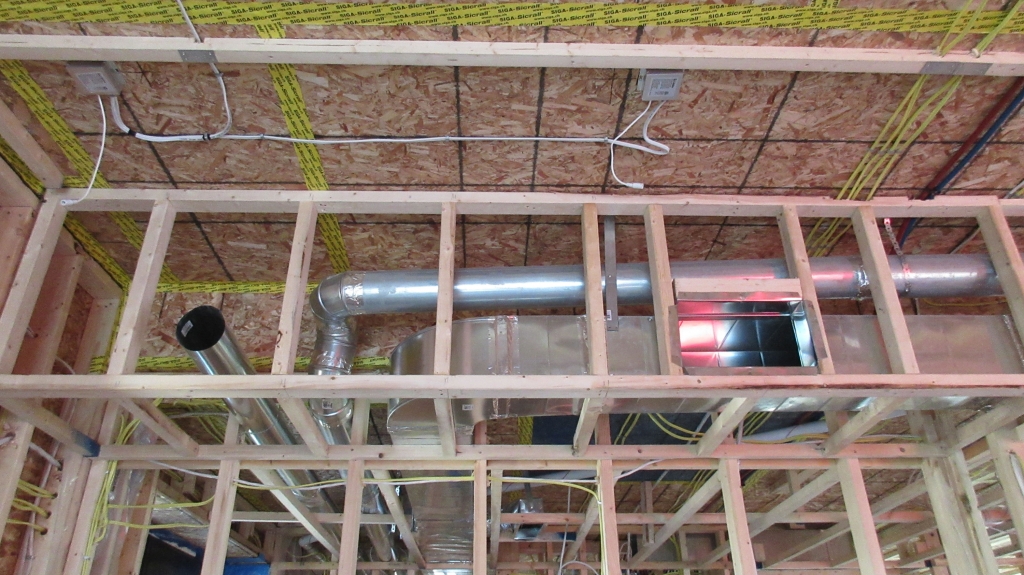
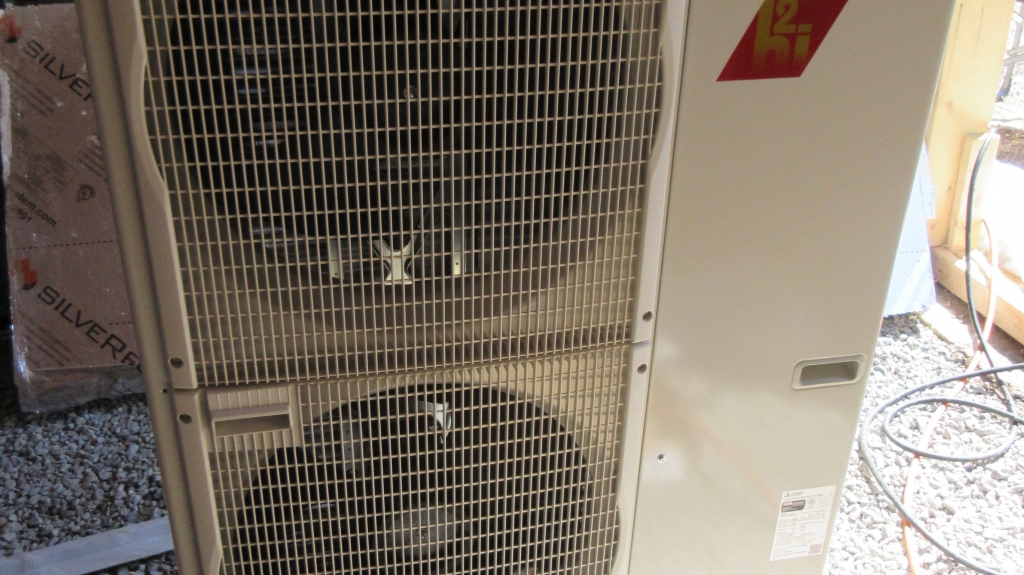
The home is heated and cooled by an air source heat pump by Mitsubishi, which we have ducted to spread hot and cool air throughout the entire house. Domestic water is heated with a standard electric tank, and the house doesn’t have a fireplace, wood, gas, or otherwise. The house’s air-tight envelope and abundance of insulation will mean heating and cooling loads will be minimal.
The Heat Recovery Ventilator (HRV) is tied to its own, separate ductwork, to ventilate the house while retaining freshness and moisture from the outgoing interior air.
Something a bit unique to this project are its short and shallow pot lights. Normally, pot lights that are installed in the ceiling break though the polyethelyne sheets that typically act as air and vapour barrier, causing leaks and holes and potentially compromising the ceiling’s air tightness.
So in order to avoid air leakage, pot lights need to sit in “boots”, which are taped onto the polyethylene sheets in an attempt to create an airtight seal and maintain the integrity of the ceiling’s air barrier. However, it’s a messy process and is usually unsuccessful in creating a truly airtight seal.
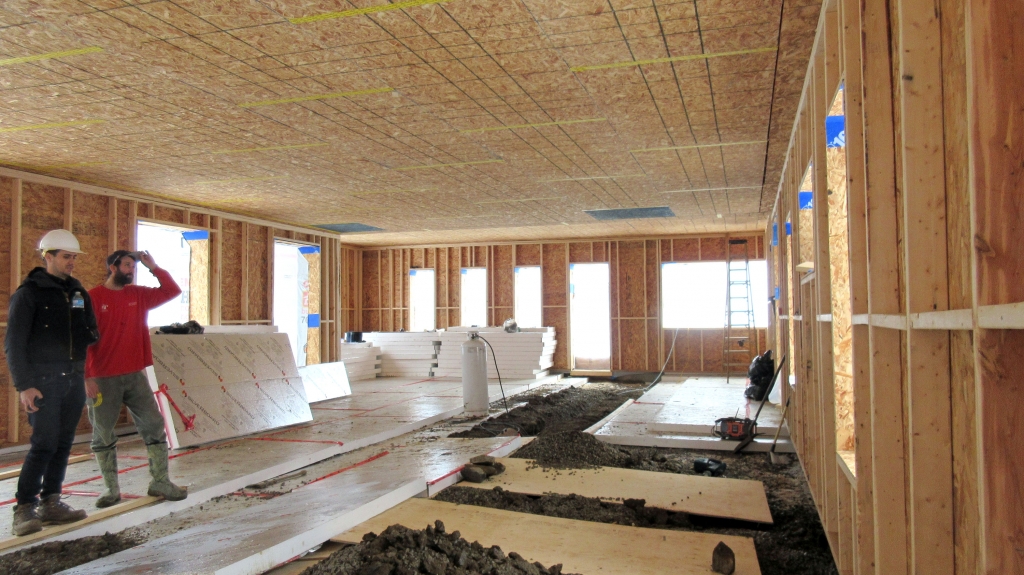
In this house, the air/vapour barrier isn’t a polyethylene sheet. It’s a ½” of OSB taped together, as Oriented Strand Board was the only material able to carry the weight of our vast loads of cellulose insulation. Using OSB instead of plastic sheets meant that this pot light “boot” approach would have been much more difficult, as we would’ve needed to cut through the ultra important layer of OSB. Besides, scratching this technique was just as well, because of its inability to create a truly airtight ceiling. We didn’t need any more air barrier stress!
Instead, we strapped the OSB with 2×2 and installed super shallow LED pots directly onto the OSB, leaving it completely intact, which saved us the grief trying to patch up any holes that the pot lights would make.
There you have it, Kawartha Highlands Net Zero’s systems in a nutshell! Next time we’ll be talking about the home’s lovely interiors, and hopefully by that time the air barrier’s hiccups will be far behind us.
Go To Project Page


- + Interiors
- Bright White Interiors
Finally, it’s time to talk about the interiors of our Net-Zero home! This home’s hiccups are far past us. Now it’s time to move on and talk about the lovely interior touches that give this house charm.
The home’s colour scheme is white on white on white. As you may know, we are huge fans of white walls. White walls are clean, timeless, and elegant. They create no visual noise, which makes for a restful and relaxing environment. But loving white walls doesn’t mean we hate colour — In fact, it’s just the opposite! Neutral walls make brightly coloured furniture, art, or appliances really pop. Plus, white walls are incredibly versatile. With neutral coloured walls, a new bedspread, art print, or even a kettle can drastically change the entire look of the space.
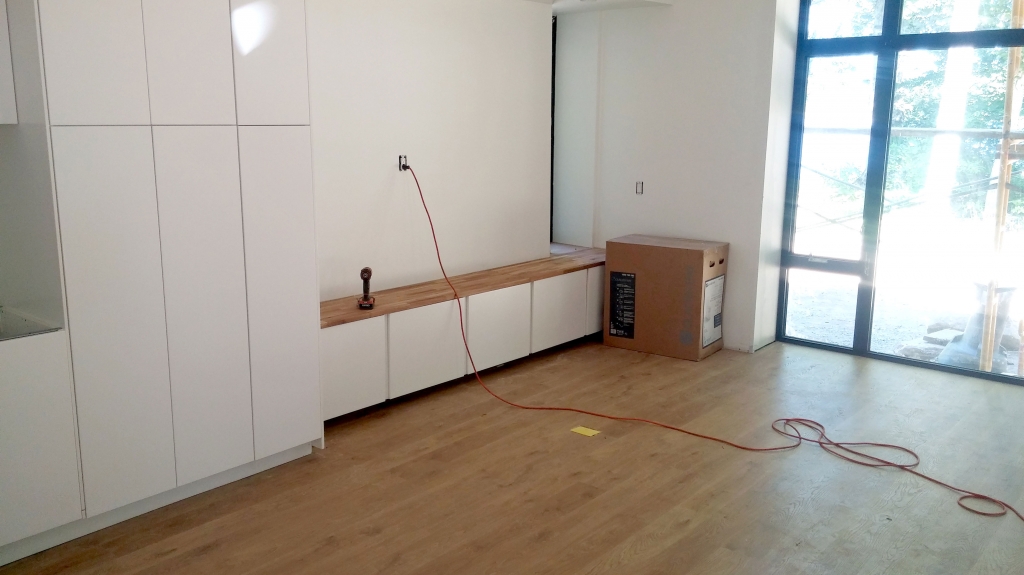
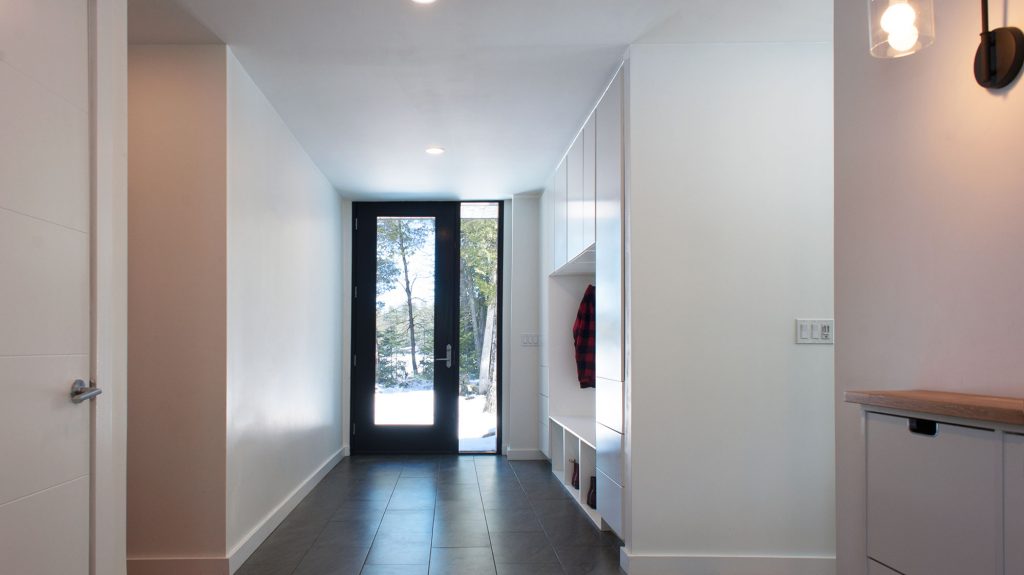
So, you may have guessed it, but we painted Kawartha’s walls white! The home’s aesthetic is cool and contemporary, with white walls, wood floors, chrome details, and plenty of glass windows. In the living areas, the floors are a warm wood, and the entranceway is tiled with dark, slate grey tiles.
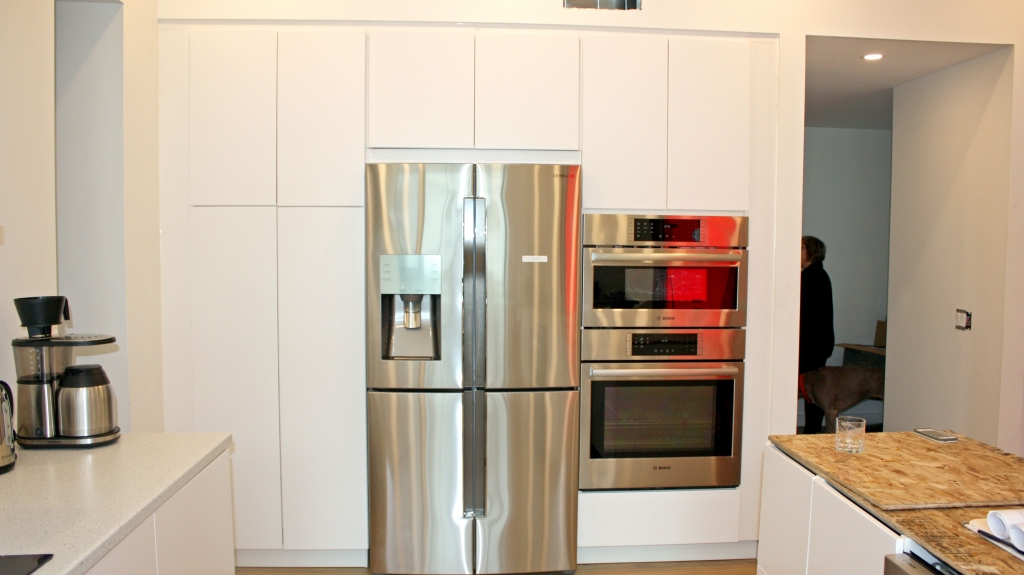
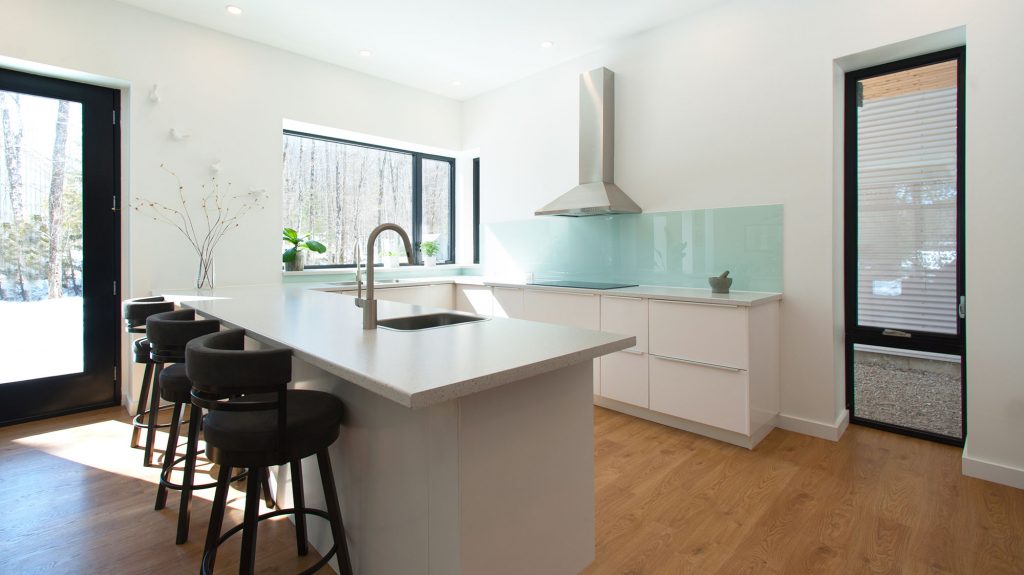
The kitchen is IKEA, a Solares favourite for their versatility, affordability, and their limited use of household toxins like VOC and formaldehyde. And this kitchen is… you guessed it, white! Glossy white cabinetry goes nearly up to the ceiling, blending into the walls and giving our clients tons of storage space. The countertops are smooth white laminate and the appliances are cool chrome.
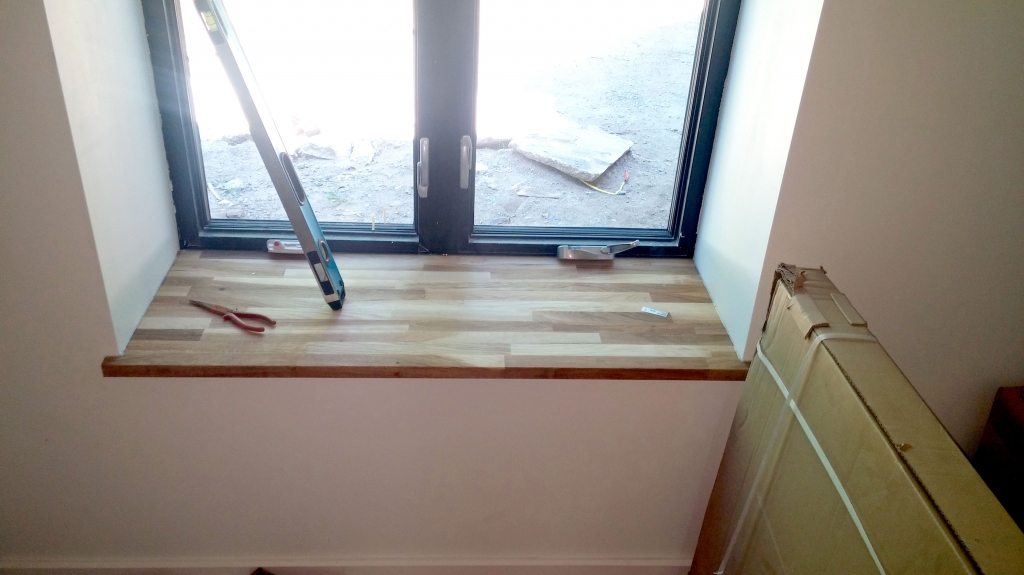
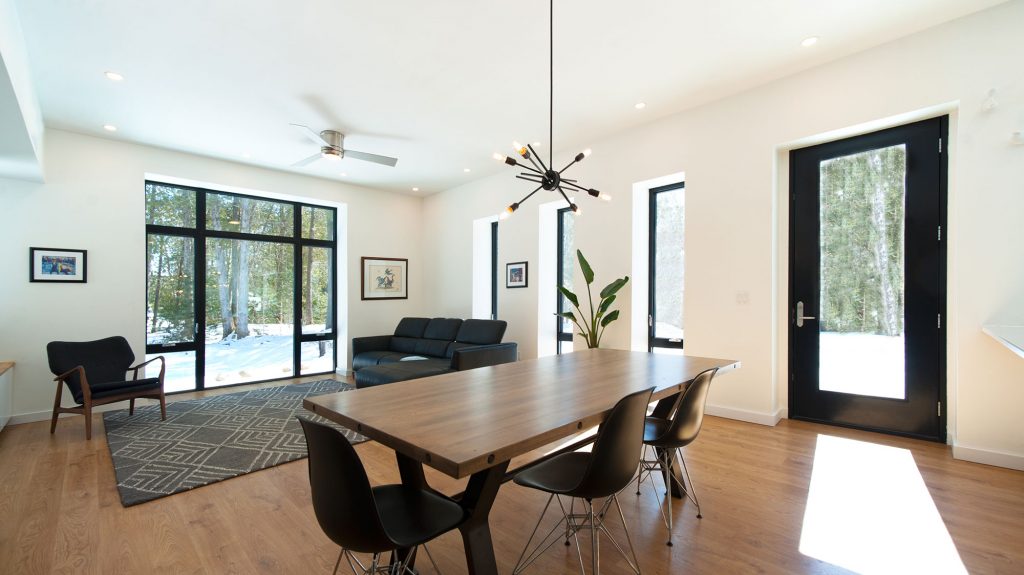
Many of the windows in the Great Room are floor-to-ceiling, which creates a very cool (and futuristic!) portal effect. From the living room, it feels like you can step right out into the countryside. Because of the home’s double-stud walls, windows are set deep into the walls, with spacious window sills. The sills are topped with a warm wood that complements the floors, and turns the sill into a built-in shelf, where our clients can display plants, knick knacks and other valuables. To add even more depth and interest to the home’s clean look, the window frames are all black, set in striking contrast against the home’s white walls.
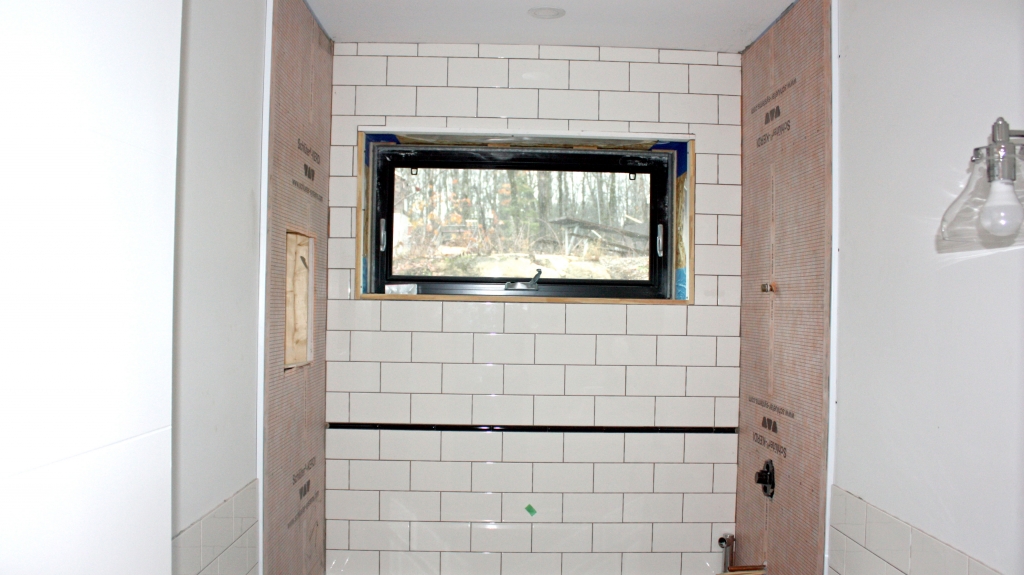
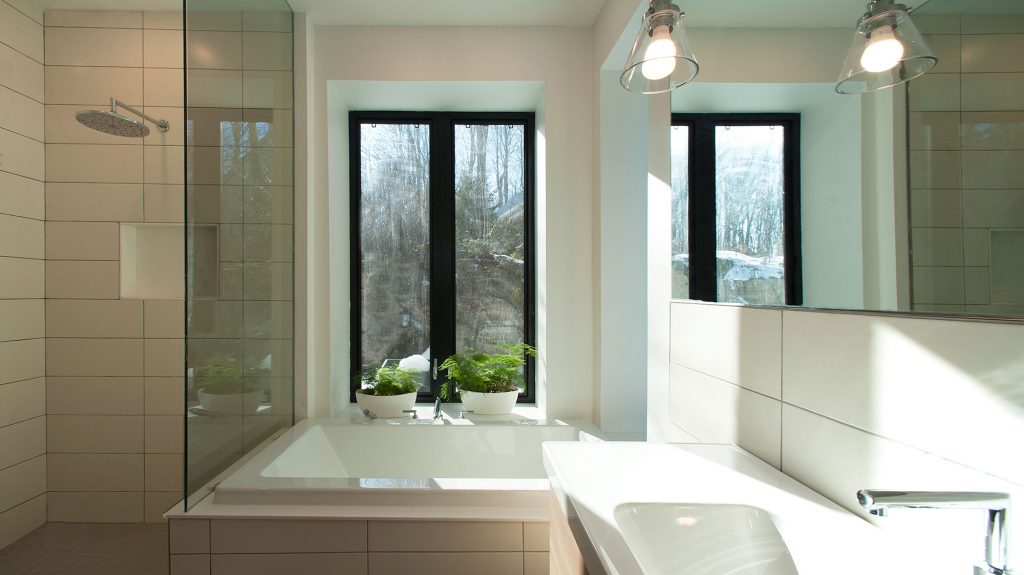
Finally, the bathrooms are finished with gleaming white ceramic and tiles. The master suite’s bathroom is complete with a large, beautiful corner bathtub, with a lovely view of the property from the bathroom window.
Next time we take a look at this house, the interiors will be finished and the house will be fully functioning as our clients’ forever home! Stay tuned for the final photos!
Go To Project Page


- + Reveal
- Final Reveal
In the recently frigid, early spring weather, Kawartha Highlands Net-Zero home stood like a glacier, surrounded in snow and ice that seemed it would never melt away. But even in the unforgiving Canadian barrens that the home was built to handle, the home’s interiors sparkled warmly.
Finally, in these past few weeks, the snow began to melt away. But not before our talented photographer Derek Monson captured its serene beauty in our “Final Reveal” photoshoot.
For those of you in need of a refresher, our Kawartha Highlands Net-Zero House is a double-walled home in the Kawartha Highlands, with the ambitious goal of creating as much energy as it used. To help meet this feat, Solares built a home that used minimal energy - the less energy a Net Zero home uses, the less it needs to collect.
The end result: A beautiful, energy efficient home with double-stud walls, filled to the brim with insulation.
Our clients have moved in and added their lovely unique personalities to this double-stud home. We love what they’ve done with the place!
The Great Room is bright, open, and unpretentious, with honey-coloured walls and minimalist furnishings. On one end of the Great Room stands a show-casing series of floor-to-ceiling window panels, In fact, many of the home’s windows touch the floor, acting as portals to the outdoors. These large and deep windows give off the impression one is in safely tucked inside a gallery (or a submarine!), looking out onto the beautiful property.
The kitchen’s spunky turquoise backsplash adds a pop of colour to the Great Room, and the spacious wraparound kitchen island gives the kitchen plenty of counter space for cooking and dining.
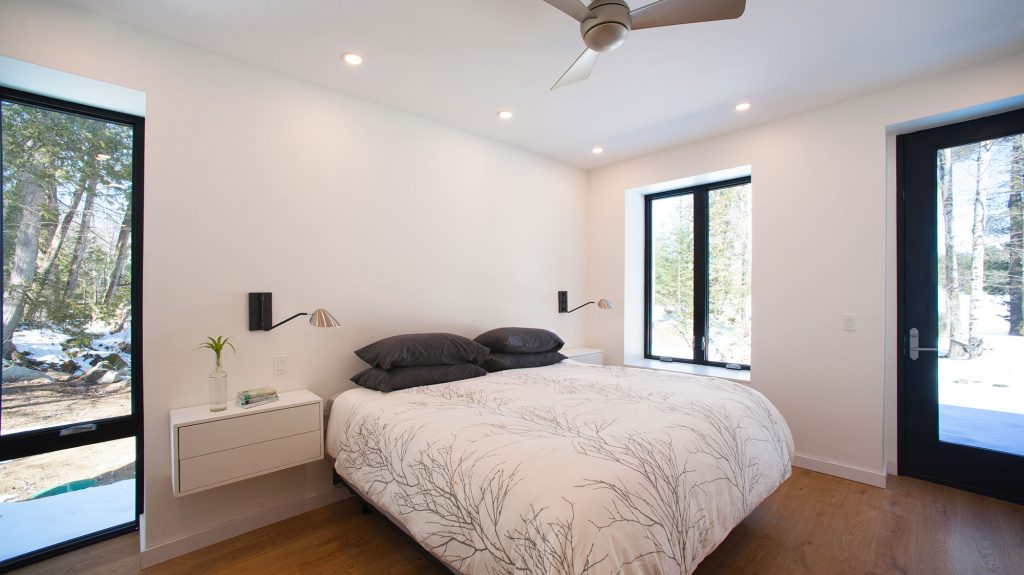
The home’s bedroom is simple and serene, with built-in bedside tables affixed to the walls.
One of our favourite features of the home is the gorgeous master bathroom. A lovely square Japanese style soaking tub sits beside a glass partition and looks out onto the property from a large window. The family chose to utilize the window’s extra deep sill to showcase two cascading ferns, which further adds to the bathroom’s spa-like tranquility.
The whole home is cozy, peaceful and serene - the perfect haven for Canada’s long winters and languid summers.
We’d also like to thank our photographer, Derek Monson, who did a wonderful job capturing the warmth and beauty of this rural home.
Go To Project Page


